Yager joins Tencent’s growing portfolio of developers and publishers.
Spec Ops: The Line developer Yager has received investment from Chinese multinational Tencent. The gaming monolith has invested an undisclosed sum in the Berlin-based developer, but Yager will still retain its independence.
The money will be used to fund Yager’s publishing ambitions and the continued development of its free-to-play shooter, The Cycle–currently in its second season. The game, which Yager describes as a competitive quest shooter, is exclusively available on the Epic Games Store and adds a unique spin to the battle royale genre.
Now Playing: The Cycle Full Stage Presentation | Gamescom 2019
Yager is, of course, most widely recognised for developing Spec Ops: The Line, which released to critical acclaim back in 2012. The subversive military shooter is one of the more memorable games of the past 10 years, but was also a commercial flop, with publisher Take-Two saying it failed to meet sales expectations.
Since then, Yager has moved away from narrative-driven single-player games and shifted into developing live service games such as The Cycle and 2017 space combat sim Dreadnought.
Tencent, meanwhile, invests in or owns an ever-growing portfolio of game developers and publishers, including Activision Blizzard, Epic Games, Riot Games, Platinum Games, and Ubisoft.
“Tencent is not only the world’s leading games company but also a prolific investor with a stellar track record: We’re humbled to join the line-up of Tencent partners which reads like a games industry Who’s Who,” said Timo Ullmann, CEO of Yager.
“We’re confident that this will greatly enhance the scope of our business, not just by getting access to Tencent’s network and resources but by tapping the vast industry know-how Tencent possesses.”
Pathologic 2 is not a game you play, it’s a game you go to war with. It’s never going to be easy, but here’s some help. Consider this an instruction manual with some swearing.
How to Survive in Pathologic 2
On Difficulty, Intended and Otherwise
The game will try, at the outset, to nag you into playing on Imago difficulty. Don’t do that on your first try. The game is a filthy liar and wants to hurt you. Yes, it’s not the “intended experience,” you can totally do that later. You’re here to have some fun and you don’t have time for this game’s nonsense. So start the game on Larva. It will be about as hard as
If you want to try this on Imago, I wish you the best of luck. You’re going to need it. But at least if you already know how to do it, it’s somewhat less likely you’ll end up in a death loop and need to back up. This isn’t like Pathologic 1, there are no safety saves here. The save points are the clocks in named people’s houses, so do your best.
Care and Feeding of Your Artemy Burakh
You have several different meters to worry about in your care and feeding of Artemy Burakh (and yes, you have to feed him). On Larva difficulty, this is manageable and basically maps to a normal person. On Imago, you are a diabetic two steps from death. If your hunger meter turns all red, you will start taking gradual health damage. This is because you are starving. This will kill you. Although something or another will kill you (and that is built into the expectations of the game), try not to have it happen too much (this will be elaborated more in the Mark Immortell Will Hurt You section). Your thirst meter won’t kill you, it’s attached to your stamina meter. If you’re too thirsty, you aren’t going to be able to run or fight. This is pretty easily dealt with by water, which you will most likely have on you.
Do not under any circumstances eat nuts. They are currency, not food. Also they won’t do anything for your hunger because come in, if you’re starving a peanut isn’t exactly going to make a difference.
Food can be bought at stores, but this shouldn’t be your primary means of getting it. Inflation is a thing that’s going to happen to you after the first day. That’s okay, there’s more than one economy in this town. The secondary one is trade with people on the street. In this town, you can’t use money on street trade. (the tertiary one is the Dead Item Shop, which will be brought up later) That’s what the random garbage you find is for. Almost everything is valuable for something or another. Each type of townsperson has certain things they carry and certain things they want. This will be elaborated in the Trade section.
Artemy has to sleep. Aside from reducing your Exhaustion meter, you will need your dreams. Two of them are absolutely critical to the progression of the game. (Several achievements are linked to the various dreams, so you can pick those up if you feel like it) Artemy can sleep at the Shelter (Lara Ravel’s house), the Lump (Vlad Olgimsky’s house), Aspity’s hospice, Artemy’s lair (when you get it), and the Bachelor’s house when you know him well enough. Sleeping is how you regain your health, but only if you take morphine. If you just sleep, your recovery will be negligible. (Don’t worry about getting addicted or anything, it’s the nebulous early 20th century. Nobody thinks morphine is addictive. More to the point, it’s not a game mechanic so get lit my dude).
Immunity is exactly what it says it is, your ability to resist the plague. As long as you have any green, you have a chance to resist. Running through infected districts (ones with guttural voices and black soot rain) will gradually erode your immunity. When you’re in danger, transparent black patches will show up at the corners of your screen. If that happens, get out now. You are in danger of infection. If you get out of the infected area, your immunity will slowly recover. If you have immunity boosters or herbal tinctures, you can boost your immunity and be in the bad air longer. You can duck into a house for a breather, but only do this in houses that contain shops. Normal infected houses will contain plague victims and multiple Hunting Clouds, and those are incredibly bad news.
Aside from being in bad air, the other ways to get the plague are contact with plague victims (they will try to grab you) or contact with Hunting Clouds. These are the black clouds that chase people down in the streets. They can be dodged, but be warned that sometimes they form in transitional spaces like doorways and you won’t have a chance to get away. If your immunity is high enough (over 60%) you might survive one without getting infected. It will decimate your immunity, so gtfo. Once your immunity is worn down, your immunity meter will become an Infection meter (See: So You’re Infected: The Hell Do I Do Now?).
Protective clothing like masks and repellent cloaks give you a little more protection from the plague, but the bad air will eventually dissolve them. Once you have access to your Lair, you can sometimes repair these things.
Health is obvious. You don’t have a whole lot of it, you’re only human (and on Imago, a brittle diabetic). Sleeping with morphine is the best way to restore it, but in an emergency bandages will do (don’t throw away bloody bandages. See: Dead Item Shop: Garbage is Your Salvation) .Tourniquets also help, but not very much. You can acquire these things from pharmacies for ridiculous prices or from drunks on the street for 5 waters (more in Trade section).
Trade
There are several different kinds of citizens in Town-on-Gorkhon. These are who they are, how to recognize them, what they have, and what they want.
Drunks
Men with beanies who are not overly pale or have dirty faces. Often found sitting around. Two can be reliably found by the Factory near the trash can fires.
Have: Bandages, tourniquets
Want: 5 waters
Young Men
Men in their 20s with scarves wearing nicer jackets and gloves. Usually found in the Atrium or richer parts of town.
Have: Coffee, lemons, kashk (cheeseballs)
Want: Matches, fingernails (flat coin with a hole in it)
Seamstresses
Young women with scarves and fingerless gloves or Asian women with crown braids. Around parks in the Maw and Gut
Middle aged men with leather hats and coats. Will be wandering the streets at night or standing by fires
Have: morphine, toast, immunity boosters
Want: lockpicks
Factory Men
Middle aged men with ask for repair option. Can be found in most areas
Have: candle stubs, nuts, metal scraps, springs
Want: matches
Kinsman
Asian adult man. Found all over
Have: matches, grindstones, fishhooks
Want: springs
Herb Brides
Mostly naked Asian women. Found by Aspity’s, in the Skinners, and Crude Sprawl. Sometimes in the steppe
Have: charms, spindles, rarely food
Want: tinctures, matches, thimbles, thread
Medicine Girls
Little girls in black dresses with white aprons. Can be blonde or black haired. The most important townspeople in the game. Found around parks or wherever playground equipment is.
Young teenage girls with pigtails. Found around parks and playground equipment.
Have: Morphine, dried fish
Want: Match, needle, broken scissors
Rebel Tween
Young teenage boy, hat doesn’t cover ears. Found around parks and playground equipment.
Have: immunity boosters, dried fish, fingernails
Want: matches, needles, broken scissors
Other people
Bandits
Overly pale men, sometimes with beanies, sometimes Asian, sometimes with injuries. Always look dead. Found on the street randomly at night.
Have: money, sometimes food, sometimes lockpicks
Want: to murder you
Muggers
Dirty men with beanies, don’t look dead. Found in Burned Districts and houses.
Have: money, food, lockpicks
Want: To murder you
Executors
Look like plague doctors with bones on their cloaks. Found in the theater and at the Stilwater.
Have: Tutorials
Want: To waste your time
Tragedians
White masks, black full body leotards
Have: advice, sometimes
Want: to mess with you
Rat Prophet
Looks like homeless Splinter
Have: terrible advice
Want: to drag you to hell
Combat: Don’t
You are a doctor. Realistically, you probably shouldn’t be fighting. However, Artemy Burakh lives like a stray tomcat and will unavoidably have to fight at some point. Combat in this game is heavily stacked against you, but it is doable. Ideally, learn how to stealth kill. Failing that, try to fight someone who’s fighting someone else. They may turn to attack you, but they aren’t always going to do that. Failing that, the way to fight is stab, back up, stab, back up. Do not mash the attack button. You are not Goku, you are Hawkeye Pierce, and you will die (small exploit: if it’s not going well, bail out and reload before you die).
Do not under any circumstances fight more than one opponent on intended difficulty. They will kill you immediately. Try to pick targets that are busy fighting someone else if you can’t. If they just spot you, duck into a house and wait a bit, or make a run for the guys in the leather caps. They’ll jump in and fight your assailant. Just don’t forget to get the killing blow and loot fast because the leathercaps absolutely will steal everything on the body. If you get to the part where the army shows up, you can loot anyone the army kills, they don’t loot. (You can also lure muggers to soldiers) Combat is never going to be a safe bet. Also, if you’re doing intended difficulty and trying to loot houses in the burned district, just run away if you run into a mugger. Don’t try to fight. The game will spawn him a buddy behind you and you will die (I said you were going to war with this game).
The game will give you audio cues if you have been spotted. The music will change, and your assailant will yell something at you. (what, I don’t know, because I played this in Russian). It is possible to outrun attackers. If you can break line of sight and get far enough away, they will **** off. Sometimes they stop at the edges of districts but don’t count on this.
Mark Immortell will Hurt You
So you ***ed up and died. Well, it happens. The game is built with the expectation of a certain number of deaths. There are some story bits that happen along with the deaths. But the master of the theater, Mark Immortell, is a rat-faced assassin of joy and he is here to make your life worse. He will resurrect you, but you will be punished. He takes a bit of your life permanently (sometimes hunger, sometimes exhaustion). You can talk to him after you’ve died, but I wouldn’t after the first few times. He’s just going to be a trash bag about everything.
Note: For the curious, the maximum penalty is -50% of your HP and -25% of your hunger. This happens after 33 deaths. After that, nothing much changes.
After nine or so deaths, the Fellow Traveler from the beginning will come back and offer you a deal. It is a horrible idea, do not do the thing.
Dead Item Shop: Garbage is Your Salvation
So there are occasionally items that the game calls “dead”: scrap names, broken ampoules, bloody bandages, that kind of thing. There is a shop that opens after midnight somewhere in the town (different every day) that will sell you things for these dead items. Mostly it’s food, but every once in a rare while they sell shmowders. Normally it’s 35 Trade, but at the Dead Item shop it’s 40. It is worth it. There are only two things in the game more important than shmowders. If you see one for trade or sale, drop everything and try to get it.
The dead item shop’s location will be revealed every night after the play in the theater at midnight. On the day it’s at the edge of the cape, drop literally everything and go. Go immediately. Buy candy wrappers, they will save your life.
The Plague: It Hates You
I’ve touched on how the plague works a bit before, so let’s go more in-depth. The number one infection vector is the Hunting Clouds. You’ll know them when you see them. They make a sound like a woman exhaling and they will track you. They spawn on streets in infected districts but are not in any way limited to those paths. In houses, they will track you. The game will tell you that they avoid fire and lanterns. The game is a ****ing liar. Do not rely on this.
Early in the game, Hunting Clouds will be fairly straightforward- just flying down the street ruining everything. Later, they will do annoying things like spawn in transitional areas or directly in front of you when you’re running. Later still, they will actively pop up to block your path. Sometimes, they will divert their course entirely just to **** your day up. Just RUN, and turn at 90 degree angles to try to shake it. If all else fails, duck into a building.
Subtler infection vectors come from corpses you have to dissect. If someone died of the plague, there is a decent chance that a Hunting Cloud will pop out of their corpse during surgery. You just have to take it if that happens. Touching containers in infected houses also carries a risk of infection. Don’t ever bother looting actively infected houses. It’s not ****ing worth it.
So You’re Infected: The Hell Do I Do Now?
Well, you’ve caught the plague. It’s fairly inevitable. There are certain decisions in the game that will lead to you being infected. Counterintuitively, you should do them. But you’ll know what that’s about when you get there. So a plague victim touched you or a hunting cloud spawned directly up your *** and decimated your immunity. Here’s how to deal with that.
Antibiotics (ferromycinium, monomycinium, neomycynium) will reduce your infection level. However, all the medicine in this jank-*** town is out of date so it will also hurt you. You should try, though, and keep your infection level low. The higher it is, the more health you lose (also, arsonists and flamethrower troops will attack you, when they’re a thing).
Shmowder, which I have been going on about, is one of the possible cures. However, it will ***ing brutalize you. Don’t take it until it’s time to sleep, because it will shred you down to a sliver of health. Pop some morphine and sleep it off.
If you have a lot of health and bandages and feel lucky, (and arsonists have spawned), you can use fire to cure the plague. It will hurt like a ***, but it does work. It’s a tricky needle to thread, but if you don’t want to use shmowders on yourself (you don’t), it’s doable.
Curing the plague is obviously the point of the game, so I’m not going to tell you what the cure is. You’ll know.
Everybody Hates You: What Now?
Reputation is also a mechanic that I haven’t touched on yet. When you start out, it’s going to drop like a ***ing rock. All adult male townspeople and guards will try to attack you on sight if they spot you with a low reputation (You are Hated Here). Women are safe, but they won’t trade or talk to you. Children are always safe and will always trade with you. The children of Gorkhon give absolutely zero ***s about anything.
Raising your reputation is part of the game itself, so I won’t tell you the story ways to do it. However, some general tips:
Talk to the townspeople when they stop attacking you. They all have problems and if you’re sympathetic and kind, they will like you better. (Dialogue options that have a diamond shape beside them are conversation enders.) Just don’t be a **** (except to Rubin, that’s only fair).
Trade at a loss. If you give them something more valuable than they give you, your reputation will go up.
Do not kill the people who are attacking you. They are just law abiding citizens trying to apprehend what they think is a dangerous criminal. You will suffer if you kill them.
Don’t autopsy unless you have to. You aren’t fully trained and your society forbids desecrating bodies unless you are. However, there will be some times when you have to get organs. Just do your best.
Don’t rob people who let you into their house.
Kill bandits, if you can. The Judge has permitted random murder, if it’s of criminals. Do with that what you will.
Work at the hospital when you can. This will also feed you.
In plague districts, you will sometimes find people lying on the ground in pain. Give them morphine so they can die in peace.
Help the Bachelor, when you can find him. He lives in the Stilwater and can sometimes be found in Town Hall or the Trammel. Yes, the Bachelor is a ***. Love him anyway.
General Advice
If you hear flies buzzing, that’s twyre, your magical medicine weed. Artemy can hear it during the daytime, but at night he can see glowing lights coming up from it. It’s best to hunt twyre in the Steppe.
There’s a twyre garden in Shekhen, but it takes a lot of time to get there.
Stack food on the first day. All day. It’s going to have to last you four days. Buy everything you can. Put food at the Shelter and the Lump. Put bandages at the Lump. Put some immunity boosters there too (the Lump is centrally located, that’s why).
Don’t bother buying food for the next few days, you’ll just waste all your money on inflation.
Kids play a game of hide and seek on day one, and the prize is a Shmowder for 5 trade. If you can do this, **ing do it. It will never be cheaper.
Stack shmowders. You never know who’s going to get infected.
The best way to get infected organs is by finding guards attacking plague victims and autopsying them after they die. Yes, that’s ***, but Artemy’s life is full of dirty compromises.
Carry tinctures once you can make them. The + tinctures don’t have an exhaustion penalty.
You can upgrade your inventory and fix weapons in the back of the Lair.
Use a walkthrough. It’s that kind of game, I’m afraid.
You don’t really need a map of the infected districts. It’s super obvious.
Critical Advice
Notkin is going to get infected at the end of Day 3. There is absolutely no avoiding this. Try to have a shmowder ready.
Fingernails are fast travel, but the price doubles in the late game.
Fix the big alembic ASAP.
Loot houses in the burned districts. Yeah, it’s dangerous, but that’s how you get that sweet sweet garbage. Don’t get too attached, though. If a mugger gets you, reload and try again.
Pay attention to Murky on Day 6. If you do nothing she will die.
Pay attention to Grace on Day 7. If you don’t resolve her issue, she will die.
Exploit: There is a spot to stand in the hospital on Day 8 that makes that mission super easy. Google ‘Day 8 hospital god spot (actually doing this is terrifying, but worth it).
Do not fight an odongh head on. You will lose. Stealth kill them, if you have to.
Have at least 8 cures by day 10. This is absolutely critical.
Don’t take the deal.
Get the candy wrappers.
You can’t save everyone, no matter what. Decide who you care about and do your best. Remember the children are your responsibility.
This guide is intended to be a compendium of all the essential tips and tricks that everyone will want to know immediately and not after 1000 hours of time spent playing the game. Warning – reading some of these may cause involuntary weeping at all the time you wasted suffering because of your ignorance. Suffer no more.
Ultimate Campaign Guide
Absolute Essentials You Need to Know
Speed up your gameplay
You can speed up (and slow down again) actions/movement by pressing R. You can permanently speed up actions at the start of your campaign by going to top left of your screen, clicking the “Camera” icon, and clicking “Fastest” for everything. You won’t get to watch what happens as it happens, but you also won’t have to wait as long to get through the End Turn calculations either. Do this right at the start of your campaign. Notifications
At the bottom right, if you uncheck all those boxes, you can turn off all those notifications, or just the ones you do not care to see. If you do this, at the same time, you can check a box on a Hero (and maybe a settlement?) that will cause you to receive a notification that you have not used that hero that turn, so important heroes & lords will still be addressed every turn but those that you plan to park somewhere for 50 turns will not bug you every turn.
Research
If you are not researching anything, winning battles can reward you with a Follower that gives +10% to Research Rate. I also got one of these from a successful Steal Research action by a hero, so hero actions while no research is active may reward as well. I have personally confirmed this in my Ikit Claw campaign, as once I finished all research there is, I started repeatedly getting those followers after battles. So get in the habit of ceasing all research at the start of your turn, fighting all the battles and performing all the actions you need to do in your turn, hopefully gaining a bunch of +Research % Followers (do not forget to assign them to your Lords & Heroes), then Resuming research before you End Turn.
Character details page
Here you can give your Lord & Heroes all sorts of items like Weapons, Armor, Trinkets (like +20% Ward Save items), Magic Wands on Magic Casters; etc. These should be obvious, but the tips below are not as obvious, and what this guide is really here for. Pay Attention!
You can replace a lord! You can disband Lords and they will return to your recruitment pool (and stop costing you money by decreasing the Supply Lines penalty) and after 5 turns they will be available to recruit again. A lot of times this works on Immortal Generic Lords (although you probably need to disband the units in their army first before you can disband them), but sometimes disaband does not work on these Immortal Generic Lords, and it often does not work on Legendary Lords. Workaround? You replace them with another, low level lord, then disband that lord. So you have a use for the crappy low level lords that you get via confederation or that you got at the beginning of your campaign but ended up disbanding for some reason early on and never ended up leveling them.
Perfect use for this is if you your Faction Leader is Level 40 and you want to replace him with a different lord to level that lord up (while after 5 turns have your faction leader available to summon to a hotspot or have him lead a crusade at the other end of the map from where he was); or, if you had Franz conquer all of Norsca and now you want him to lead an invasion of Araby and The Southlands, but it would take 10-20 turns to get him down there leading that army, and his army isn’t that great anyway, you could just replace him, then disband that whole army and have Franz recruit another one closer to the action once he becomes available again. You could even have the army recruited and ready to go using another lord then have Franz replace that lord.
Side Note: If you want a great way to get rid of all those worthless banners and followers such as scarecrow banners and +4 leadership against (insert faction) followers (or those Pigeon Pluck Pendants), here is a tip that I confirmed. If you have a Lord that you intend to disband and leave him disbanded (or just recruit him to defend a settlement where he is likely to die), you can give him the worthless banners and followers, and you could disband him while they all show the (1) icon indicating it will be 1 turn before they are added to his retinue, and if you later re-recruit him, he will have those banners and followers.
Mounts
You can select/change/remove the Lord or Hero’s mount if you have given them one. Note that you can change a mount once per turn, and you can do it instantly, so if you need to dismount a Lord from his horse so he can scale the walls in a siege, you can do that right before you attack. And you can you re-mount the Lord before a field battle. Note that mounts increase the upkeep cost of your Lords & Heroes; Lizardmen Skink Priests and Skink Chiefs on Ancient Stegadons are expensive! If you do not need your Lords & Heroes on a mount, it is a good idea to remove them from their mount so that they cost you less in upkeep.
You can rename Lords & Heroes
You can sort your Lords & Heroes a number of ways, but if you take the time to figure out a good naming system, you could sort by name, and be able to first do everything with your Lords, then your Assassin heroes, then your Steal Research heroes, then your Damage Walls heroes, etc. Note that there are 2 spaces for names, so you can put Ezio in the top line and “the Assassin” or “de Assassin” or “da Hitman” in the bottom line, and their name will show as “Ezio de Assassin”. You can also put their name in the top line, and put their key usage in the bottom line, such as “Damage Walls” or “Assault Garrison” so that hero is easier to find when you need that particular use. I highly recommend you come up with such a system and set it up as you recruit heroes and move along in your campaign, late game hero management can really make you hate ever having recruited heroes to begin with.
Replenishment
Lords, Heroes and Single Entity units (Giants, Doomwheels, Carnosaurs, etc) do not benefit from the Post-Battle option that immediately replenishes your forces, they only benefit from getting healed in battle by spells or items that regenerate their health before the battle ends (Life Magic spells are good example), or from the replenishment from being in your own province, settlement, or Encamp Stance (which can be further boosted by items and hero skills).
Above is very important to know if you want to do lots of fighting in enemy territory or in the ocean. Heroes and single Monsters can be awesome, but also awesome is the ability for an army of 19 units to instantly heal to full health and unit numbers after each battle as long as they do not take too much damage and choose the post-battle replenish option.
Campaign Movement Glitches
Summary – You can hold down the right mouse as you drag a line to where you want to move your army and see how much movement points it will cost you. However, if you aim to be at exactly 50% or 25% move points left and still be able to switch to a desired army stance, be advised that certain terrain can force your army to move a little further than intended, thereby using move points and causing you not to be able to change stance. It is often a good idea to “leave some in the tank” to make sure this does not happen, especially which changing your army’s stance is critical. This issue can also be caused by certain followers and events that boost but glitch your movement to such a degree that you would have to leave 70%+ move points in the tank to be able to switch to Raid or Encamp stance (I confirmed this in my Ikit Claw campaign when 3 Warlock Engineers and the “Favorable Winds” event caused exactly this scenario). See below for more details.
“Holding on right mouse button as you drag lets you measure out how much movement you want to use up. With the bar on the bottom left showing the percentages. So you can use 75% of it to move towards a spot, then use the remaining 25% for ambush stance for example. If you right click somewhere, you can press space at anytime to have the character immediately stop moving. They aren’t locked into completing that movement. More useful these days due to the fog of war changes and such”.
“Caveat: The movement bar % is not accurate if you start getting campaign movement buffs on the army. It shows you % of unmodified movement points that you have left, but the stances require % of your modified movement points. In some extreme cases I’ve had it at 30%+ remaining on the bar and unable to go into ambush stance because of the number of boosts”.
In support of the above Caveat, in my Ikit Claw campaign, when I had 3 Warlock Engineers with max Increase Mobility skill, Scribe on the Lord, and especially the “Favorable Winds” +25% campaign movement range Event (from ocean Treasure Hunts), I think I had to have over 70% of my remaining movement points remaining in order for my army to be change to “Raiding” or “Encampment” Stance, when without any movement boosts the army should be able to do either at 50% movement points remaining.
“Tt seems that it’s also not clear which abilities modify this and which don’t. As far as I can make out, if the general has +x% then it’s fine, whereas if they are granted a boost by a building or an embedded hero then their % movement becomes inaccurate”.
“I’ve only ever had problems when heros have joined the army the same turn and the heroes’ movement range isn’t enough”.
“100%. No heroes leaving or joining on that same turn. Happens to me every time I play TK cause the Necrotect never leaves, I need his healing”.
“The way to avert that is by putting the army in the stance you need before the heroes join. However, what /u/paeyvn is referring to is a genuine bug that’s been in the game since the beginning. As far as I can tell, it occurs when your lord is given a movement boost by an embedded hero or local building (not by a global effect or ability of the lord themselves). Try it out with the Tomb Kings and a necrotect, and their various movement buildings, or with the Dwarves & an engineer.”
Razor Standard & Banner Of Eternal Flame
Key info from an old post:
Razor Standard only applies to melee attacks. So putting it on ranged units is worthless.
Banner Of Eternal Flame’s +8% Weapon Damage only applies to Melee; however, the banner’s Fire Damage applies to both Melee and Ranged, and the banner gives an aura that affect multiple units, so if you put the banner on Empire Crossbowmen you could turn them into brutally efficient purgers of the Undead.
More Useful Goodies
If you capture the Galleon’s Graveyard (Count Noctilus’ island capital in the middle of the map in the ocean), the reward is “Immunity from storm and reef attrition.” A very nice quality of life perk.
The Map
Effective communication requires understanding of what is being discussed. For those who struggled to remember the names of the continents in Warhammer 2, a quick guide:
The Old World
This is “Europe”, the area inhabited by The Empire provinces including Sylvania, Bretonnia, Tilea, Estalia, Kislev.
Norsca
The northern-most and mainly frozen part of the map, where the Norscan tribes raid down from. To the far right is the Chaos Wastes where the Warrios of Chaos spawn.
The Southlands (and Araby)
This is “Africa”, the continent in the Southeast of the Vortex map (and the continent that The Old World connects to on the Mortal Empires map), with the northern half part being “Araby”, which is the area that would be Egypt to the Northeast (where Khemri is), Libya and Algeria to the north (Bretonnians), and Morocco and Mauritania to the west. “South Africa” would be where Kroq-Gar and Queek are, with those islands in the Southeast Corner being like Madagascar.
Lustria
This is “South America”. Pretty self-explanatory, this is the continent in the Southwest of the Vortex map. There are now a bunch of Legendary Lord factions here, hence many now call this the “Lustria-bowl” due to the bloodbath.
Ulthuan
The circle-island in the Northeast of the Vortex map, with the swirling Vortex over the island in the sea at the center.
Naggaroth
This is “North America”, where Malekith and the Dark Elves live in Naggarond to the north, Morathi in the area where Texas/Northern Mexico would be, with Mazdamundi in “Central America” in the connecting part between Lustria and Naggaroth. I had trouble remember the name of this area because of the similarity between the names Naggaroth and Naggarond.
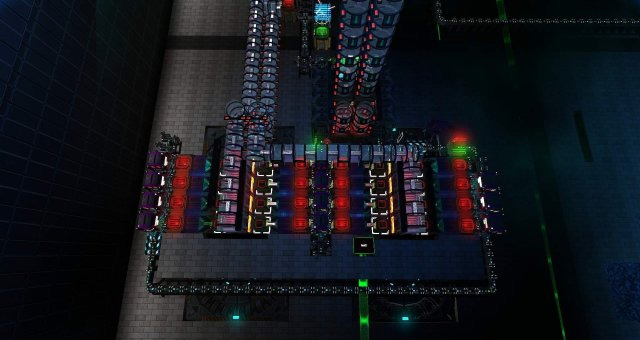
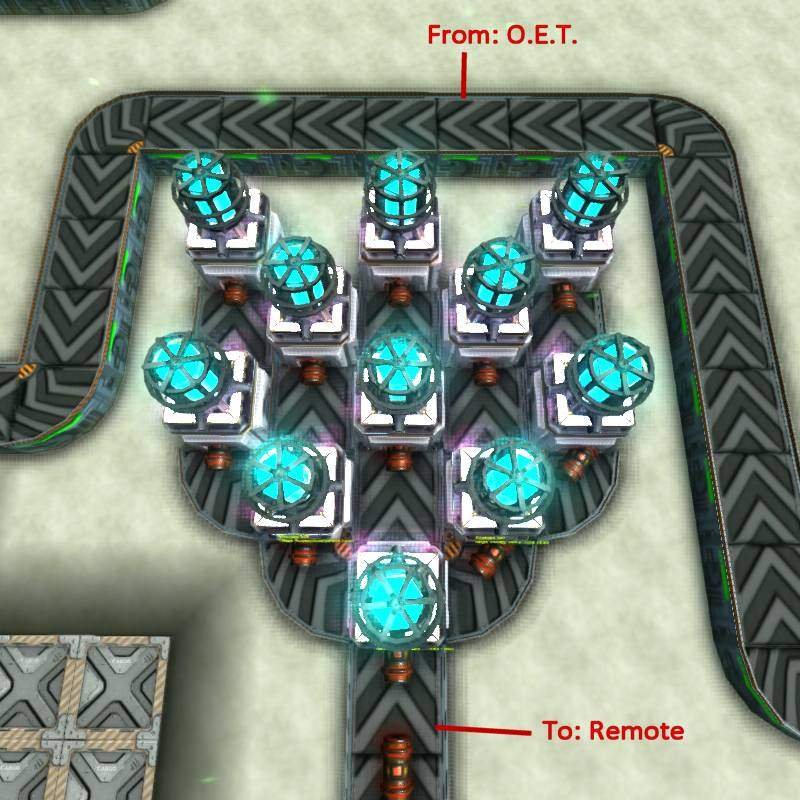
This guide describes how a mass storage system can be used to maintain a continuous stockpile. This is particularly useful in the case of fuel (HCEF), where empty canisters must be filled, consumed, and refilled, in a non-stop loop.
Non-Stop Fuel Loop Guide
Introduction
The cost of a canister is trivial if you have an Iron vein in the millions. Because of this, many people choose to simply macerate empty canisters and this solves the problem of a refill loop. But some people enjoy figuring out the challenge of refilling spent canisters. The ‘holy grail’ of this system is devising how you will incorporate the missile production into the loop. The issue with missiles is, the missile line doesn’t return any empties, fuel is constantly leaving the system, and a loop eventually runs out of fuel without new cans entering. But, how do you maintain a flow of new cans at the same rate that fuel is consumed? If you add to many cans, then the fuel will stop once it fills with empties. The trick is to use a mass storage system as a line buffer.
Loop Input
The mass storage will have three points of entry, which all canisters use to enter the fuel line. They are the FALCOR input, the belt input, and the new input.
FALCOR
The FALCOR input accepts delivery of canisters from random places. The purpose of using FALCORs to deliver/return fuel is to make the fuel line shorter. For example, a hive mind farm 100m from the base would need at least that many conveyors to get fuel out to this location. There’s just no need to have that much fuel sitting around. So the FALCOR could fill up a Logistic Hopper with just enough fuel to keep everything running.
Manufacturing + OET (Orbital Energy Transmitter)
The second canister inputs are belts which loop through a manufacturing floor, and an OET charge. For information about keeping your power separate from your manufacturing.
New Crafting
The third input is a brand new canister that is crafted from the pipe fitter. On this line, the stocking ports can be limited to a max capacity, like 300 max and the mass storage would have a capacity of 1000. Stocking Port limits prevent new canisters from filling up the mass storage system. The mass storage will always have 700 free space.
Maintaining this continuous balance though machinery, means you can hook up a missile system, which only consumes fuel, into the same machinery that supplies the loop with fuel. When the threshold on the stocking port drops below the limit, new canisters enter the system.
Loop Output
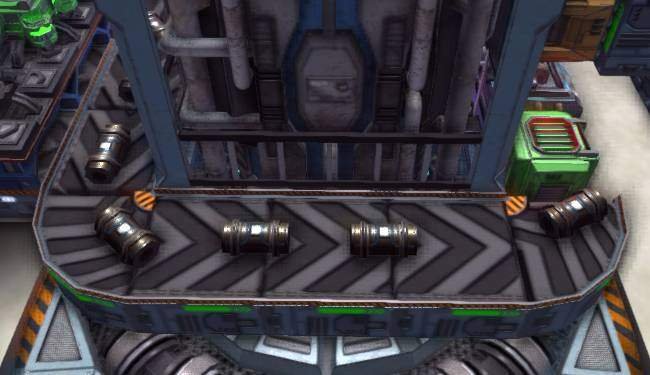
Empty Canisters
Empty canisters exit the mass storage system from the left, and go around to the opposite side of the Refinery Reactor Vat.
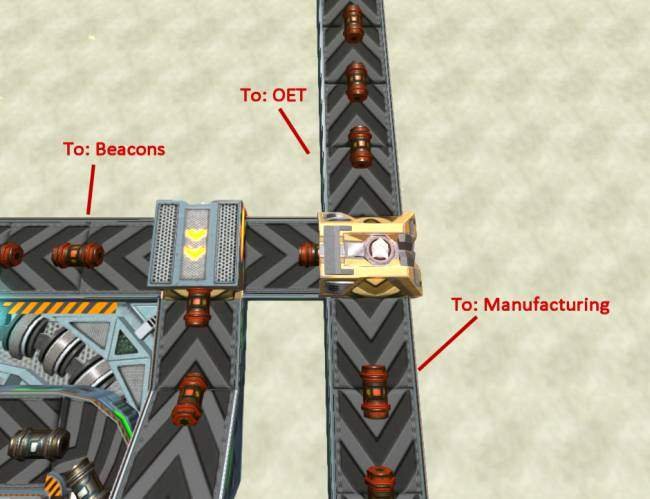
Full HECF
The fuel is being split three ways. The manufacturing line will contain a split further down to service missile production. Those canisters will not return to the loop, and it’s the reason we have a new canister maker, so we can maintain the limit set at stocking ports. The OET line will be consumed and returned at a high rate of flow.
Beacons
The distribution of fuel by beacon is one of the neatest things about this game. Drones deliver items into hard to reach locations. This simple distribution array makes sure there is always a free beacon for a FALCOR unit to travel to.
Summary
This technique is a simple and effective method to regulate flow in systems. While there anything else in this game where flow needs to be carefully maintained, I hear that the next version of this game will need it.
Repanse de Lyonesse’s campaign can be a fast and fun campaign of stomping Tomb King faces into the sand. This guide is here to help you achieve victory and glory; and not end up bleached bones in the desert sands.
Guide to Beat Repanse de Lyonesse Campaign
Victory Condition
To win Repanse’s campaign, you must reach 2000 Chivalry, choose an Errantry Battle to fight, then fight that Errantry Battle and win. If you win, you win the campaign. NOTE that as soon as you hit 2000 Chivalry, the Errantry Battle choice will pop at the beginning of the next turn, so save beforehand if you want to fight both battles. You get 2 choices for your Errantry Battle – Vanquish the Tomb Kings, or, Strike at the Vampire Coast.
If you choose Tomb Kings, the marker will spawn just below the Black Pyramid of Nagash.
If you choose Vampire Coast, the marker will spawn in the ocean north of Aranessa Saltspite’s island.
Either way, I always recommend for fighting a Bretonnian faction’s Errantry battle that you bring an army composed mainly of Royal Hippogryph Knights. Makes for a stupidly easy win. Repanse plus Henri le Massif (on his Hippogryph) + 1-2 Life Damsels with the rest being Royal Hippogrphy Knights should make any battle ridiculously easy.
Other option might be Grail Guardians and/or Grail Knights, which should also be a powerful doomstack.
Repanse First Turns Guide
Key Info: Starting Turn 2, you need you armies to carry water or they suffer Desert Attrition. Move your armies into a settlement in order to carry up to 5 turns worth of water with them. This is a unique mechanic for Repanse’s campaign.
Turn 1
Do not turn on research yet. Have Repanse choose Pledge to Valor for her Grail Vow (kill 5 enemy lords). Have Henri le Massif choose Pledge to Chivalry (Rank up 5 times). Move Repanse up just above Henri, THEN have Henri join Repanse, so he does not subtract from her movement. Attack the Vampire Counts army to your east and Auto-Resolve that battle (apparently auto-resolve does better than you likely will per ItalianSpartacus). Choose the +4 leadership option kill captives, then attack the fleeing army again, finally kill them for good. If you get a +10% research rate follower drop after the battle, add that follower to Henri le Massif. Have Repanse choose the “Route Marcher” blue line skill, then March Stance back toward Copher. Now choose “The Southern Guard” tech (+3 chivalry when , which you will want in preparation for your fight against the Tomb Kings, and it will choose the tech leading to it and start researching. Recruit a “Lord” lord, hopefully with the +10 Melee Attack or Melee Defense trait, but also Penitent for the +5 Ward Save is good too. Have the lord recruit 2 Knights Errant and 2 Men-at-Arms (this will make the Peasant Cap 8/8). Do whatever Diplomacy you can, try to get trade agreements, and try to get the AI to pay you for trade agreements or non-aggression pacts. End Turn.
Turn 2
Change Repanse’s stance to normal, move into Copher, then back out of Copher toward Martek, have the 2nd Lord give his troops to Repanse (especially since he cannot afford the knights yet) and have her start recruit 4 Knights Errant units to get her army to an 18 unit stack. End Turn.
Turn 3
Move your 2nd Lord near Martek first, then attack Martek with Repanse, win, then sack Martek (I tried just occupying it, but Martek was still reduced to Tier 1, so might as well boost your treasury). At this point with my losses and combinging a unit of Men-at-Arms, I was 4/10 Peasant Cap. I recruited another Lord, so my projected income was 155. Too low to recruit Knights Errant. Recruit 4 more Men-at-Arms in Repanse’s army. Build a Weaving House in Martek. End Turn.
Turn 4
Attack then Sack then occupy Al Hakik. Confederate with the Knights of Origo when the dilemma pops up (choose Unite Together). The Lord you get from Origo can be the 4th lord in your posse. Decide which units in Origo’s former army you want to keep and which to disband, you have to at least get down to the Peasant Cap which will now be 14. I’d disband the Polearms but keep the trebuchet.
Turn 5 and beyond
Send a Lord to colonize Bel Aliad before the Dwarves take it (it has a Gold Smelter!). Move Repanse and her posse west back toward Copher and then south to the Wizard’s Caliph Palace. Capture it, which will cause the Knights of the Flame to confederate with you. You will also be able to make non-aggression pact and trade agreements with the Dwarves. Then take out Snikch asap. Take out Sudenburg to complete control over El Kalabad’s province. You now have a nice base of operations, take the fight to Khemri and the other Tomb Kings, and win. Be careful fighting The Sentinels, I don’t think they attack you until you attack them, but once you declare war on them, they will totally come after you hard.
Get Repanse’s skill that give her army fire attacks. This will make fighting the Tomb Kings much easier.
Tech to “The Southern Guard”, then tech to “Rally the Peasants”. After that, focus on your economy tech. Ignore the Diplomacy tech or the other +Chivalry for Victory tech, they are not worth jack in this campaign.
In your starting province with Al Hakik, you are going to want to end up with a Tier 5 Stables so you can recruit Royal Hippogryph Knights to give to Repanse to fight the Errantry Battle with.
If you are going to use Peasant Bowmen, use Bowmen (Fire Arrows); they do +4 base damage in comparison to standard or Pox Arrows, and fire damage is brutally effective against Tomb Kings which will be your most important foe in this campaign.
Vows & Troths
Vows and Troths are basically the same thing, Lords and Paladins make Vows, Prophetess make Troths.
Notes
Once you select a Pledge for a Vow, there is no undoing it; you must complete that pledge to complete the Vow, and you must do the Vows in order.
Do not forget to select a Pledge asap. It would suck for your Lord or Paladin to complete a number of the required actions only for you to realize who never selected a Pledge…
The grail vow gives your lord or paladin immortality.
Knight’s Vow (Troth of Protection)
Pledge to Duty = Research 5 tech while leading an Army (for Paladins, this is “Perform 5 agent actions Successfully”).
Pledge to Order = Be present when 5 building are completed in a region.
Pledge to Chivalry = Rank up 5 times after making the pledge.
Questing Vow (Troth of Wisdom)
Pledge to Campaign = Win 1 Siege Battle in a Desert or Jungle Climate (must be against a major settlement).*
Pledge to Manaan = Win a Battle at Sea.
Pledge to Protect = Defeat a Beastmen, Greenskin, or Dark Elf Legendary Lord.
Grail Vow (Troth of Virtue)
Pledge to Untaint = Defeat a Legendary Lord of the Warriors of Chaos, Skaven, Vampire Counts**, Vampire Coast.
Pledge to Valor = Kill 5 enemy Lords in Battle (settlement defender’s leaders do not count).***
Pledge to Destroy = Raze 5 major settlements.
* – Important trick! Again, siege battle must be against a major settlement. Have a bunch of lords who need to complete their Questing Vow present. Only the attacking Lord will complete their vow by winning the siege battle; However, here is the trick… If you sacked the settlement with your attacking lord instead of occupying or razing it… You can have every lord you have nearby click on the settlement, which will give the option to “Occupy” or “Do Nothing”. Do Nothing. Your Lord will complete their Questing Vow, and then you can have another lord do the same thing. Every lord neary who has already completed their Knight’s Vow but needs their Questing Vow can do this to knock this vow out real fast.
** – Currently there is a bug which means that you must literally defeat a “Vampire Counts” Legendary Lord (Mannfred for example), and other Vampire Counts factions do not work. So if you choose Pledge to Untain at the start of Repanse’s campaign hoping to get the Grail Vow from killing the startin vampires, you will be disappointed. And I don’t think there is even a Warriors of Chaos faction you can fight in the Vortex Campaign.
*** – Disbanding a lord counts as a kill for this. So you can get a bunch of Lords who have completed their Questing Vow, and then have 5 non-Immortal lords or prophetesses disband, instantly completing the Grail Vow for a bunch of your lords.
Which pledge to choose
Knight’s Vow – I recommend either Order or Chivalry depending on how much fighting you will do with that lord.
Questing Vow – In Repanse’s campaign this was an easy choice, Pledge to Campaign, since The Southlands are either desert or Jungle. For regular Bretonnian factions, this vow might be a pain to complete if it is not different in Mortal Empires.
Grail Vow – I would choose Pledge to Valor.
Sacking vs Occupying
Note: Once you reach 2000 Chivalry, I think the game removes the option for you to sack; you will only be able to occupy or raze at that point!
If you Occupy, you suffer no Chivalry penalty, and the occupied settlement should only be reduced by 1 level.
If you sack a settlement, you reduce it by 2 levels, and if you do this a certain number of times, you will gain a trait that gives +sacking income but -50 Chivalry. If you keep sacking with this Lord, that -50 Chivalry can grow to -200 as the trait gets stronger.
This is important, because you can gain huge sums of money for sacking, especially against a Major Settlement; but do you really want to reduce a Tier 5 Major Settlement to Tier 3 instead of just Tier 4 if you plan to occupy it?
No Supply Lines
Bretonnia does not suffer from supply lines penalty. So each Lord you recruit only costs you their own upkeep, and then the upkeep of whatever units you add to their army.
This means that when you have a full stack army, that army should be followed by 3 other Lords fighting with your main army. As you get the money, you can then add 17 units to 1 of those 3 supporting lords, to have your main stack reinforced by a 2nd stack with 17 units + 2 Lords as reinforcements. Why only 17 units in the 2nd stack and none in Lord 3 & 4? Because the cap on units in battle is 40 units. So main stack is 20, 2nd stack is 18, + 2 Lords = 40.
This also means that you should send out approximately 4-5 lords to go treasure hunting in the great ocean. 1 to go Northeast around Ulthuan and then west to Naggarond; 1 that will go up the left side of Ulthuan and then turn and explore the east coast of Naggaroth (North America) all the way down past east coast of Central America (Hexoatl area) and then easy across north coast of Lustria; 1 to go south hugging the west coast of The Southlands (Africa) and go all the way to where the islands and Kroq-Gar are and explore that sea; 1 to go west to the coast of Lustria then south hugging the east coast of Lustria and then around the bottom of Lustria and all the way back up the west coast of Lustria all the way up to Naggaroth and the far north; and 1 to quickly explore the middle of the great ocean around Galleon’s Graveyard and fill in wherever another misses. Once they have explored the map and gained you lots of money from treasure hunting, you can disband then to return them home. Also, if they finish their movement in range of an Ocean Rogue Army, that Rogue Army will probably attack your lord and kill him, so you should probably disband him before they do that.
Peasant Cap
Each region you capture gives you +2 to your Peasant Cap (P.Cap). This can be increased by 1 to +3 with the “Water Pumps” technology. “Rally the Peasants” technology gives a straight +15 Peasant Cap. So if you have 20 regions you would have a Peasant Cap of 40, 60 with the “Water Pumps” tech, and 75 with “Rally the Peasants” tech.
If you have a P.Cap of 20, you can have exactly 20 peasant units and still get the bonuses. The Bonuses from being within P.Cap are:
Farms work as full capacity, meaning they get 100% of the income they say they provide.
-100% upkeep for Peasant Mob units (so Peasant Mob units costs nothing to keep in your armies; they each cost 50 upkeep if you are over the P.Cap).
-10% upkeep for all other non-knight peasant units.
If a unit card does not say “Knight”, it is a peasant unit, Foot Squires, Trebuchets, Mounted Yeomen and Grail Pilgrims included. Heroes DO NOT count toward P.Cap.
The Negatives of Exceeding The Peasant Cap
If you go even 1 peasant unit over the P.Cap, you lose the -% upkeep bonuses entirely, and a varying negative modifier is applied to your farm income. You could have as low as -1% farm income applied, to -100% farm income.
At -79% farm income, there is no other negative beside -% farm income.
-80-89% farm income adds a new negative, -50% replenishment rate for all non-knight units (peasant units).
-90% + farm income applies a -90% replenishment rate penalty for all non-knight units.
Farms or Industry or Mixed?
Key Terms: Province = the entire Province and all settlements in it. Region = individual settlement and the “region” around it. Tier = the building level
Notes
The negatives that Max Tier 3 Farms and Industry cause only apply in the region they are built in. So if you have a 4 settlement province with 2 regions that have trade resources, you could build Industry in the trade resource regions and Farms in the other 2 regions and be fine.
Tier 3 (T3) Farms appear to remove all income from Resource/Trade Good buildings in that region! So if you build an “Iron Smelter” in a region, which would give 200 gold and the iron resource for trade, if you build a T3 farm in that same region , you would lose all income from the Iron Smelter.
Ports do not appear to be considered Industry or Farming buildings (they may possibly be settlement buildings?), so should be un-affected by either.
I have only actually tested Landed Estate reducing trade good building income to 0 on the Iron Smelter. I presume it would be the same for Gold, Diamonds, Lumber, and presumably everything else, but it “may” be possible that Farms would not affect something like Exotic Animals or Spices, etc. If anyone can test and comment, would be much appreciated.
Industry income is not affected by the Peasant Cap. Simply put, if you go all Industry and never build a single farm, your income will never be affected by the P.Cap. Exceeding the P.Cap does still mean you will not get the -% Upkeep bonuses from staying within the cap; and if you reach 180% of the P.Cap (so if your P.Cap is 100, having 180 peasant units), the -Replenishment modifier would kick in; see the Peasant Cap section for more info about that.
Max Tier Farm (Landed Estate) and Max Tier Industry (Tailor) are effectively mutually exclusive in a REGION, because Tier 3 Farm causes -100% income for Industry, and Tier 3 Industry causes -100% for farms. I mean, you could build them both in a Major Settlement, but it would be stupid to do so.
Landed Estate + Water Wheel gives 900 gold.
Tailor + Storehouse gives 600 gold.
Note: Technology can buff Industry by 55% so that Industry income becomes basically as good as Farm income later in the game.
Pro’s for Farms:
Farms allow you to recruit Peasant Mobs and Fire or Poison Arrow Peasant Bowmen.
Water Wheels gives +10 Growth and +5 Growth in all adjacent provinces.
Farms are a lot cheaper to build: T1 Fields costs 500 but gives 300 income while T1 Weaving House costs 1000 but gives 200 income.
Pro’s for Industry:
Storehouses give +15% Campaign Movement to armies starting their turn in Region, +2 Siege Holdout Time and +50% ammo when under siege.
Both Water Wheels and Storehouses give +2 local recruitment capacity.
A 4 settlement province with a Storehouse or Water Wheel in each settlement and the +2 recruit commandment = 19 recruitment slots.
What Do I Do?
The ultimate question you must answer is: Are you willing to build your Army Build and War Strategy around not exceeding the Peasant Cap?
If no, then build Industry everywhere! If you build a farm at all, it would only be in your main recruitment provinces to recruit Peasant Mobs or Bowmen, basically being treated like a recruitment building that gives no income (I would get the farm to T2 then delete the windmill so it only takes up 1 build slot).
If yes, then you can build farms where it is suitable, and industry where it is suitable, and be fine. In Regions with Gold or Diamonds, you would definitely want to build Industry because a Gold Smelter gives 1200 income, and it would suck for a farm to reduce that to 0. There is really no downside to building industry where it is more profitable to do so, other than less Growth from the Water Wheel, but that is not that important and there another great way to get Growth anyway.
If you have a minor settlement region with no port but has a Resource/Trade Goods building, but you would rather build a different building than the resource building in the 3rd available slot (such as walls or a Tier 3 Stables to get an extra Paladin, etc); then Landed Estate + Water Wheel probably gives most income.
If: You have a minor settlement with a port, Landed Estate + Water Wheel would most likely provide the most income (unless that port region also had a gold mine, but I don’t remember seeing that anywhere)
If: You plan to win the campaign quickly and just want as much money as quickly as possible, without worrying about trade income, Landed Estates + Water Wheels almost everywhere (although again, Industry in Bel Aliad for the Gold Smelter, that Gold income is just too good)
Lords & Heroes
At the start of your campaign, I would choose your “Lord” lord over the “Prophetess” lord almost every time (see exception).
The Bretonnian Lord is a combat beast, especially once he reaches Level 14 and gets the Hippogryph mount (be sure to get Basic Training and The Blessing of the Lady). Leveling up the Yellow Combat line just makes him absurd in combat.
However, the main reason to choose the “Lord” over the Prophetess is that he is awesome in combat right from the start (whereas the Prophetess has to level up her spell line before becoming remotely useful), which means that you can hold off on the Yellow line, and instead level up the Blue and/or Red line(s) first.
See my section on Blue Line and Red Line strategies for details.
Exception
I suppose you could bring a Lore of Life Prophetess as your 4th lord in your 4-lord army posse. Get Route Marcher first, then 1 point in Awakening of the Wood, then max Earth Blood, max A Shield of Thorns, Evasion, Magical Reserves, Max Regrowth, point in The Dweller’s Below, Arcane conduit, then finish maxing Dweller’s and Awakening. Get the Royal Pegasus as soon as you can.
I suppose you could bring a Heavens Prophetess with the crew to buff Repanse’s army or debuff the enemy, since Lore of Heavens has some nice buffing and debuffing spells. Problem is that Heavens’ spells are expensive.
Prophetess
The Prophetess as the start of the campaign sucks because she doesn’t have her skills unlocked yet. Once you reach the point in the campaign where you can recruit Level 14+ Prophetesses then she can start to shine, but even then, you have to choose her Spell Line first over the Blue or Red line, otherwise she isn’t worth bringing.
Damsel
At the start of your campaign you won’t have any Damsels. Get Fyrus asap and level it up to T3 and then build the “Holy Monastery of the Divine Origo” that will give you +500 income and +4 rank for Damsels. Recruit 4 Lore of Life Damsels asap. Hopefully you’ve gained a bunch of +10% research rate attendants to add to your Damsels and Paladins. Max Specialist and then Steal Research on your Damsels. Go spam Steal Research on a Tomb King settlement until you have about +300% research rate. Keep that up until at least you have gotten the most important tech you need. Doing this should also have allowed you to get your Life spells and Arcane Conduit etc, so once you are done boosting your research, you can go put those Life Damsels in your armies to heal your units.
Paladin
Paladins give 30 experience per turn to their armies base, which can be increased to 55 by maxing Training. I was a bit disappointed with how long it was taking to get my knights units ranked up despite having 4 Paladins in their armies, but still, probably good to put points in that skill at the start of their career.
I wouldn’t bother with any other “Campaign” skills on the Paladin, your Paladins are going to be embedded in your armies killing your foes, not assaulting garrisons.
Blue Line Strategy
A TL;DR Summary:
Get Router Marcher, Max Bonded Service for -15% Recruitment, put 1 point into Tenth-Share, get Irrepressible Spirit, Max Steward of the Realm, get Lightning Strike, and then maybe Bailiff and go back and Max Tenth-Share depending on your economic strategy/whether you have a ridiculously rich region like Khemri.
All skills will be listed with their maximum benefit from putting however many required points into the skill
Router Marcher: +10% movement (always get, duh)
Justiciar: +3 Control
Bonded Service: -15% Recruitment (Lord’s Army)
Tenth-Share: +10% Farm Income, +5% Industry Income (in Local Region)
Devoted of the Goddess: +3 Untainted
Irrepressible Spirit: Casualty Replenishment Rate +30% for Lords in Lord’s army, -1 Wound Recovery time
Lightning Strike: Prevents reinforcements from reinforcing when you attack (at your discretion)
Steward of the Realm: +36 Growth in Local Province
(Crap Skill)
(Crap Skill)
Bailiff: +10% Industry Income (in Local Region)
The main goal of the Blue Line Strategy is to get max Steward of the Realm for the +36 Growth. Even with just a 4 lord posse moving through a province, that is +144 Growth each turn they are there. With 10 such lords, +360 Growth per turn (not including growth from buildings)
You want at least 1 lord to have -15% recruitment, since Knight units are expensive.
Tenth-Share is good either way because at worst it is helping to offset the cost of your lord’s upkeep however so slightly. If end up deciding to try make tons of income, you can put your lords in your most profitable Region to boost that Region’s income significantly.
I don’t think I needed Untainted as much as I thought I might in Repanse’s campaign, but it may be very useful in a Mortal Empires Bretonnia campaign.
Control could be useful if really struggling with that, but I never needed it in my Repanse campaign.
Khemri can build a Tailor and a Gold Mine. I put 7 Bailiff Lords in Khemri, and I think 5 out of the 7 had the Tollkeeper follower (+12% tax rate) in their retinue; the income in Khemri jumped from 2700 to over 5600. Now, 7 lords cost $1750 in upkeep cost if you dismount them (250 upkeep). So that is only an $1150 profit over not having those lords disbanded. But the point remains, a “Tenth-Share + Bailiff” lord can boost the income in a region, perhaps enough to at least cover the cost of his upkeep.
Are you sick and tired of having games be too hard and not having save’s every 2 seconds? This is a Guide on how to make sure you can save every time you need to and pick off where you left off in game.
This guide is going to help you understand Thea core mechanics and equip you with tools that will allow you to explore its world. I don’t want to tell you how to play exactly, I want to explain and give you map and compass so you can start your own adventure.
How to Start
Set Up for Survive
So… starting the game asks you to create a profile. Each profile gives you 2 random Gods, and 2 God points so if you don’t like the ones you get on the beggining you can just create new profile. The last two Gods you can unlock for free by completing game objective, while other gods you can unlock by spending god points. Be carefull, The more gods you unlock the more points it will take to unlock another one.
Each god has:
Unique trait.
2 domain cards (except 2 last ones, they have 3).
4 slots (3 for last gods) for neutral cards.
At the beggining you won’t have much points and you probably don’t know the impact and effect of most of the cards.
My advice is to go for any god you want or find fun, place his domain character and fill neutral spots with the class you miss for 3rd challange type. For example, Svarog gets Harmony and Turmoil so he gets Craftsman (mental class) and Warrior (physical class), he misses Magic class which for starting option is scoundrel or scavenger. Add that in and 2 children, the rest of neutral slots I recommend to use on starting resources. huge group at start may have problems to equip and survive, so its better to start with less characters equipped better.
Note: I really like the Fog of Knowledge card as it quite cheap, lets me scout starting area much faster by spreading starting company) and set up for right direction while it also gives some basic resources to play with.)
It is important to fill all types of challange as even the 1st level challange can get you kill or injure without characters that can deal with the danger. The first few games are meant to score you some more god points and play with different cards. The longer you survive and the more game you will explore in first run, the less time you lose for that in next plays and you won’t get tired or bored by replaying on low level characters.
Pick your chosen wisely, when it dies you are forced to resurect him or end the game. He also have to stand alone in one of the final challanges so it must be strong character (Warrior, Zerca, Witch), not the suport class (Gatherer, Craftsman, Scoundrell). You can select any character to be chosen, even child but you don’t know what it grow up to. (you can even chose rat or other beasts which is fun when playing as Nydia’s).
Next select world size and shape. I prefer Pangea as its makes more of the world open to explore and does not forces you to build a raft or ship in order to progress.
First Few Steps
Before you move, check your equipment:
Turn off using all the food and cook it on the way instead.
Turn off using Fuel other than regular wood.
Identify your characters skills and stats, use all equipment you have.
Adjust your equipment to fit characters, move heavy armor and good weapons to warrior, etc.
If you have children give them pets like boar, spider, wraths, to make them helpful in early fights or give them mules or again boars to increase speed so they won’t slow you down.
Now… time for planning, still not moving:
Check the coast line, look for ruins in the fog of war and plan your moves.
Split the party so you can move any direction you want and can. Depending of the difficulty you participate in event with ALL character that stay within 6 (easy) 3 (normal) or 0 (hard) tiles from the event. On hard you can safely plan to scout with this very first moves.
Identify resources nearby, you will need wood and food to get you gear for longer journey.
Time to move on:
On the first biome you will most likely not find any tier 2 resources (mithril, obsidian, diamonds, etc) but if you do, or you have access to Coal to upgrade Tier 1, you should camp near it and get your stuff. I recommend to focus on armor first, preferably heavy for physical and/or at least medium for other characters.
Because your gathering skill (and all other) is low you should focus on participating in events to get xp, research points, and gear to let you move on. In order to do so, explore as much as you can, help the factions, fight whatever you can beat.
Remember about children, check how many turn it will take for them to grow up and try to participate in as many encounters as possible before they grow up. The more stats and skill they earn early the better their potential when they grow up.
Don’t plan to settle on first biome, if you get resources craft the other ring instead. It will boost one of your character. Settling on first biome will stall the game as you have to guard your group and village and you most likely don’t get good resources. Consider settling only near coal, and tier 2 resource if possible (and food obviously).
After few turns (depending of difficulty) the lightbringers spawns start to appear. By this time you should handle level 3-4 challenges in at least one type (most likely physical), so clear the spawns and collect the loot.
Turn 50+
Congrats, you managed to survive first few steps. Now its time to improve your gear, exploit the weaknesses of your enemy, get more characters and plan to conquer… ekhm… Fix the world. One more thing, avoid Bandit Camps and Red Cave main event until you are really strong (deal with level 8 and higher encounters).
Use any items you find. You probably don’t have good crafters, nor gatherers so getting resources and your own equipment will take time and you cant craft on the go, you would have to camp for long time (10 turn) or settle (no good spots). One way around it is to camp near easy to defeat spawn location, like Nests, Slavs/Scavenger village, or Light spawn and bully the troops they spawn each turn (as you smash them). Keep in mind that bullying slavs or scavenger will lower their attitude. Keep your team busy in camp on crafting, gathering, smelting etc. and split one character to kill the spawn within the helping radius tiles (6,3,0).
You can also do kill and wood/stone quests for human factions but its slower, and does not let you place the camp so you can’t actually craft or research in the meantime.
Do the math with resources, maybe you miss one or 2 resources but you will get them by destroying your currently used item. Break it and improve your gear or use Coal to upgrade the resource you have.
Unless you don’t have to craft, or collect/research artifacts you should keep moving to better biomes. Go for biome of resource you need. Pushing the main quest will require you to have strong gear and it will force you to explore other biomes anyway.
Once you find your perfect spot you can consider to settle in if you haven’t craft the seed into Ring yet, or push a main quest to get another cosmic seed and settle.
That would be all for starting and most basic tips and guide. If you are interested in something less step by step please check the sections below.
General Points to Note
Get all challenge type classes at the beginning. Even challenge level 1 or 2 can kill or seriously injure your characters.
If you know you lose the challenge (you got ambushed) or miscalculated your possibilities start manual fight and forfeit before taking any other action, you should lower your losses that way.
If you can’t escape choose to lose Magic challenge. Losing magic is safest choice, You can regenerate it via ritual and the only thing it does on 0 it lower max health. Losing health or mental bars may cost you a character, while this only weakens them.
Don’t settle to fast. You don’t have valuable resource on the starting biome, and you cannot change the location of your village. You can think about using first Cosmic seed to craft the Other ring and push to another biome with strong character (you can use Mithril Goat card to speed this process)
Walking on the coast can trigger event that gives you quite a load of Tier 1 and Tier 2 wood but can slightly injure or poison you party.
Unlock Physical level 4 challenge to grind resources and survive easier.
Heavy Armor is your friend. Warrior in Heavy armor can soak the damage even if it has poor weapon. Shield regenerates per each encounter while Health points don’t. You can drop to medium armor for non-physical classes, but it has to magical to get you real value in other than physical challenges so it’s better to equip shields an artifacts found in world early on and support it with Heavy Magic armor later on.
Don’t spend research points to fast. You can get a lot of goods from the world events, you don’t have to spend time and resources to craft it, you can also trade for goods.
You cannot use more than 7 character cards in combat, so having more than 7 character can potentially kill your run if you have only 1 strong character to deal with challenge. having that in mind bigger groups are harder to feed as well. So the bugger starting crew is the harder it is to have good start. I prefer to have no more than 5 starting characters and at least 1 strong physical character.
Don’t trust auto resolve. many fights can be won perfectly if you know how to use your people skills and equipment.
Grow wisely when your child grows up it saves the skills but resets level to 1. Pick skill that will matter for future class you aim to get on child, or level up skill you already have so you don’t trash your progress in the future.
Don’t pick new skills that have no sense for class. it’s better to level up old skill (Brute Force) than pick new one that has no impact on class or challenges it support (like Protective word or Battle orders for someone without block, which can also by substitute by shields).
Many buffing or de-buffing skills are useful only on the start of the game when the number are low (Hunter mark, Weakness or Inspire). Hurry up and/or other speed/slow skills can be useful, but it’s usually better to play strong character twice, than speed it up for 1.0
Read you character skills and match the equipment. Character with good skill does not care for strong weapon as damage he does comes from skill not a weapon. Poor skilled character should get better equipment.
Stone and Bones are you friends. Magic and legendary weapons made of these materials are good because of 2 reasons. They leech shielding and life, so your character can stand for Very long time in battles as well as can heal on weak encounters. The essences also allows the weapons to be used in Mental (stone) or Magic (bones) challenges. Remember that Range weapon scale with Perception, Wisdom and Destiny, while melee use Strength, Intelligence and Mysticism. So… equip your Zerca with Stone Double handed axe and watch him steel mental health and shields of your opponents.
Win mentally (yellow) against Lightbringer spawn, you will get some specters (good pets and source of high value resources).
Personal Experience and Preference
I played more in Early Access and I have to revisit the biomes to refresh the knowledge, but below you can find my personal best ways to approach and tips how to deal with the game and beat it on hardest difficulty.
Always go for Armor first
Without armor your people don’t survive for long. Get it from events, or craft when you have resources. Prefer the heavy for warriors and magical medium for other classes. The problem with magical armor is that it requires a high tier resource to make it effective and medium armor does really give you that much block. It also requires different tech tree. So instead I go for regular heavy for fighters and magical heavy armor for other characters and support them with artifacts to increase the weight they can use. Or give them range weapons and protect them on the board with physical character in magical armor or summons.
Love First strike on spears and javelins
Having strong regular spear 1h or 2h, or javelins lets you skip all the setup faze and deploy characters a the end of fight while still clearing the board. The hunter with high dmg javelins can clear the board before they act. With support from good skills like double toss it even can wipe entire challenge. Double toss is extremely good on hunters as its fast attack and it procs the first strike as well, meaning your hunter can strike twice before enemies act. Or if it don’t you can place warrior with high armor before enemy to block that attack when the real fight begins.
Exploit the Essences
If you don’t have ways to clear the board, you should craft weapons from Stone and/or Bones to get Shield leech or Life leech. Again, min max characters. If your warrior has a lot of str. You can use heavy armor and 2h Axe to hit like truck and heal on the of the round from any dmg dealt to you.
Shift the balance
If you have scoundrel, rat or other character with Swarm skill use it to your advantage as well. Equip character with distance weapon, deploy 2 of them at start of the fight in opposite corners (each next character played procs the swarm twice) and block first line dmg with heavy armor warrior, summon boar or something just to soak that dmg hit and trigger swarm again. The Swarm buff stays for second part of the fight if it did not finished in first draw so your characters are even more deadly now then before, and you can repeat the process.
Do not be afraid to rummage around the arms at the guard post. Usually guards don’t mind this, and you will get plenty of weapons, or at least coins from selling it.
Before you take on the first quest, scout the nearest lands, look for interesting places. This is a good initial practice and, possibly, income.
When leaving the city, check for a vital minimum of things:
At least two loaves of bread or something just as nourishing.
Full waterskin (can be filled in the well).
Two or three jars of healing salve or several leeches.
A couple of splints.
Bandages or rags for two-three bleeding wounds.
Anything to treat pain, whether it’s an inhaler or alcohol.
And also it’s good to take something against toxicity.
It’s not like all this is necessary for a hike, but in the middle of hostile terrain it is better to have that things without needing them, rather than vice versa.
Remember about change of day and night. In your adventures you can run around for days, but when darkness advents civilians prefer to rest , and not engage in trades, repairs and other businesses. Additionaly, dangerous creatures can crawl out at night.
Each room and hallway is full of traps until you have checked for them.
If you love to shoot then you need to love spare arrows.
Pyromancer? Better to sleep while it rains, rather than try to burn wet bandits and monsters.
Sleeping is generally good. Do it more often and longer. Unless you’re on an urgent mission.
While going on quest or just into the dungeon it would be nice to pick various herbs along the way. If they will be needles – it’s not a pity to throw them out, but if they’ll be needed – they are already with you.
The price of things doesn’t mean they will be bought from you for that much. This is especially true for expensive books. See which merchants value some things more than others.
I do not believe that I have to write this down, but do not irritate bears. They are very deadly and tenacious beasts.
Gameplay may be the defining characteristic of a great game but it’s the story that keeps you coming back for more. Storytelling in gaming can be as subtle as a few tidbits in the item descriptions or as macro as button blasting QTEs during life or death struggles.
Every flavor has its charm though, and with that in mind we’ve compiled this list of the best PS4 story games. The ranking includes everything from small scale indies to the biggest and best of the AAA sphere, from walking simulators to open world action games.
Note: remakes and remasters have been omitted from this list, as have games from previous generations that have since been ported over.
20. BATMAN: ARKHAM KNIGHT
Arkham Knight
Developer: Rocksteady Publisher: WB Games
While Batman: Arkham Knight may not be the best of the Rocksteady Batman games, it is still home to a compelling narrative and some wonderful moments for the Caped Crusader.
Scarecrow and the titular Arkham Knight fill in well enough for the Joker as key villains, while the stakes of the adventure have never been higher. Better still, side characters and outlier villains get more focus than ever since Mr. J isn’t there to steal the limelight.
Finally, the jaw-dropping finale still resonates strongly all these years later, leaving fans with a great desire to see a return to this version of the Batman mythos. Whether Rocksteady will oblige us remains to be seen.
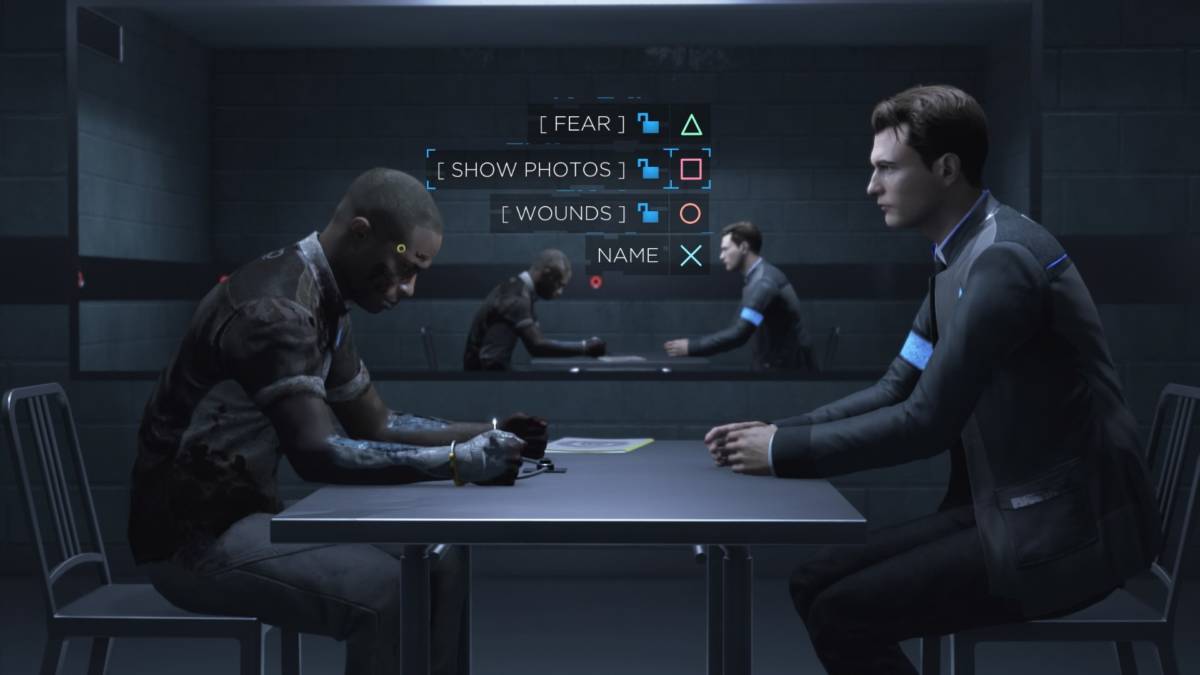
19. DETROIT: BECOME HUMAN
Detroit: Become Human
Developer: Quantic Dream Publisher: SIE
David Cage’s fifth game is his strongest by a long shot. Set in a near future where androids have become commonplace, Detroit: Become Human examines the ways society has been altered in this new world.
Following three androids across a variety of dynamics, Detroit socially and morally allows players to become truly immersed in this future, and asks us whether we can empathize with robots or AI in a society where we have used them to make our lives easier.
Though some of the references to race are a little tone deaf, overall Detroit: Become Human asks some compelling questions about our possible future, while making us consider our world in a different light as well.
18. RESIDENT EVIL VII
Resident Evil 7
Developer: Capcom Publisher: Capcom
The Resident Evil series has been home to some of the campiest and corniest storytelling this side of a Jill sandwich for the vast majority of its franchise run. That’s why Resident Evil VII was such a nice surprise.
With a newly serious tone of not just terror, but outright despair of a disturbing nature, Resident Evil VII introduces us to a relatable new protagonist in Ethan Winters, new antagonists in the sinister Baker clan, and a whole new narrative flavor for the series.
With shades of The Texas Chainsaw Massacre, The Devil’s Rejects, The Thing and other horror greats mixed in with its standard zombie mythos, Resident Evil VII is the most compelled fans have ever been by a story in this long running series.
17. LIFE IS STRANGE 2
Life is Strange 2
Developer: DONTNOD Publisher: Square Enix
Life is Strange 2 had a serious pedigree to match after the first game emerged as a surprise cult hit back in 2015. Luckily, the sequel matches, and even doubles up on, much of the social reverence of the original.
Following the Diaz brothers as they attempt a cross country odyssey to the Mexican border, Life is Strange 2 sees you, as Sean, attempting to guide and teach your younger brother about the world as his sole caregiver.
With strong political allegories and a story that couldn’t be more culturally relevant to our times, Life is Strange 2 pulls you directly into the struggles of disenfranchised groups of people, albeit with a strong supernatural bent.
16. HELLBLADE: SENUA’S SACRIFICE
Hellblade
Developer: Ninja Theory Publisher: Ninja Theory
The notion of exploring mental illness from a point of view where the term had yet to be invented is an intriguing one, and it’s the goal Ninja Theory set for themselves with the compelling Norse adventure, Hellblade: Senua’s Sacrifice.
Afflicted with schizophrenia, Senua is seen as a seer by some and an accursed witch by others. Her own trauma only causes her more trouble as she seeks to mount a journey to Hel in hopes of finding redemption and purpose.
With an immersive audio and visual experience that really puts you in Senua’s fractured psyche, Hellblade is one of the most fascinating and troubling looks at mental illness to ever be constructed in the gaming world.
15. FURI
Furi
Developer: The Game Bakers Publisher: The Game Bakers
Furi, from The Game Bakers, is one of the most viscerally thrilling and challenging genre mash-ups in gaming history, and it’s also home to a surprisingly compelling narrative.
As the imprisoned Stranger, you must journey across a massive galactic prison and battle the wardens along the way, each there with the express purpose of never letting you escape.
As the reasons for your imprisonment gradually unfold, and the wardens themselves reveal their purposes for volunteering to do such a thankless job, Furi takes on compelling shades of grey, asking us if we’re more than our purpose.
14. FINAL FANTASY XV
Final Fantasy XV
Developer: Square Enix Publisher: Square Enix
After almost a decade in development, Final Fantasy XV emerged from the Square Enix collective as something of a mixed bag. The new battle system, vast open world, and all male cast each split the fanbase in a different way.
Still, the plot, which sees Prince Noctis attempting to grow into the purpose for which he is predestined, that of savior and king to his people, is one of the best yarns to ever be woven in this long-running series.
With strong writing, a close-knit cast, and stakes that rise with increasing fervor over the course of the adventure, Final Fantasy XV turned out the best story the franchise had seen in years.
13. THE WALKING DEAD: THE FINAL SEASON
Telltale’s The Walking Dead The Final Season
Developer: Telltale Games/Still Not Bitten Publisher: Telltale Games/Skybound
Telltale’s The Walking Dead series was one of the great surprises of the gaming world back in 2012. Giving us compelling characters and stories that match the quality of the comic series that inspired it, The Walking Dead emerged as one of the strongest narrative experiences in gaming over the course of its five seasons.
The ultimate culmination of this long running tale, The Walking Dead: The Final Season, sees Clementine, in her late teenage years, taking on the role of caregiver and guide to her young charge A.J. in an increasingly fractured and troubling world.
With a unique new setting, surprise returns from past series characters, and some of the toughest moral questions of the franchise, The Walking Dead: The Final Season is a fantastic send-off for the series and its protagonist.
12. PYRE
Pyre
Developer: Supergiant Games Publisher: Supergiant Games
Supergiant Games have made their pedigree over the years by weaving surprisingly compelling narratives into their meticulously crafted gameplay experiences. Still, none of them match the depth and scope of Pyre.
Set in a world where the prosperous live above, and criminals are sent to a lower world, Pyre saddles you with many of the lower world denizens as they seek to regain entry to the upper world through a competition that allows the winners to return.
Basically a trumped up NBA Jam, Pyre didn’t need to craft such an intricate world with so many colorful characters in order to succeed, but it’s so much more to its credit, and success, that it did.
11. HORIZON ZERO DAWN
Horizon Zero Dawn
Developer: Guerrilla Games Publisher: SIE
One of the best new franchises of this generation, and one of the best PS4 exclusives to boot, Horizon Zero Dawn boasts a deeply felt and richly developed future world that gradually unwinds over the course of the game.
As a member of a primitive tribe, Aloy does battle with robotic versions of animals and dinosaurs in her journey to unravel the past of her world, and save the human race from languishing into extinction.
With fantastic motion capture and voice work to pull you into its world, Horizon Zero Dawn is one of the most thrilling, immersive and original stories you can find on the PS4.
10. MARVEL’S SPIDER-MAN
Marvel’s Spider-Man
Developer: Insomniac Publisher: SIE
Gamers and viewers alike could easily, and understandably, be jaded by superhero content in a time where the latest movie, game, animated series or comic is always being trumped up as the next big thing, but Marvel’s Spider-Man really was.
Focusing on Peter Parker, Mary-Jane Watson and Miles Morales, Marvel’s Spider-Man uses all of these characters to their maximum potential, telling not just one of the best Spider-Man stories ever but maybe the best Spider-Man tales of all time.
Filled with high stakes, well-rounded characters and a story that weaves many disparate threads into a cohesive whole, Marvel’s Spider-Man is a better game, and a better story, than fans might’ve ever dreamed it would be.
9. CONTROL
Control
Developer: Remedy Entertainment Publisher: 505 Games
One of last year’s best new franchises, Control puts players in the shoes of Jesse Faden as she assumes management of the Bureau of Control, a secret, interdimensional government organization.
With in-depth world building and tons of lore, Control establishes a secret sub-section of society where aliens, monstrosities and extra dimensional creatures threaten the safety of our world at every turn.
Connected with the world of Alan Wake (also from developer Remedy Entertainment), Control has built a realm that might be home to two cool franchises instead of just one. With shades of X-Files and Twin Peaks to boot, Control is one of the most exciting new stories to come along in a good, long while.
8. DEATH STRANDING
Death Stranding
Developer: Kojima Productions Publisher: SIE
Another of last year’s coolest new franchises, Death Stranding manages to weave a fascinating original story out of the mostly desolate post-apocalyptic open world genre.
Playing as Sam Bridges, players battle ghosts and terrorists alike while they work to transport packages, reconnect a fractured country, and unravel the mystery behind why the worlds of the dead and the living have suddenly crossed paths.
While the complex narrative and challenging gameplay left some players scratching their heads, the emotional core of the story remains one of its strongest features, and the final trump card in its vast bag of tricks.
7. BLOODBORNE
Bloodborne
Developer: FromSoftware Publisher: SIE
The realms of H.P. Lovecraft have provided inspiration to dozens of great horror games since the inception of the medium, but few can match Bloodborne for sheer scope and understanding of Lovecraft’s mad mythos.
Set in a Victorian style city called Yharnam, Bloodborne sees you as a Hunter. Tasked with slaying the vampires, werewolves and other monstrosities that have emerged from the abyss, you must survive the terrors of the night while seeking a cure for your own infected blood.
Though the lore of the game may be hard to decipher, for those who put in the time to unravel this horrifying, mysterious tale, Bloodborne is one of the greatest horror stories ever told.
6. UNCHARTED 4: A THIEF’S END
Image source: YouTube
Developer: Naughty Dog Publisher: SIE
The adventures of Nathan Drake have offered some of the highest quality, and best-acted storytelling of the last two console generations. Uncharted 4, as the culmination of the series, takes this franchise to new narrative heights, while wrapping up the story of its central protagonist.
As Nate settles into a dull (but happy) retirement with Elena Fisher, he can’t help but feel the pull toward the adventure that defined his younger years. When his brother suddenly comes back into his life with a tantalizing new proposition, Nate decides to saddle up for one last globe-trotting quest — but his final adventure might cost him everything he’s worked so har to build.
With some of the most convincing voice acting and a subtlety for storytelling that the rest of the series lacks, Uncharted 4: A Thief’s End is undoubtedly the crown jewel in Naughty Dog’s long-treasured franchise.
5. INSIDE
Inside
Developer: Playdead Publisher: Playdead
From the makers of Limbo, one of last generation’s standout indies, comes Inside: the story of a young boy navigating a dangerous government/corporate complex with mysterious means as his sole motivation.
Told with no dialogue whatsoever, the narrative of Inside speaks for itself through the actions your character takes, and the things you observe in the increasingly disturbing facility that you make your way through over the course of the game.
With some really jarring narrative left turns over the breadth of its story, few games pack as much surprise in from their humble beginnings as Inside does.
4. METAL GEAR SOLID V: THE PHANTOM PAIN
Metal Gear Solid V
Developer: Kojima Productions Publisher: Konami
Hideo Kojima’s greatest storytelling strength has been his marrying of big time action movie conventions with a stirring cast of characters and real world socio-political events.
Metal Gear Solid V is Kojima’s greatest triumph yet in this regard, concocting a story that fills in many of the gaps of his 60 year odyssey while offering fantastic new characters and shocking plot revelations over the course of its vast adventure.
A stirring, often troubling, tale of the last years of the Cold War, Metal Gear Solid V is Kojima’s darkest game by a long shot, and while the twists it offers on the mythology might not be for everyone, for those who vibe with its particular brand of insanity, Metal Gear Solid V is a one of a kind narrative experience.
3. GOD OF WAR
God of War
Developer: SIE Santa Monica Publisher: SIE
A next generation adventure that breathes new life into a franchise that had long gone stagnant, God of War came out of 2018 as the nearly undisputed pick for the game of the year — and much of that is down to its thrilling story of Norse gods and monsters.
While the realm in which it takes place offers plenty of fresh flavor, it is ultimately the touching tale of a damaged man trying to connect with his son and build a better life for him that makes God of War such a compelling bit of storytelling. It’s a tale of redemption and trauma unfolding gradually over a vast and intricate world.
With a raw, real emotional core, and plenty of grand adventure along the way, God of War is Sony’s Santa Monica studio at the absolute height of their abilities.
2. DARK SOULS III
Dark Souls 3
Developer: FromSoftware Publisher: Bandai Namco
This choice may be divisive, but stay with me here. Like Bloodborne, for those who put in the time and effort to explore the mythology of Dark Souls, few games offer as well-established lore and the depth of history that Dark Souls does.
Dark Souls III faces the unenviable task of putting a bow on this gigantic world of undying warriors and long forgotten kingdoms. Luckily, the story, weaving together elements of every recent FromSoftware game, offers an extremely satisfying, even darkly tragic, take on this world while tying up the narrative loose ends of the series.
With a scope and poise characteristic of Stephen King’s Dark Tower series, Dark Souls III tells the ultimate story of the end of the world, while crossing over characters, settings and history from the storied past of the series.
Few games are able to pack in the emotional punch and narrative oomph that What Remains of Edith Finch does, and almost none can do so over such a short run time as this.
Coming in at only 2-3 hours long, What Remains of Edith Finch manages to weave together the troubling fates of nearly every member of the Finch clan through touching, emotional vignettes.
While one sees you soaring with the birds, another sees you simply playing on a swing set. These journeys take you from the mundane drudgery of factory work to a faraway kingdom, from the simplicity of a daily bath to exploring a magical underwater playground.
As the stories of the Finch family are retold with stirring imagination and often troubling revelations, What Remains of Edith Finch emerges as a narrative adventure unlike anything else on the PS4 — or anywhere else for that matter.
2020 is a massive year for JRPGs, with a wealth of titles that look to push the envelope. Here are the most exciting JRPGs coming in 2020.
JRPGs have been on the upswing for the last few years, but 2020 looks to be a huge year for the genre the likes of which haven’t been seen since the golden age in the ’90s, when titles like Final Fantasy VII, Chrono Trigger, Phantasy Star IV, and Super Mario RPG released. Interestingly, 2020 represents both the past and future of JRPGs, as developers remake beloved titles with new style, or shift established game franchises into the JRPG genre.
The JRPGs on the way this year are recapturing the ambition the genre used to have, and a few titles in particular exemplify this comeback. The ’20s are already shaping up to be impressive, and developers are bringing their best to the table. Here are the most exciting JRPGs coming in 2020.
Persona 5 Royal
Persona 5 has been a smash-hit since its release, propelling the franchise to new heights. Now, Persona 5 Royal is giving the game an ambitious update. Royal makes graphical improvements to make the game more closely resemble the style of Dancing in Starlight and run in 4K and 60fps on PS4 Pro. Character portraits have been completely redrawn to be more animated.
Past a visual upgrade, though, Royal is a massively ambitious new game. It adds a brand new party member named Kasumi, new confidants, new Personas, and an entirely new school term to play through. There are also a vast array of gameplay and UI improvements, like the in-game calendar displaying rain and snow. Persona 4 Golden has gone down as one of the highest-rated JRPGs ever, so expectations for Persona 5 Royal will understandably be high when it launches on March 31 for PS4.
Final Fantasy VII Remake
There are few JRPGs, or even video games in general, with more of a legacy than Final Fantasy VII. Technically this is just the first “part” of the remake, only taking things through the events in Midgar. Despite that, Square Enix has promised an experience on par with a normal Final Fantasy game, greatly expanding on the content of the original.
The Final Fantasy VII Remake has gone for a hybrid combat system, combining elements of turn-based and action, as well as having an optional turn-based mode. Characters still have ATB bars for special moves, but you can attack in real time. The remake uses Unreal Engine 4 impressively, with a more realized version of Midgar than we’ve ever seen before. With the new story beats, a brand new voice cast, and its new action-based combat system, Final Fantasy VII looks to be more than a mere remake.
Tales Of Arise
Tales is one of the longest-running JRPG franchises out there, celebrating its 25th anniversary in 2020. After a few years off the series is going all-in with Tales of Arise, a big new entry built on Unreal Engine 4. Tales of Arise takes place in a setting separated into two worlds: the medieval world of Dahna and the technologically advanced world of Rena. Subjugation and prejudice are central to the story, spring boarding off of the complex storytelling of Tales of Berseria.
Arise is developed by a mix of veterans and newcomers to the franchise, hoping to evolve the Tales formula. Minoru Iwamoto, artist for Tales of Zestiria and Berseria, returns as character designer and art director. As the very first Tales game developed on an outside engine, Arise is a big step forward for the franchise, and its darker themes and evolution on the Linear Motion Battle System seem promising.
Others Exciting JRPGs Releasing In 2020
While those three might take the focus, there are a host of other promising JRPGs slated to release in 2020. Yakuza: Like A Dragon takes the cult series into turn-based JRPG gameplay for the first time, still retaining its drama and wacky humor.
Trials of Mana reimagines another classic with a full remake, this time in 3D. More exciting remakes come in the form of Langrisser I & II and Xenoblade Chronicles Definitive Edition. Past that, the Kingdom Hearts series continues with the Xehanort-focused mobile title Dark Road, Nintendo is bringing back the Bravely series with Bravely Default 2, and the Fairy Tail anime is getting its very own JRPG adaptation.
There are more remasters and new titles to talk about, but this all highlights a robust schedule for JRPGs, one packed with both mainstream titles and smaller niche ones. If you’re a fan of the genre, 2020 is bringing a whole lot of content.