The most comprehensive all-in-one guide to help you earn every achievement/trophy in Airship Syndicate’s latest entry in the Darksiders saga!
Overview
- Number of achievements: 30.
- Missable achievements: None.
- Hidden achievements: Yes.
- Online required: No.
- Time required for 100%: 30 hours.
- Minimum amount of playthroughs: 2 (But you’ll want to do 3 for comfort).
Hello and welcome to this beautiful guide written in order to help you earn every single achievement in the latest entry in the Darksiders franchise. While the game has been out on PC and Stadia for over a month at this point, there doesn’t seem to be a comprehensive 100% achievement guide for Darksiders Genesis available anywhere, just snippets and loose explanations. Since I’d always wanted to publish at least one guide on here at some point, I figured I might as well tackle this one in order to help PS4 and Xbox One players once the game drops for them in February.
This guide only covers the steps needed to get 100% achievements/trophies in Darksiders Genesis, it doesn’t contain information on how to complete the Journal or every objective in the game, since those are not required for the game to count as being complete on your profile. I only cover the story-related achievements (the bosses), the Boatman’s Coins collectibles, the weapon abilities and wrath powers, the side quests which earn you an achievement or are needed to earn an achievement later on (such as in the Boatman’s labyrinth), the miscellaneous ones, the creature cores and finally the difficulty-related achievements. I try to stay light on spoilers but some are required for explanations.
A note should be made that Darksiders Genesis heavily encourages you to play through its content more than once, as it leads to new abilities, treasures and powerups that will make you even stronger and allow you to tackle even the hardest challenges the game throws at you.
Story-Related
MammonDefeat Mammon, Lord of Hell.
Notes: Can’t be missed if you play through the game normally. You’ll face Mammon in Chapter 6; he is the game’s first true boss. He shouldn’t be too much of a challenge, and you can take out his summons to make the fight easier.
Belial (Hidden)Defeat Belial, Lord of Hell.
Notes: Can’t be missed if you play through the game normally. You’ll face Belial in Chapter 9; he is the game’s second true boss. Unlike his Darksiders 2 incarnation, he isn’t too much of a hassle. He’ll occasionally draw energy from two pillars in the room, boosting his magic damage. Switch to War and throw the Vorpal Blade at said pillars to prevent Belial from using them.
Astarte (Hidden)Defeat Astarte, Fallen Angel.
Notes: Can’t be missed if you play through the game normally. You’ll face Astarte in Chapter 10; she is the game’s third true boss. Coming right on the heels of Belial, she’s a tough fight, summoning fallen Nephilim to attack you, and they take a lot of hits to go down. Whenever possible, jump on your horse with Strife and follow Astarte around the pyre, shooting her until she trips and falls.
Dagon (Hidden)Defeat Dagon, Lord of Hell.
Notes: Can’t be missed if you play through the game normally. You’ll face Dagon in Chapter 13; he is the game’s fourth true boss. This giant eldritch abomination will summon lightning and giant waves to bring the pain. Whenever your characters start talking about an upcoming wave, make sure to have an enemy minion close at hand, weaken them, then perform an execution move. This will put you in an invincible state that protects you from being pushed off the platform.
Moloch (Hidden)Defeat Moloch, Lord of Hell.Notes: Can’t be missed if you play through the game normally. You’ll face Moloch in Chapter 16; he is the game’s fifth and final boss. Unlike other bosses who like to summon dozens of minions to keep up the pressure, Moloch is the only enemy you’ll face in this fight. His attacks are mostly slow and telegraphed, but they deal massive damage. He can also summon crystal formations and make them explode, and both actions in succession can kill you on the spot, so keep dodging no matter what. Once this harrowing fight is over, you’ll have completed the main story, congratulations!
Boatman Coins Collectibles
Mint ICollect 50 Boatman Coins.
Mint IICollect 200 Boatman Coins.
Mint IIICollect 350 Boatman Coins.
Notes: These three achievements are fairly easy to get by playing normally. Check your map screen to see the locations of Coins in the levels after you’ve acquired the respective Chapter’s treasure map. When you see a side quest objective show up, try to complete the requirements, as said side quests often reward you with Boatman Coins. You are almost guaranteed to get the first two by playing through the game normally, and the last one will follow soon after when you start to go through levels more thoroughly in order to get the remaining collectibles.
Elemental Enhancements
A Bullet for All SeasonsFind all 5 of Strife’s elemental ammo types.
Notes: Every time you acquire a new ammo type, your base DPS increases a little, so obviously it’s in your best interest to get all of them! To get the A Bullet for All Seasons achievement, the locations for Strife’s multiple elemental ammo types are as follows:
- Charge Shot: This excellent all-around ammo type will become yours as part of normal story progression as early as the first chapter, Dethroned. Halfway through the level, you’ll be locked into an encounter with some Legion Bombers and Hellhounds. Wipe the floor with them then open the Epic Chest to acquire the Charge Shot.
- Static Shot: Now this ammo type is the absolute crowd control darling of the game and for good reason! It covers a huge area, jumps from enemy to enemy, and the Hotstreak version is straight up broken, I love it! It can be purchased at Vulgrim’s shop after completing the first chapter, Dethroned, and will cost you 3500 Souls and 10 Boatman Coins.
- Gravity Shot: A situational ammo type that nonetheless leads to some hilarious results when used well, the Gravity Shot can be purchased from Vulgrim for 3500 Souls and 10 Boatman Coins after completing Chapter 4, Icebind Cavern.
- Nature Shot: This one is found in Chapter 12, The Maelstrom, in the southwest section of the map, atop an Angelic building. It requires that you first own Strife’s Aether Spark, which you should normally have acquired in the previous chapter. Simply solve the puzzle and defeat the Angelic Champions that spawn as you approach the chest in order to claim the Nature Shot.
- Beam Shot: This one I didn’t get much use out of. At the beginning of Chapter 2, The Slag Pit, you’ll find yourself in a room with a door directly visible before you. It requires the use of one Trickster Key to open. Simply enter the treasure cave and interact with the Epic Chest to get the Beam Shot for Strife.
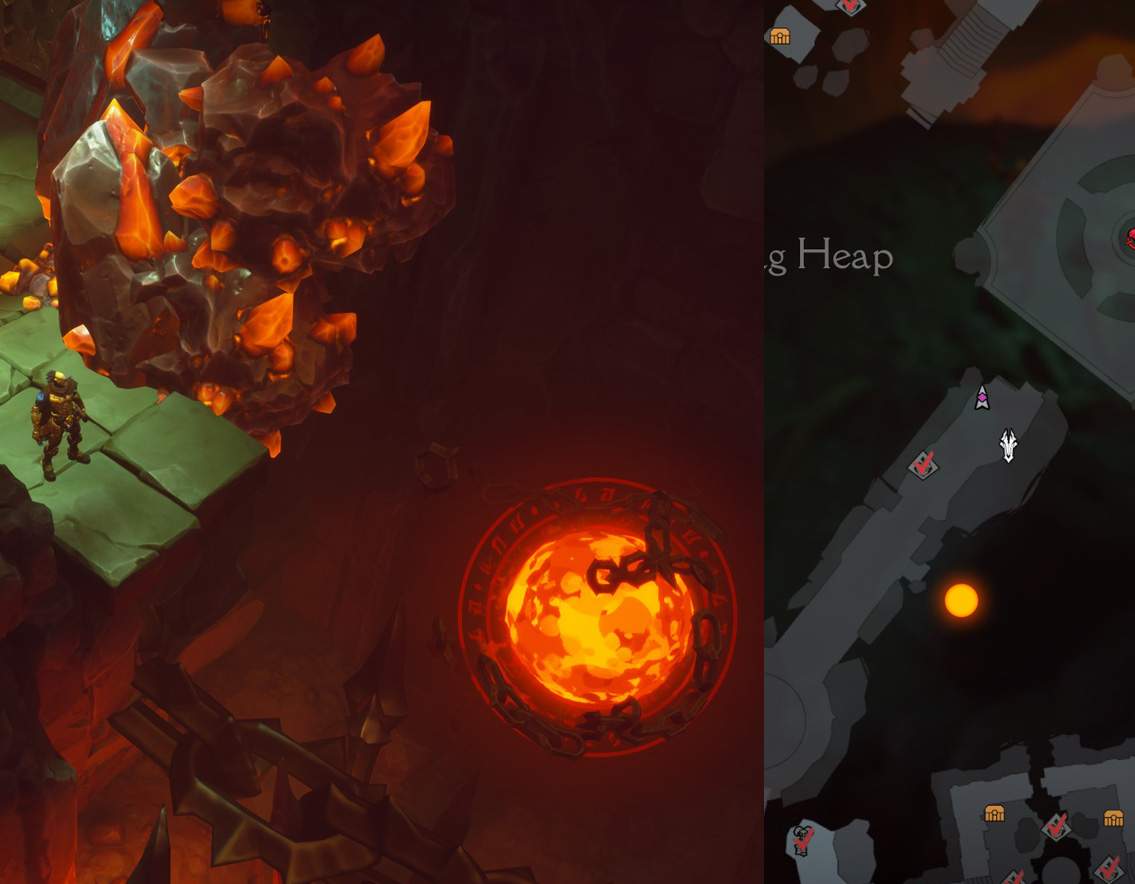
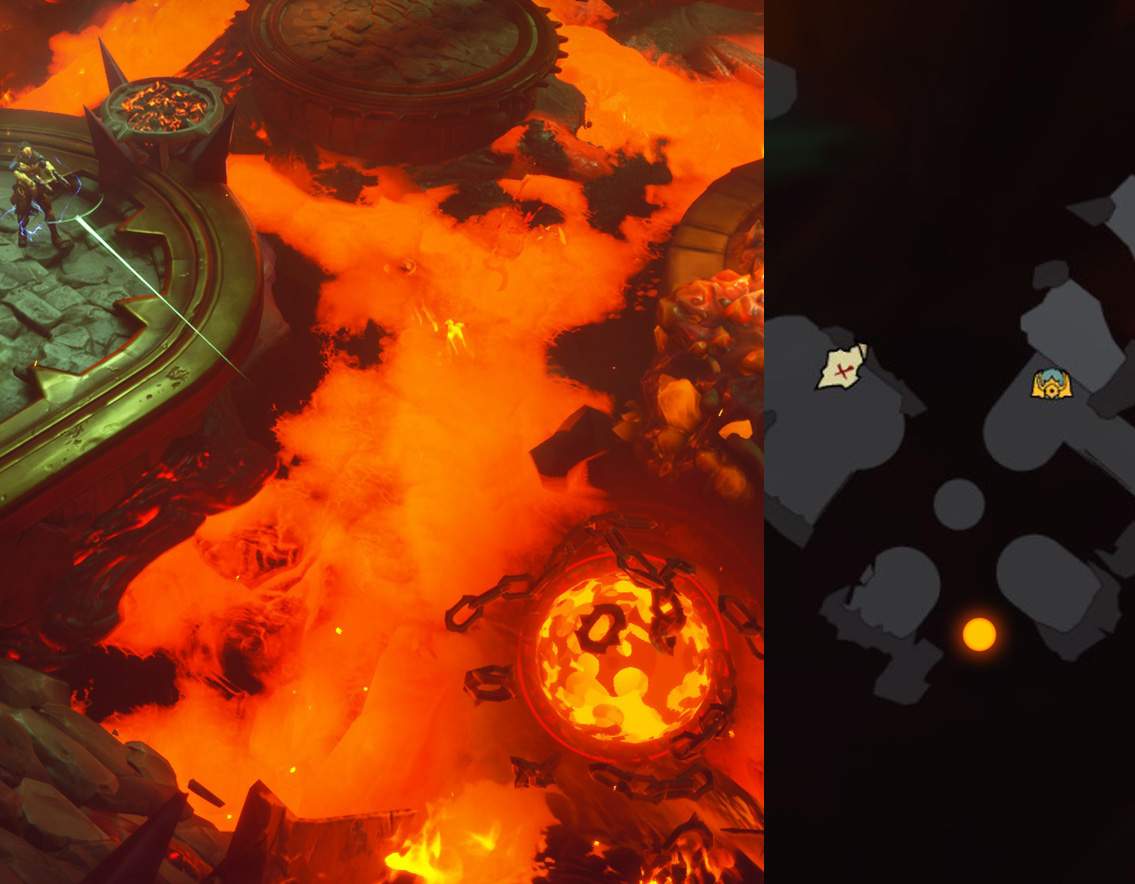
- Lava Shot: This excellent DOT weapon is found in Chapter 5, the Hoard, in the Easter section of the Vault. After you release the lava in that section, head towards the lower left corner of your screen until you find a rocky path upwards. Follow it, use the Vorpal Blade on the switch and then complete the newly unlocked section of the dungeon to claim the Lava Shot!
Walking ArmoryFind all 5 of War’s elemental enhancements.
Notes: Just as with Strife’s elemental ammo types, War’s elemental enhancements also increase your overall DPS by a little every time you acquire a new one, and it adds up by the end! Here’s where to find all of War’s enhancements:
- Earthsplitter: Just as Strife gets the Charge Shot in Chapter 1, Dethroned, so does War get his first upgrade, the Earthsplitter. In fact, it happens earlier than for Strife, and it also cannot be skipped, as you’ll be locked in a combat arena with some Legion demons. Defeat their first wave to spawn an Epic Chest containing the prized elemental enhancement.
- Thunderclap: Vulgrim loves selling you new toys, and the Thunderclap enhancement for War can be purchased after completing Chapter 1, Dethroned, for a comfy 3500 Souls and 10 Boatman Coins.
- Vampiric Rune: This excellent health-absorbing baby can be yours after completing Chapter 4, Icebind Cavern. Just head on over to Vulgrim’s Shop and be ready to drop 3500 Souls and 10 Boatman Coins.
- Flamebrand: A favorite of mine, the Flamebrand enhancement is found in Chapter 4, Icebind Cavern. At the beginning of the level, head northwest towards the area called the Precipice and pass the giant demon Statue to see an Epic Chest just waiting for you to open it. Defeat the Magi that spawn as you approach it, then open it to claim the Flamebrand!
- Deathtouch: Enemies will now explode on death! This upgrade is in Chapter 7, Decay. After you’ve entered the dungeon, acquire the Tremor Gauntlet then head on over to the western section, the Undermine. In the scrotum-shaped room, walk around the room until you find the Epic Chest containing the enhancement.
- Vortex: War’s final upgrade, Vortex, can be found in Chapter 11, Bastion’s Fall. At the very start of the level, head north towards the waterfall and pass through in order to reach a Trickster Door requiring three Keys to open. Enter the treasure room, press the switch and proceed to curse of the most aggravating platforming challenges in the game, at the end of which you’ll get the enhancement.
Wrath Abilities
Master of StrifeLearn all 3 of Strife’s Wrath abilities.
Notes: The first ability of both Horsemen is unlocked from the start, being the classic Blade Geyser for War, and Shadow Clone for Strife. All abilities are useful throughout the game, but the two default abilities have probably been the most useful to me. Regardless, you’re here to get all of them, so let’s do this:
- Shadow Clone: Strife’s default Wrath Ability, unlocked from the start.
- Caltrops: Strife’s first unlockable Wrath Ability, this one can be acquired in Chapter 3, Inferno Vault. As you advance through the first part of the level, you’ll eventually find yourself in a longer than average battle that’ll end with you getting access to a blue jumping orb that you can use to gain height. Instead of going down the obvious path, go towards the bottom right corner of your screen, up the stairs and all the way until you find the Epic Chest containing the Caltrops ability!
- World Ender: Strife’s second and last unlockable Wrath Ability, World Ender is a devastating laser blast that can be found in Chapter 5, the Hoard, in the leftmost section of the dungeon. After letting the lava flow, head towards the bottom left corner of your screen, go up the stairs beyond the river of lava, and you’ll find out a section of the floor has now collapsed. Jump down into the newly revealed Stash, go northwest, and beat the simple platforming challenge to reach the Epic Chest containing the World Ender!
Master of WarLearn all 3 of War’s Wrath abilities.
Notes: See “Master of Strife” for more information.
- Blade Geyser: War’s most iconic move is also his default Wrath Ability, unlocked from the start.
- Rampage: War’s first unlockable Wrath Ability, Rampage, is a new addition to his move set, allowing him to plow through everything in his path for a short distance, dealing great damage. It is found in Chapter 5, the Hoard. From the beginning of the level, make your way to the main gate, then head south and find the alternate path into the dungeon. Solve the puzzle inside the small labyrinth and defeat the Houndmaster (there is another optional achievement here, called “Respect for Animals”, see the dedicated section). Open the chest he was guarding and acquire the Rampage ability.
- Stoneskin: War’s second and final unlockable Wrath Ability, Stoneskin is another returning classic found in Chapter 8, the Holdback. Make your way through the level until you find a statue of a demon holding a lantern, with a Growth bomb and Void portal immediately afterwards. There is an extra section of the level north of the island, accessible via double jumping and some flying above the corrupted water. Walk all the way to the end, listen to War and Strife’s conversation, then turn back only to get ambushed by enemies. Defeat all of them and an Epic Chest containing the last Wrath Ability will appear.
Soul Cache
Soul CacheDestroy all 4 Soul Caches in The Slag Pit.
Notes: The Soul Caches in the Slag Pit are fairly straightforward to locate and destroy, but (and this applies to all other caches in the game), you’ll first have to feed them souls by destroying demons near them (don’t worry, the range is wide). After a certain amount, they’ll switch from blue to orange with a screaming sound and will become vulnerable.
The first Soul Cache is found very shortly after leaving the first room of the level. At the bottom of the stairs, destroy the enemies that spawn, then go south, towards the lower right corner of your screen, and grapple over the chasm to land on a new platform. The first Soul Cache should be visible right next to you.

The second Soul Cache is a bit further into the level, after the fight with the Legion Champion. You’ll find a door that requires you to activate two Vorpal Blade switches, one of which is covered up by Growth. Stand next to said Growth and the second Cache should come into view, ready for you to blow it up.

The third Soul Cache is a bit further into the level. After reaching the giant square platform in the middle of which Dis is locked away, follow the path that becomes available to you to the northwest, grapple over the chasm, up the stairs, double jump towards the next platform, and the Soul Cache should be visible in the distance, waiting to be destroyed

The fourth Soul Cache is also accessed from the square platform, go southeast and grapple over to the other side. In the next room, which is filled with lava, you’ll find the Soul Cache in the corner to the south. It might require extra souls to become available so step onto the central platform to trigger a fight with more than enough enemies (and souls) to satisfy the requirements.

Demolition Derby
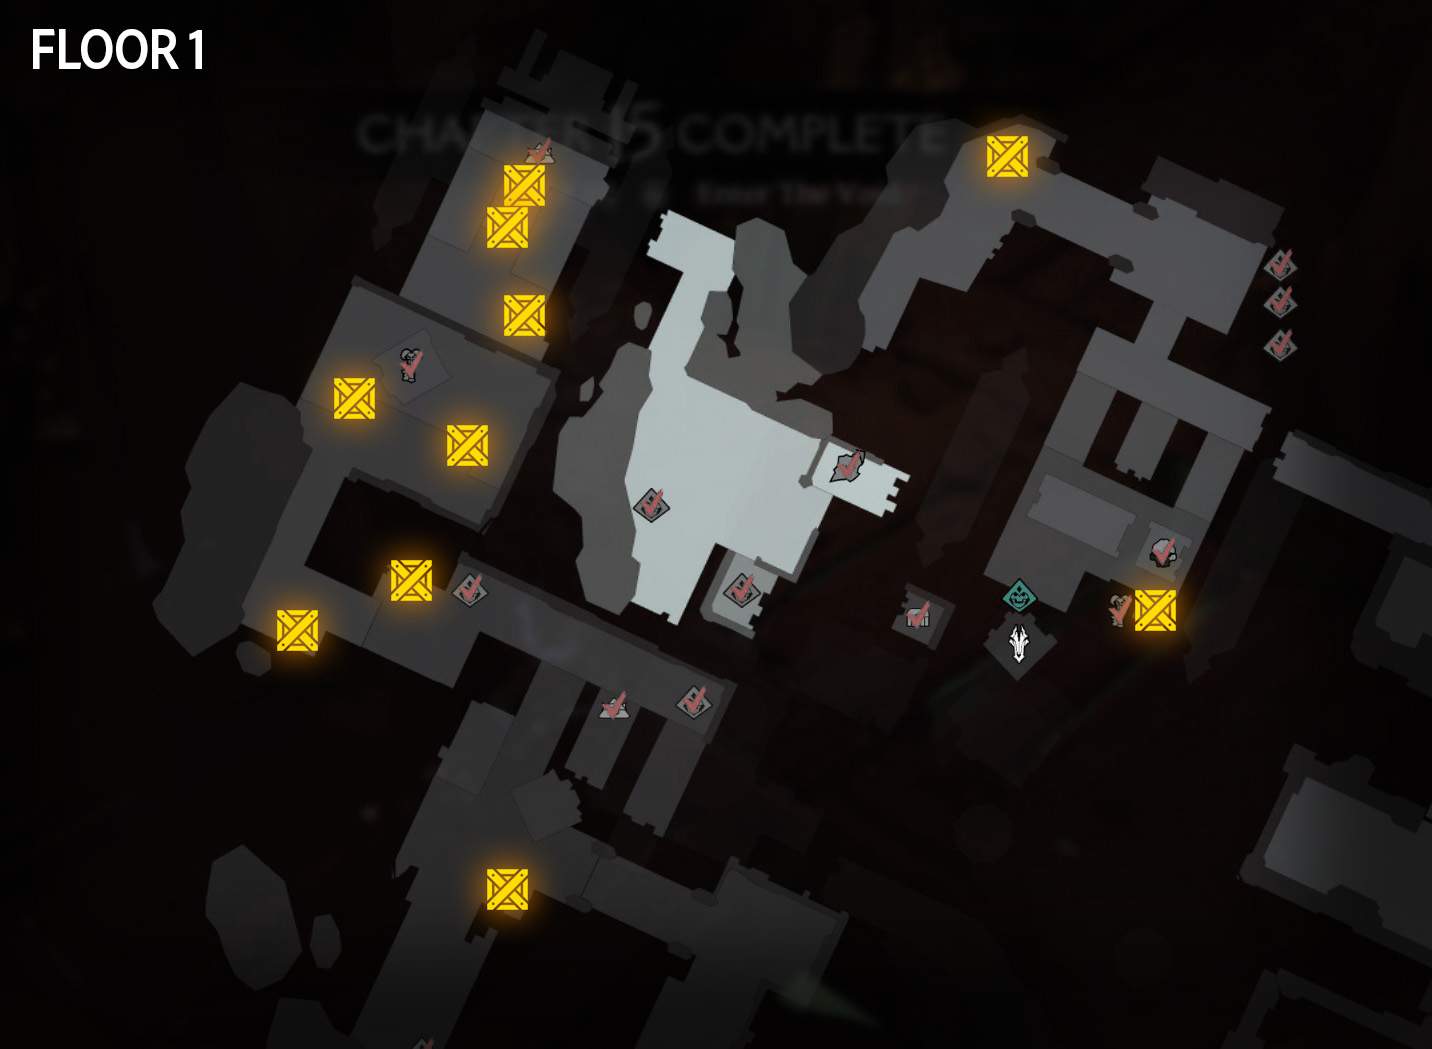
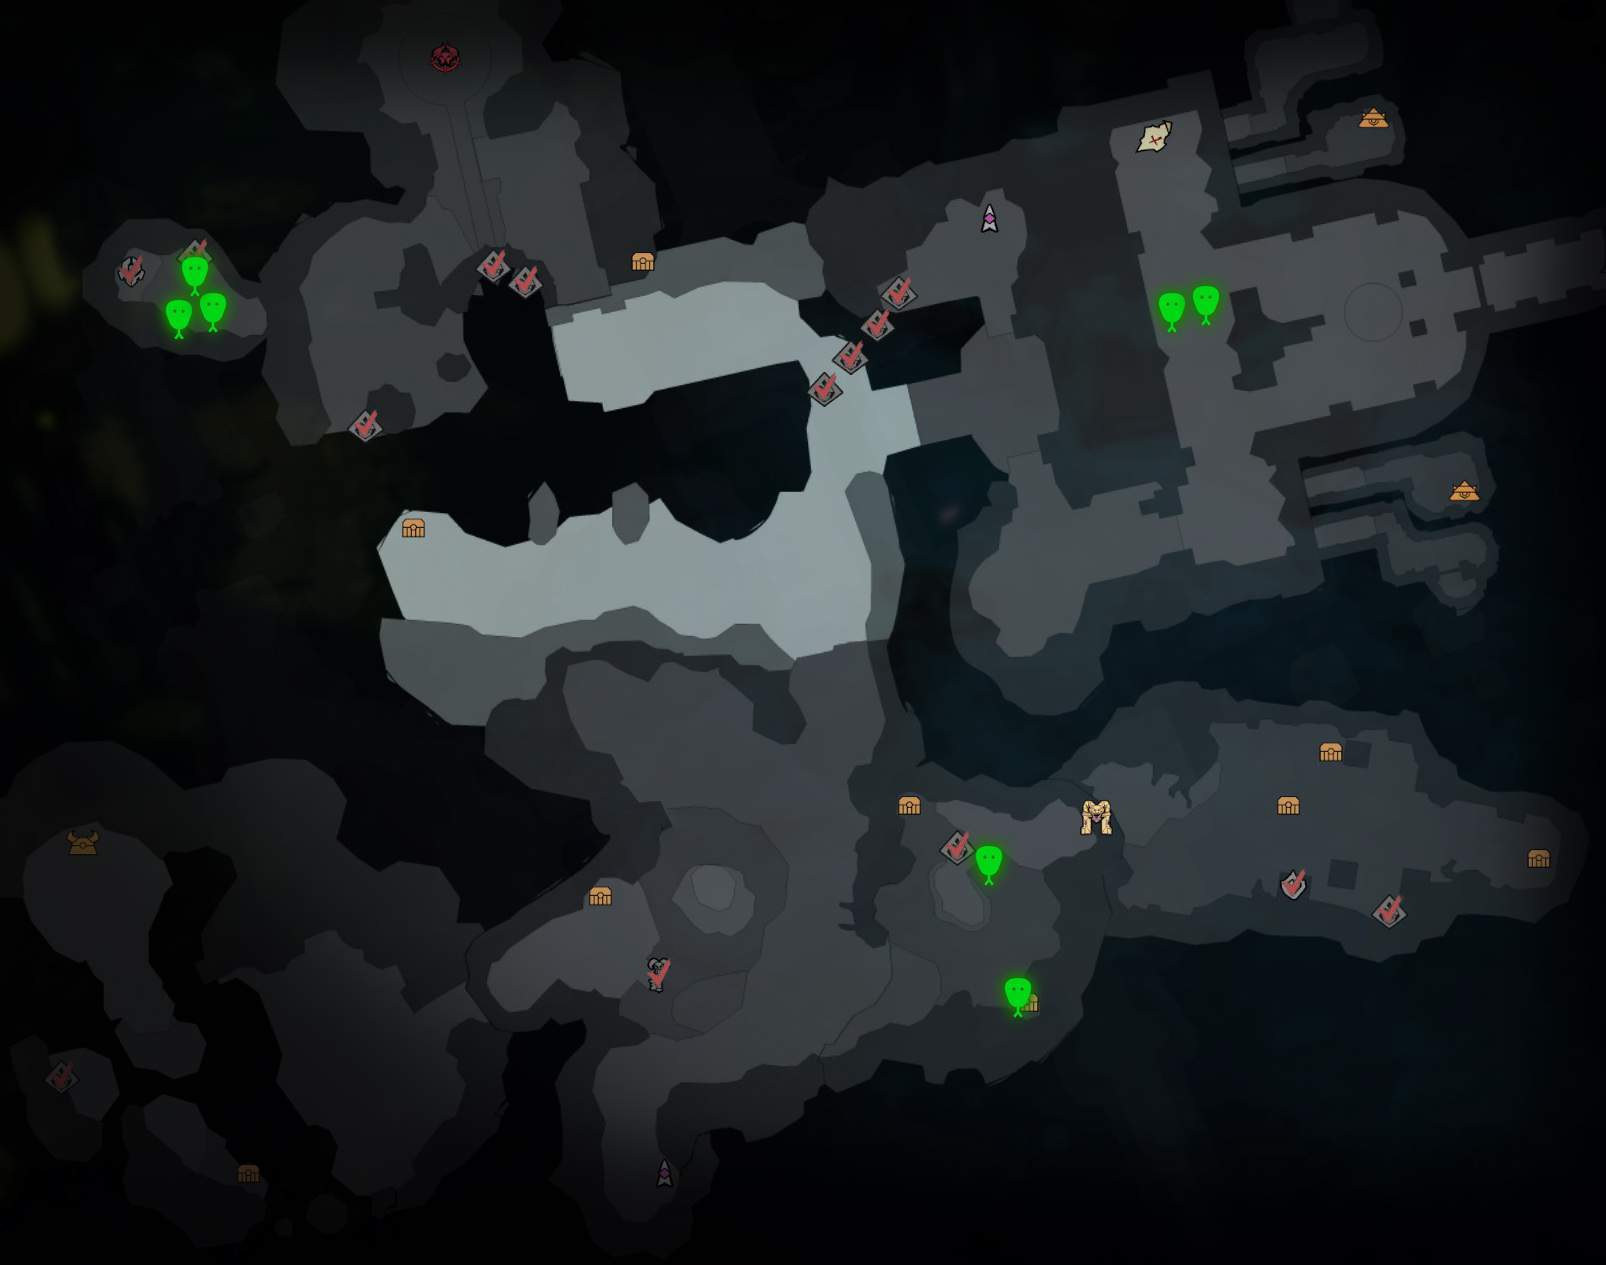
Demolition DerbyDestroy 10 structures in War Machine.
Notes: This can and also should be attempted at the same time as “Ready to blow”, as both achievements require you to blow a lot of things up by shooting red barrel bombs in Chapter 15, War Machine. Unlike the supply caches however, all the structures you need to destroy are located on what we’ll call the main path through the level.
They’re harder to identify than the supply caches as they don’t stand out much from the rest of the Chapter’s wooden structures, but you should be good if you just blow up every red barrel bomb you see. In order to make things even easier for you, I’ve created a map with the location of all ten structures!

Close the Rift
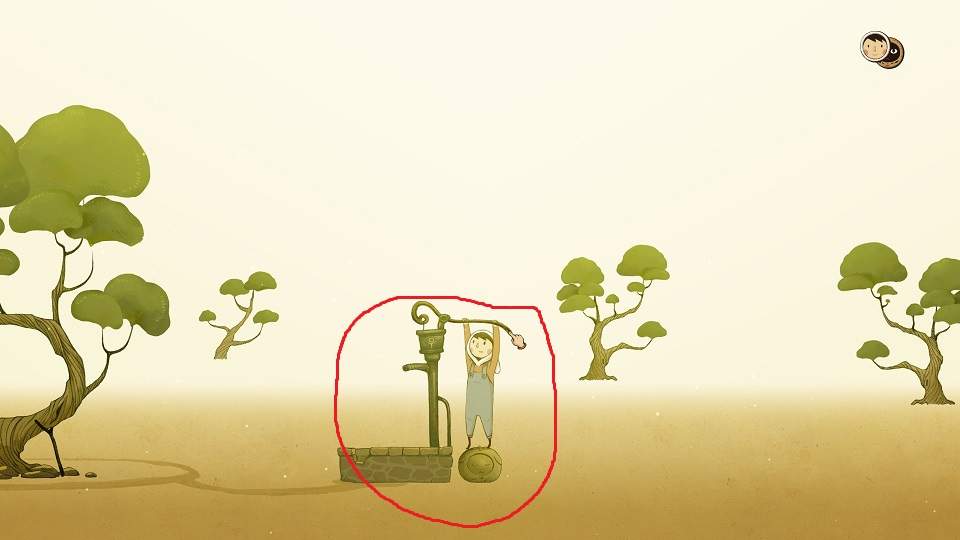
Close the RiftClose the rift leaking void creatures in Icebind Cavern.
Notes: This achievement is done during Chapter 4, Icebind Cavern, and you’ll need the Void Bomb item that you acquire in the dungeon during the second part of the chapter. This means you can either do some backtracking once you reach the portal that leads back outside at the end of the dungeon, or you can complete the mission normally then come back later.
From the starting location, go northwest past the explosive barrels, and turn right towards the Void Bomb Portal Surface as you reach the Precipice. Deal with the enemies that attack you, then place two portals using Void Bombs in order to reach the elevated section behind the wall. Go north and ignore the torch puzzle until you reach this point.
Here, simply jump and glide over the chasm, and you’ll find the rift waiting for you. It’ll spawn a couple of enemies, and eventually collapse after you destroy every demon. This will earn you the achievement.
The Dead Court
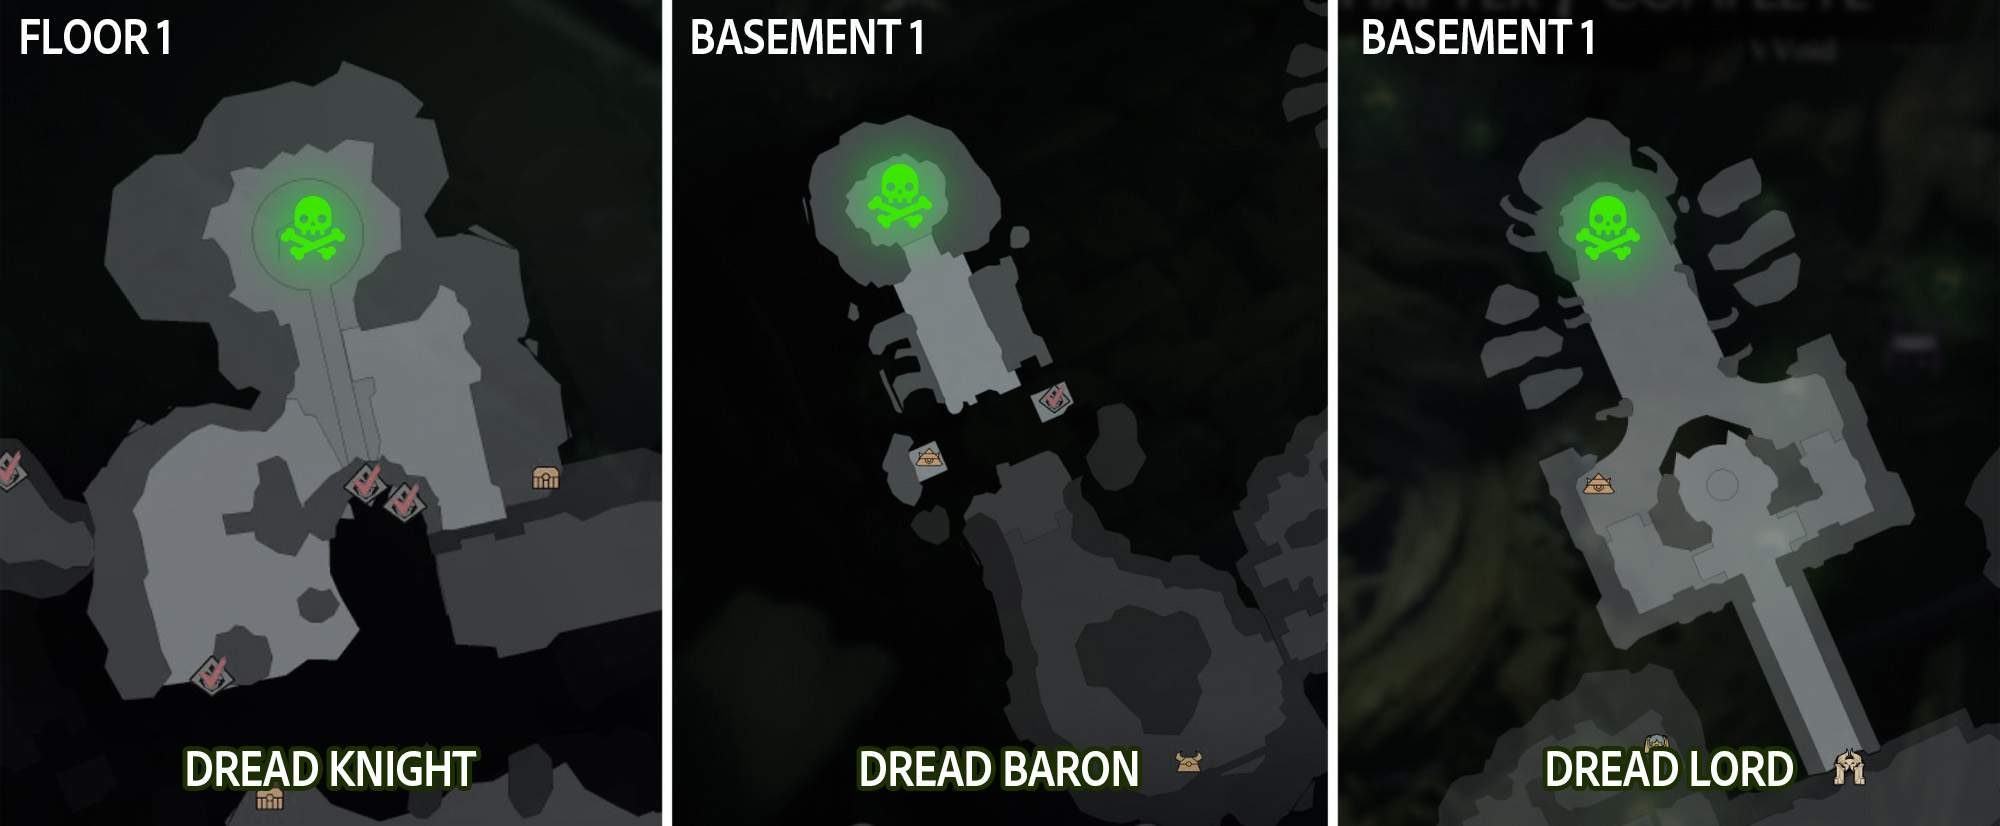
The Dead CourtDefeat the Dread Lord’s subjects in Decay.
Notes: Not a difficult achievement by any means, but it is possible to miss two of the three targets you’ll have to slay for this achievement. In Chapter 7, Decay, your task is to defeat all three Dreadwalkers, however the level is marked as completed as soon as you defeat the third one, the Dread Lord.

Both the Dread Knight, found outside of the dungeon, and the Dread Baron, found in the left wing of the dungeon, can be completely ignored. Obviously, we want the achievement, so here are the locations of all three targets on the Chapter’s map.

Infested
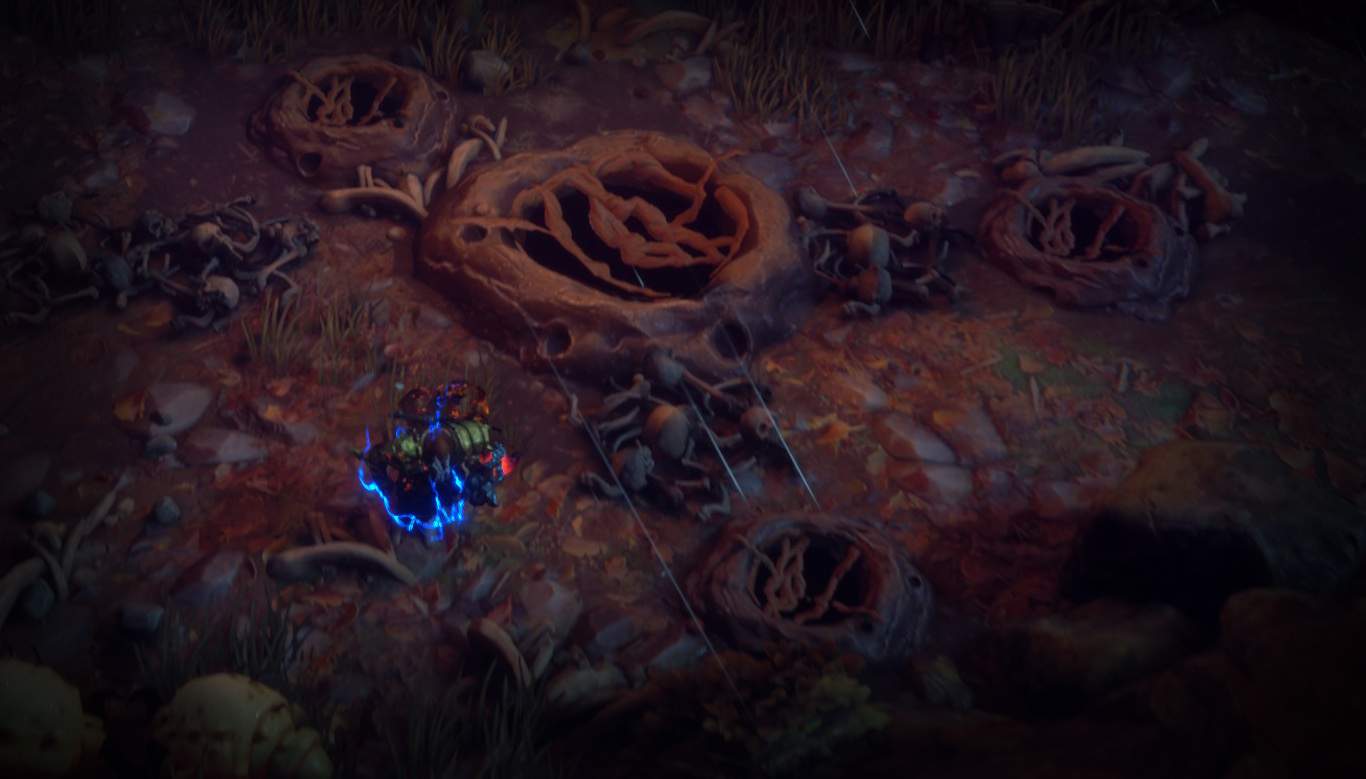
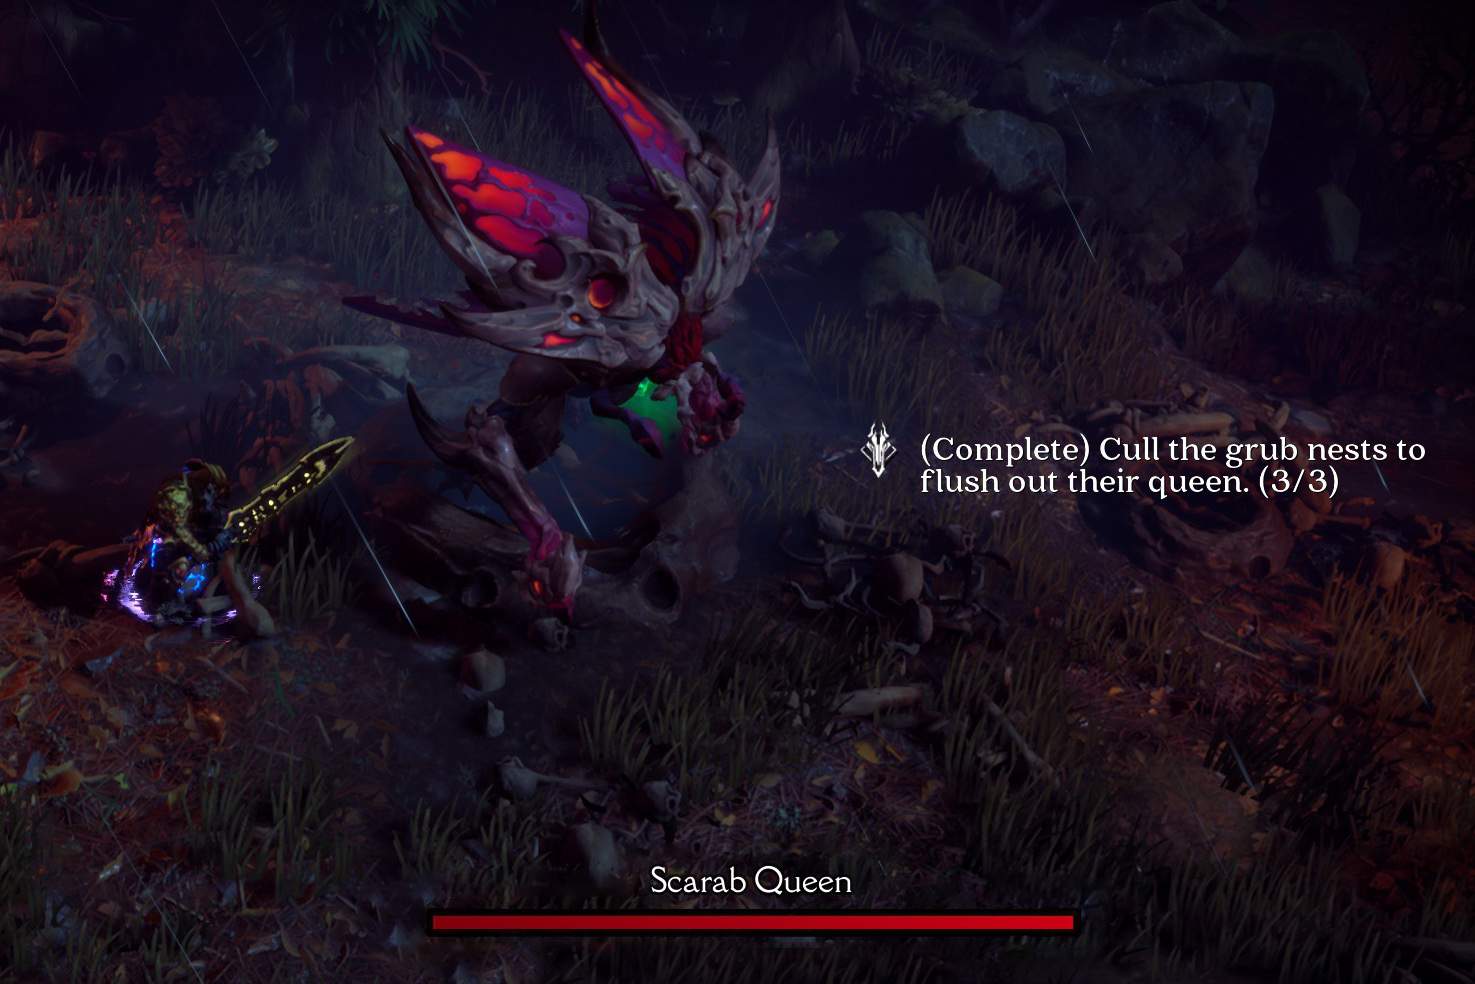
InfestedDefeat the grub queen in The Maelstrom.
Notes: A pretty satisfying achievement that requires you to kill a huge amount of grubs in three different locations in Chapter 12, The Maelstrom, in order to get the big mama to spawn. The nests are found in the following spots:

And look like this:

Once there, you’ll be attacked by waves of grubs that shouldn’t be much of a problem to deal with. You’re done with a nest after the grubs no longer spawn, so move onto the next one until you’ve destroyed all of them, at which point the queen herself will spawn.

She’s much tougher than her underlings, about as strong as a mini-boss. Once she’s been dealt with, the achievement will unlock.
Good Deeds
Good DeedsSave the uncorrupted angels in Bastion’s Fall
Notes: This one is done around the beginning of chapter 11, Bastion’s Fall. After your first meeting with Abaddon, you’ll have to jump down into a courtyard, where some angels will be fighting their corrupt brethren. Quickly dispatch the purple angels but watch out because there a more than just the ones you see at first, with some coming down the steps to the northeast after you’ve defeated the first group.
A good way to guarantee their survival is to play on easy or normal difficulty, and as soon as you jump down, use Strife’s Shadow Clones Wrath Ability. They’ll automatically target the hostile angels even if they’re outside of your screen, allowing you to find them easily. War’s Blade Geyser can also come in handy for its combination of range, casting time and damage. Your priority is to get the Corrupt Angels to focus on you rather than their original targets so they can’t damage them anymore.
Once the Corrupt Angels have been killed, a cutscene with Abaddon will trigger, and he’ll thank you for saving his brethren, unlocking the achievement.
Hell’s Forge
Hell’s ForgeGather all the ingots in the Inferno Vault and take them to Hell’s Forge.
Notes: This achievement requires you to gather four gold ingots throughout Chapter 3, Inferno Vault, and to bring them to a specific location. You’ll also need two Trickster Keys to access the Forge itself, as it is locked behind the Chapter’s Trickster Door. In addition to that, you’ll have to backtrack from the point where you find the final ingot, as the Forge is located between the third and fourth ingots.
The first ingot is found at the bottom of the first circular flight of stairs you walk down at the very beginning of the level, you’d have a hard time missing it. Simply approach the ingot and interact with it to collect it.
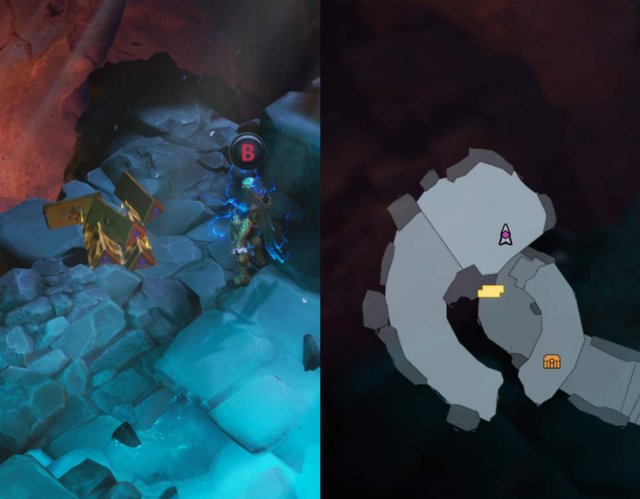
The second ingot is located a little bit further into the level, after you get attacked by (ENEMIES!). Jump down to the lower level and find the broken stairs to the southwest. Reach them with a jump, then look southeast to spot another platform you can reach by gliding. The second ingot is located on this platform.

The third ingot is a bit off the main path. After defeating the Magi that ambush you and unlocking the blue high jump point, instead of using it to progress, head north and past the Health Chest. There should be a path headed northeast, simply follow it and climb the ledges until you find the third gold ingot.

The fourth and final ingot is located inside the Inferno Vault, in the first large room you’ll find after the opening hallway. There are a couple of fallen towers parts around the room, and the ingot is located in the southeastern section. You’ll likely have to fight the demons that spawned in to escape the room and make your way back to the Trickster Door at this point.

The Forge itself is located northwest of the entrance to the Inferno Vault. There’s a snowy path you can follow right from the entrance to the Vault, and it’ll lead you to the Trickster door. Once inside, all you have to do is interact with the Forge to craft a Creature Core and unlock the achievement!
Ready to Blow
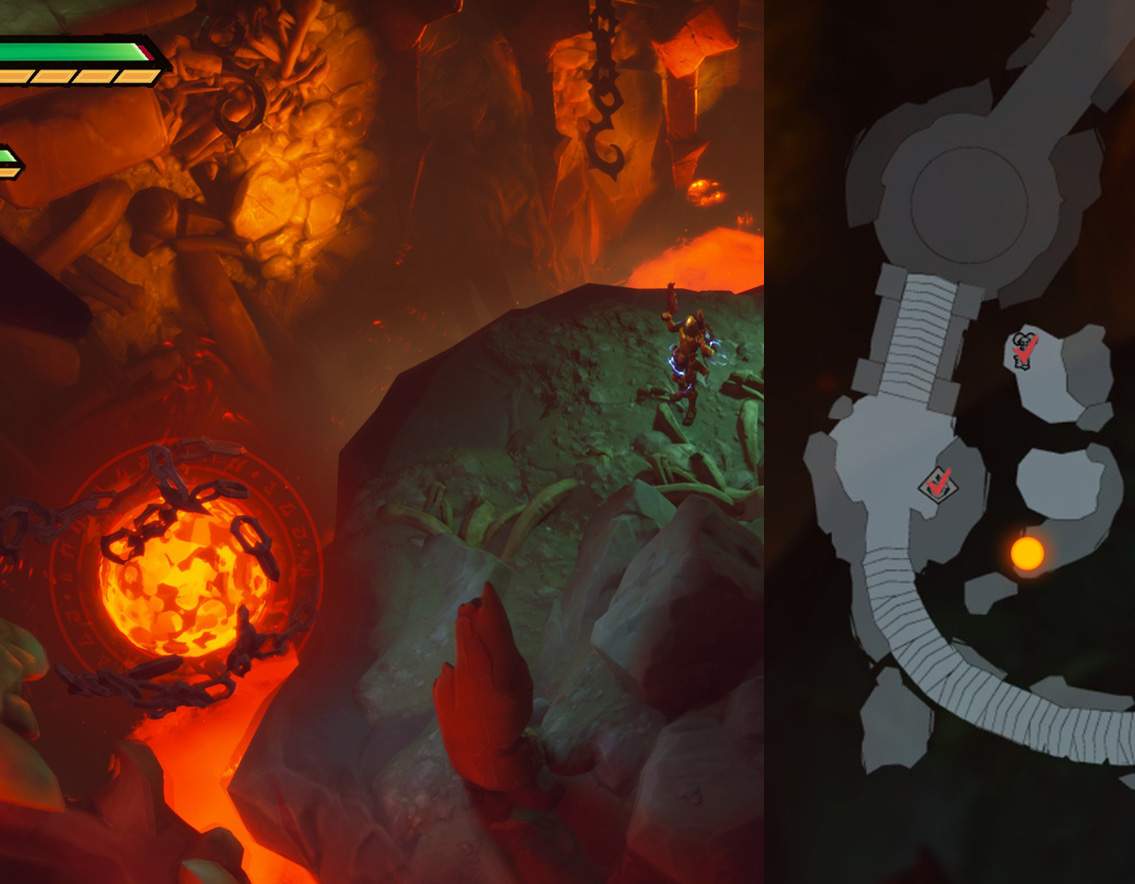
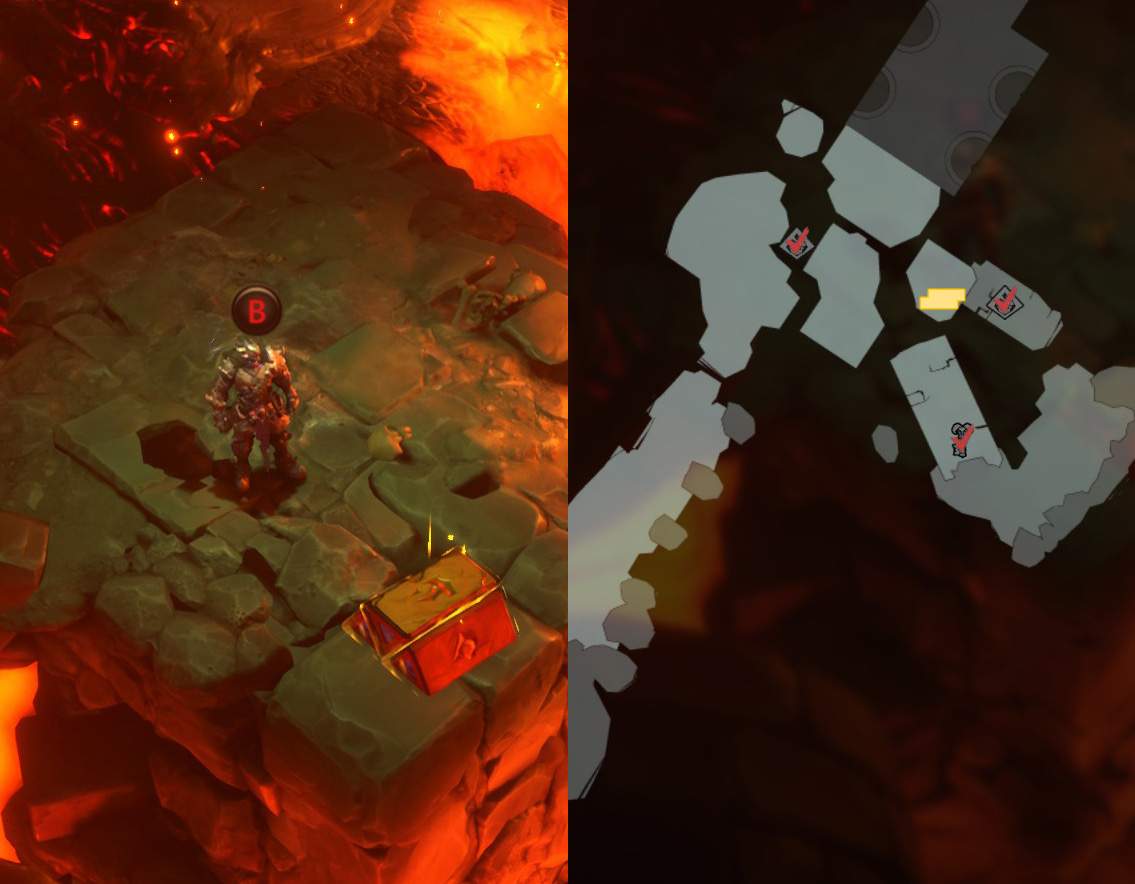
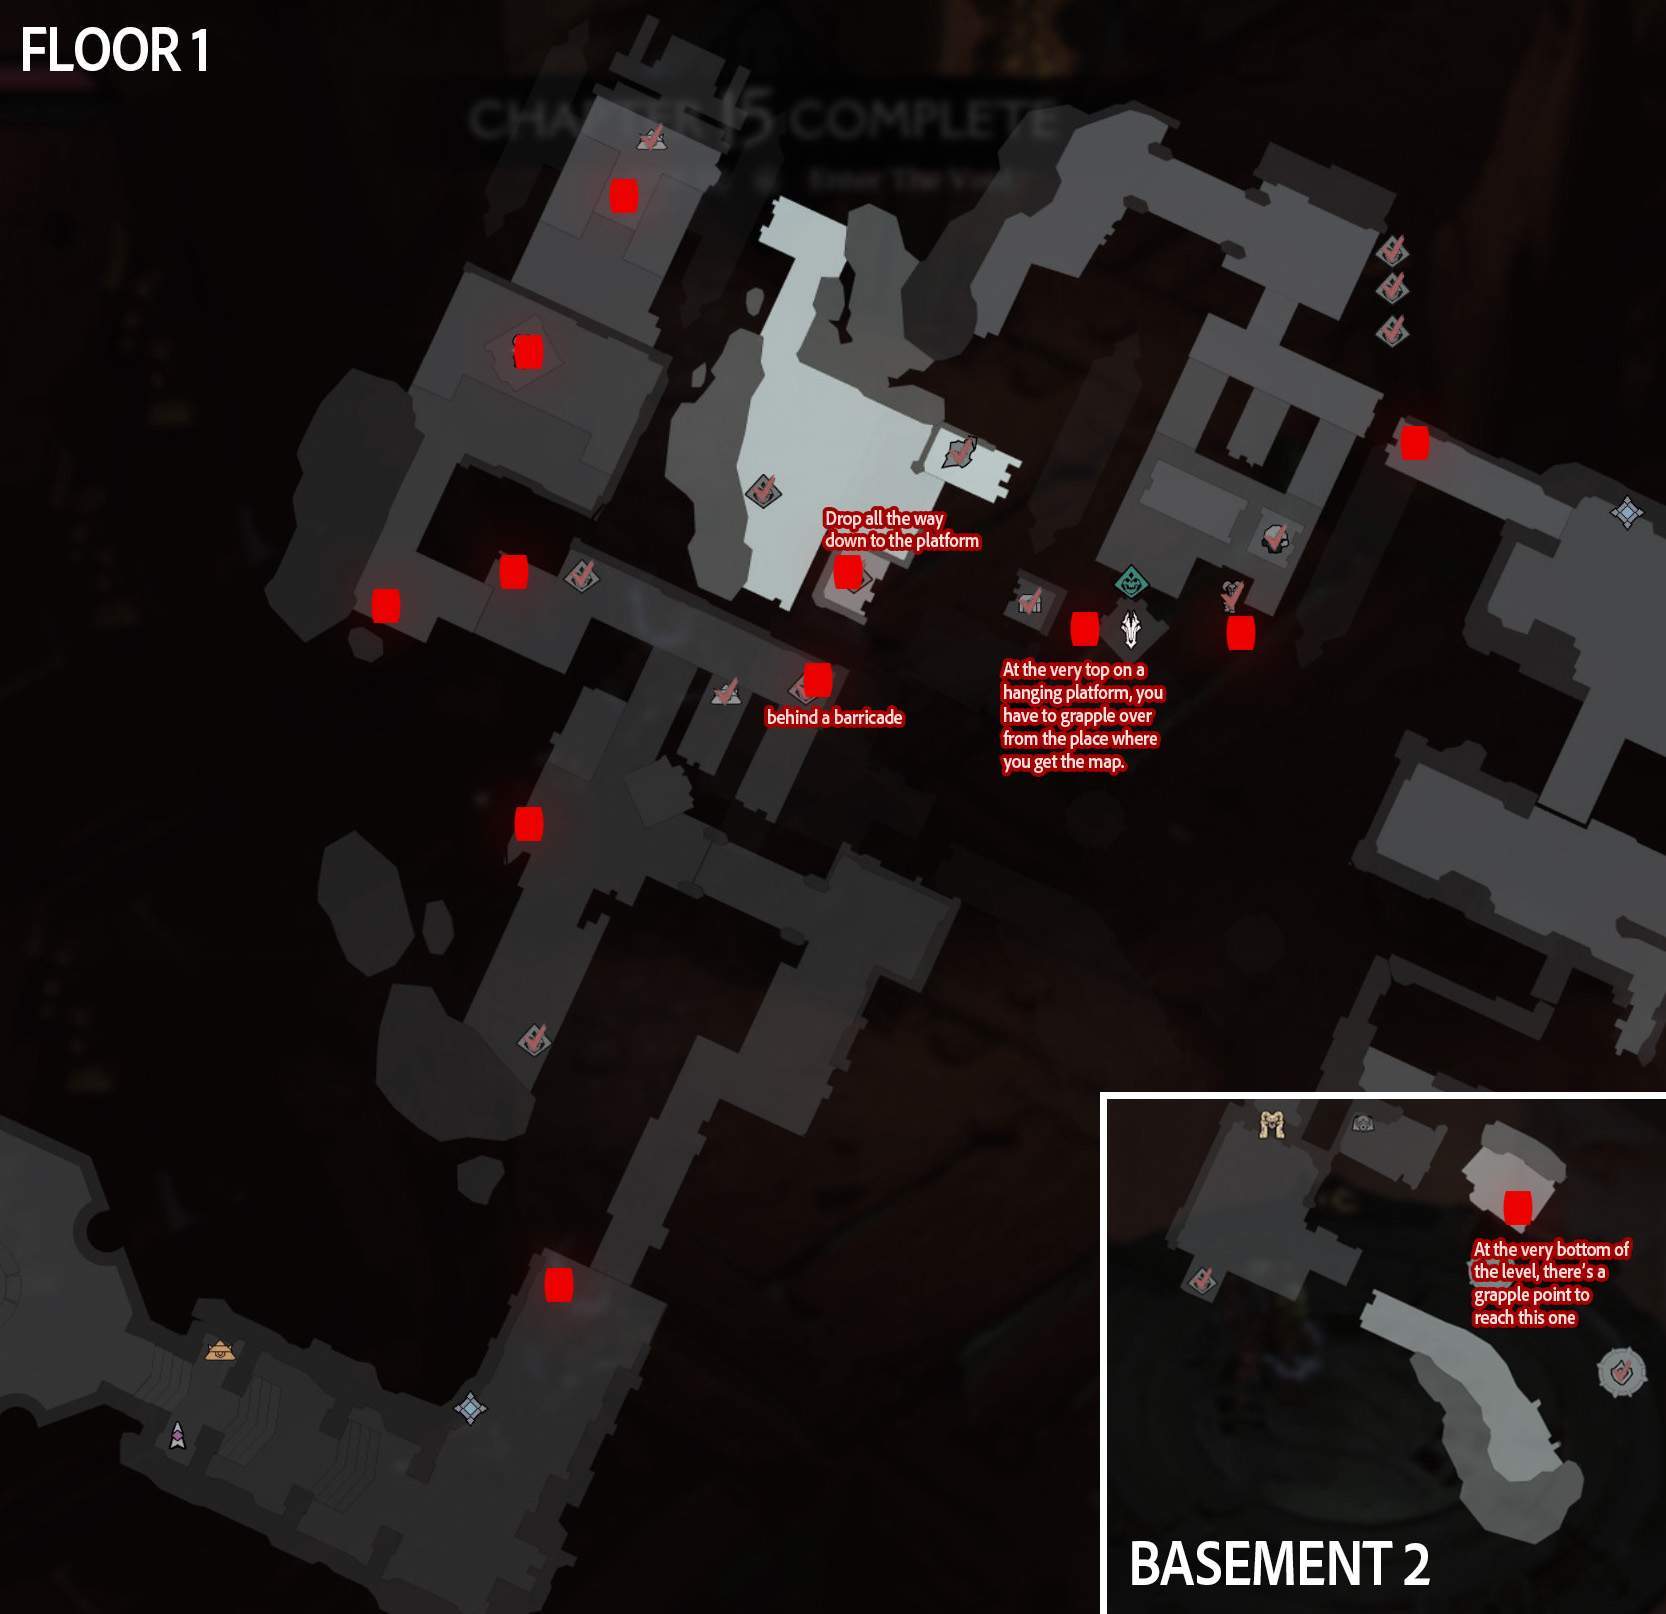
Ready to BlowDestroy all 12 of Moloch’s supply caches in War Machine.
Notes: This achievement requires you to blow up all twelve supply caches in Chapter 15, War machine. The caches themselves look like piles of crates accompanied by one or more red barrel bombs every time.

They’re scattered throughout the level and some are fairly well hidden, outside of the beaten path. Usually I’d describe where all of them are one by one, but in this case, I felt like a map would do the job better.
Note that there’s also a side objective for blowing up ten structures in this level, also using red barrel bombs, and sometimes caches and structures are bundled together.
A good rule of thumb is to just blow up every bomb you come across. Without further ado, here are the locations of all the caches along with some remarks where I felt they were needed.

Why’d It Have to Be Snakes?
Why’d It Have to Be Snakes?Defeat every snake in Decay.
Notes: There are seven snakes in total in Chapter 7, Decay. The best strategy is to shoot them from afar, as they’ll flee and then burrow into the ground if you approach them. If they manage to get away, you’ll have to restart the level as the achievement will become impossible to complete.
- The first two are near the start of the level. As you enter the large swamp area, you’ll be ambushed by a group of demons. Defeat them and head east, drop into the water, and look for a chest to the southeast. The first snake is next to it. The second one is found about twenty meters north of the first, under the wooden bridge.
- The third and fourth ones are located near the entrance to the tomb of the warrior. As you make your way up the steps past the horse-blocking seal, look west down the hallway carefully, and you’ll spot the two snakes running away. Use Strife to take them out before they vanish.
- The last three are found as a group behind a secret waterfall to the southwest of the steps leading to the tomb of the warrior. You’ll have to grapple across a chasm to reach the platform, where you’ll get attacked by a couple of demons. To the left are some stalagmites, and behind them, almost invisible, is the hidden entrance to the cave where the last three snakes are found. Take them out to unlock the achievement!
And in case all of this wasn’t enough, I’ve prepared a map for you to use as a reference:

Respect for Animals
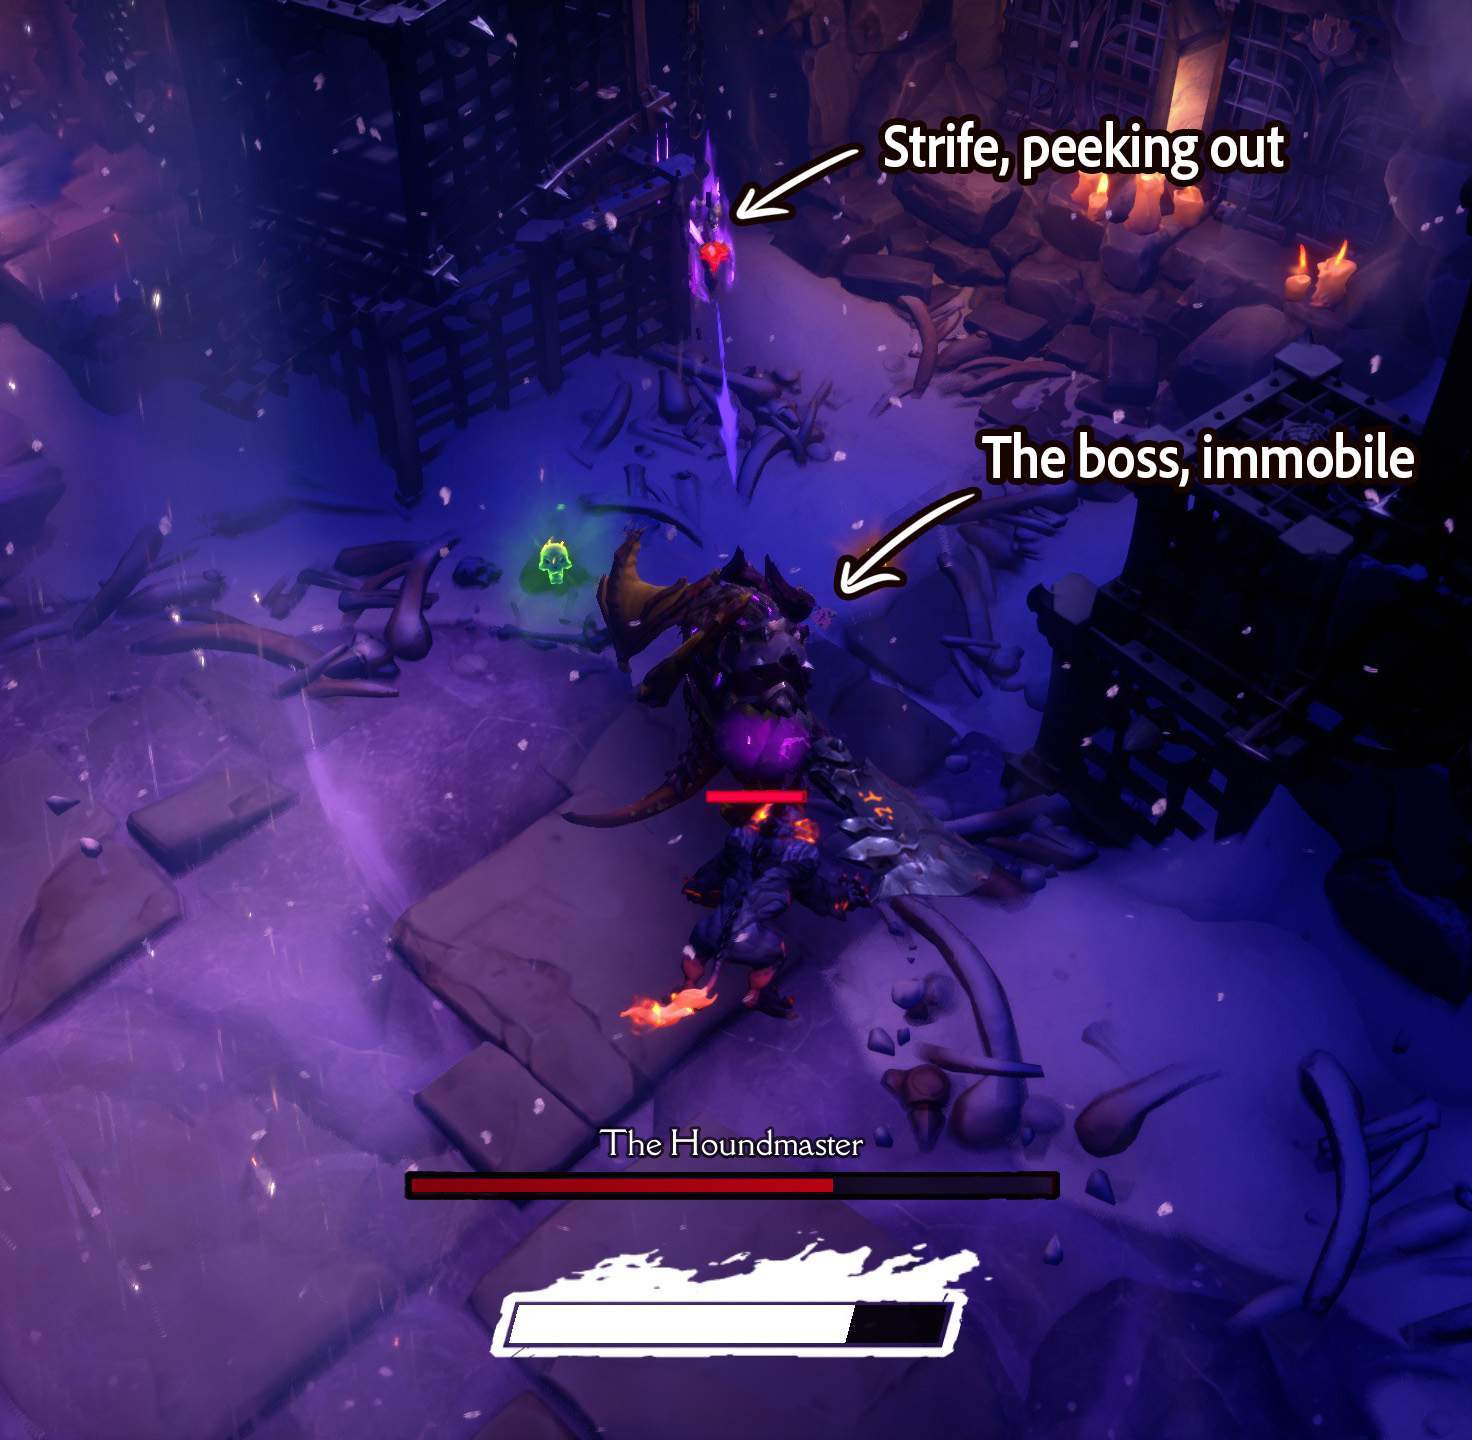
Respect for AnimalsDefeat less than 5 hounds before killing the Houndmaster in The Horde.
Notes: Now this one is tricky, probably one of the most difficult achievements in this game. Fortunately, there’s a way to make it completely trivial. First things first tho, you’ll want to play as Strife and not War, as the latter has a lot of range with his sword attacks, and you’ll want to focus your damage in a single spot: The Houndmaster’s face. You should also avoid equipping any Creature Cores that reflect the damage you receive towards foes.
Follow the alternate path into the Hoard found south of the main gate and make your way through the Growth bomb puzzle without killing any Hounds. Be swift, as they’ll start swarming you if you are too slow, making it difficult to progress.
With the puzzle behind you, enter the Houndmaster’s room and trigger the cutscene. As he attacks you, stay at a safe distance and unload your regular ammo into his face. Avoid Charged or Static Shots, as those have a nasty habit of dealing collateral damage and you have to keep the dogs alive at all cost. Keep it up until the Houndmaster is defeated.
If you’re having trouble, this achievement can be cheesed: As the fight starts, lead the Houndmaster to the northwestern section of the room, and stay slightly behind this crate.

The boss will stop moving and so will his Hounds, allowing you to damage him from afar without any risk of retaliation or dogs getting in the way.
Blademaster
Blademaster (Hidden)Defeat Moloch without taking damage.
Notes: This is actually much simpler than it sounds, tho it still might take you a couple of attempts to get into a proper rhythm. Unlike every other Creator-forsaken boss in the game, Moloch does NOT summon dozens of distracting minions, instead favoring a classic one-on-one duel with you (okay, technically it’s two on one if you count both Horsemen).
His moves are heavily telegraphed and have consistent hitboxes, so in order to avoid taking any damage, just use Strife the whole time, and keep unloading your guns into Moloch while abusing Hotstreak, caltrops and shadow clones as you slowly build your Anarchy form meter. Once Moloch has about 20% of his health left, enter your Anarchy Form and abuse the invincibility period to deal massive damage to what’s left of the boss’ health bar. This should reward you with a flawless victory, congratulations!
(You can technically make it go even faster by switching to easy difficulty for the fight, since he’ll have less health, but shhh).
Gatekeeper
GatekeeperUnlock every Trickster Door.
Notes: There’s a total of 12 Trickster Doors in the game that are required for this achievement. 11 of them are found in the main story Chapters, one per Chapter, and a secret twelfth door can be found in the Void. You’ll need to find and use every single Trickster Key found in the main game, which means you’ll have to go through levels again to find all of them and use them on the doors themselves (note that if my instructions are not enough, you can always check your map! The doors are marked with a special icon).
I will not be showing the location of every key in this guide. Don’t forget you can also buy a couple of keys from Vulgrim himself in the Void. Without further ado, here are the locations of the trickster doors in every chapter as well as the hidden one in the Void:
- Chapter 1, Dethroned: The door is located at the very end of the level, AFTER your meeting with Samael. You’ll find yourself inside the Void. The Door is slightly off the beaten path, just keep moving right instead of entering the circular room which leads to the Vorpal Blade, and the door will be waiting for you a little further ahead.
- Chapter 2, The Slag Pit: The door is found right at the beginning of the level, in the very first room you appear in. Just head towards the northern wall, you can’t miss it.
- Chapter 3, Inferno Vault: Right before the entrance to the Vault itself, you’ll have to activate two switches to open the gate to the dungeon. From the entrance itself, go northwest until you find a snowy path and keep following it to find the door.
- Chapter 4, Icebind Cavern: Follow the steps to reach the Void Rift at the top of the cliff, which you can find in the “Close the Rift” section of this guide. Instead of dealing with the rift however, continue your path towards the northwest past some crates. The door is located at the end of the path and can’t be missed.
- Chapter 5, The Hoard: You’ll have to enter the fortress through the main gate and defeat the Legion Boltsplitter blocking your path. From there, head north, to the left of the elevator platform that became available after beating the miniboss. The door is found towards the end of the path, to the northwest.
- Chapter 7, Decay: The door is found near the beginning of the level. As you enter the large swamp area, head east until you reach the area called the Mire. There, jump on top of the rocky formation in the middle of the swamp, and head north along the wooden bridge. Follow the path until you reach the end, where the Trickster door is located.
- Chapter 8, The Holdback: One of the trickiest doors in the game. It is found at the very end of the level. When you reach the part where you have to use War’s Vorpal Blade to raise a bridge from below the corrupted water, turn back and head south. You should see some broken stairs to your right. Follow them and jump down to the lower level. Head east until you find a Trickster door buried under a pile of rubble. Don’t worry, it’s not the real one!
- To the right of the door, you’ll find a small path leading to a drain pipe. Jump into the pipe and fall down to the lower level again. You’ll know you’ve reached the right spot if you find yourself next to the final valve and a blue flight orb. From there, head northwest and you’ll find the door!
- Chapter 11, Bastion’s Fall: This door is located near the beginning of the level. As you come across the first river, follow it north and go through the waterfall (I love that one of gaming’s oldest tropes keeps getting used to this day). Defeat the enemies in your way and you’ll find the trickster door waiting for you.
- Chapter 12, The Maelstrom: Head as far east as possible, until your reach the edge of the level. From there, head northeast and you’ll find the door.
- Chapter 14, The Dredge Works: As you reach the giant barricade, you’ll find a path on the leftmost tower that allows you to climb to the top of the barricade and head southwest until you reach a small ledge leading back down to a horse-blocking seal. Pass the seal and follow the desert path southwest, the door will be waiting for you at the end.
- Chapter 15, War Machine: The trickster door in this level is located near the end of the level. At some point, you’ll get ambushed by waves of enemies as War and Strife talk about drowning Moloch in a river of blood, that sort of thing, before a bridge drops down. At this point, backtrack to the northeast instead of progressing, and you’ll spot a couple of pillars you can climb up and down. Drop down to the lower level, and you’ll find the trickster door to the northeast.
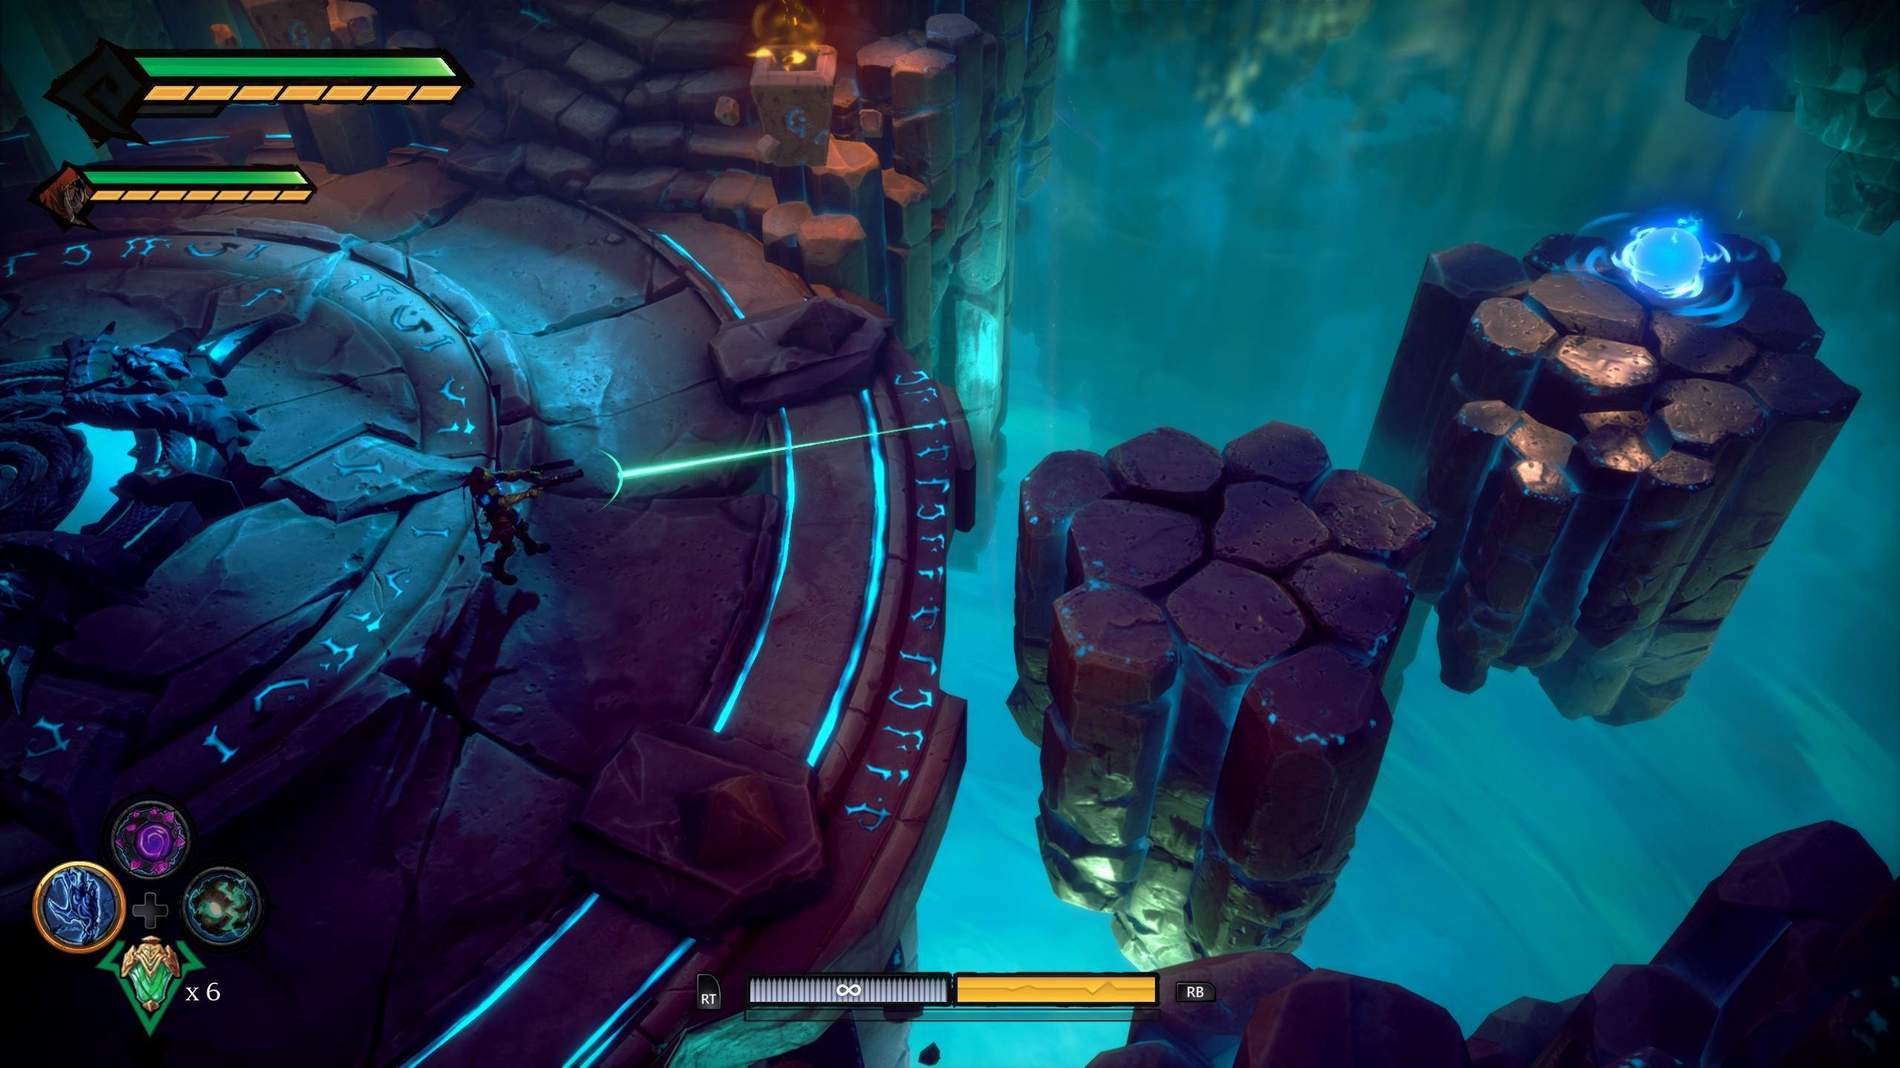
- The Void, Secret Trickster Door: The secret final trickster door is found by completing a series of puzzles and platforming challenges in the Void. You’ll need to have all the upgrades to make it through this section. From the central platform where you select the level you want to play, go east and jump onto the small floating formations until you reach the blue orb.

Use it to fly up and reach the platform to the right. Here, use War’s Vorpal blade to transfer the flames to the torches you can spot on the other side of the wall by making the blade bounce off the wall.
From here, a series of puzzles await you, making you use all your abilities, including the Tremor Gauntlet, Void Bombs and even the Aether Spark in one of the most difficult challenges the game offers. After you succeed, you’ll be greeted by the final Trickster door, which requires a whopping six keys to open. Once you open it, the achievement will unlock.
Secret Boss, Trickster
Wicked Killington (Hidden)Face the Trickster himself, Wicked Killington.
Notes: This achievement is directly linked to the previous one, Gatekeeper. In order to reach Trickster, you’ll first have to find every Trickster Key, and open every Trickster door, including the hidden on in the void. Once you’ve taken care of that, you’ll be able to open the large door to the left of Vulgrim’s shop.
Inside, you’ll find yourself face to face with good ol’ Wicked K! He’s a fierce adversary, and even if your Horsemen are wearing Abyssal Armor, you’ll likely die in two hits if you’re careless. It is recommended to stick to Strife for this boss, as Wicked K’s melee attacks can be hard to see coming. I also cannot confirm this, but I believe this fight is automatically set to Apocalyptic difficulty no matter your current difficulty settings.
After defeating Wicked K’s, you’ll be rewarded with one of the best Cores in the game and the achievement, as well as having Chapter 17 be marked as completed on your level selection screen.
Are You Not Entertained?
Are You Not Entertained?Achieve a score of 70000 or higher in the arena.
Notes: In order to do this, you’ll first have to complete the game once to unlock the final Arena Challenges. After completing Challenges XIV to XX, you’ll unlock Endless mode, which is the only place where a score of 70000 points can possibly be reached, as every other challenge has a limited number of waves, and your score won’t go past 20000 even on the hardest ones.
SO, this means you’re gonna be fighting wave after wave of enemies, watching your multiplier go up so very slightly every five waves. The enemies you’ll be fighting will mostly be the same every ten waves, as they loop infinitely. I believe it took me 80 waves to reach the required score, but I went up to 100 for good luck, at which point I let enemies bash me to death.
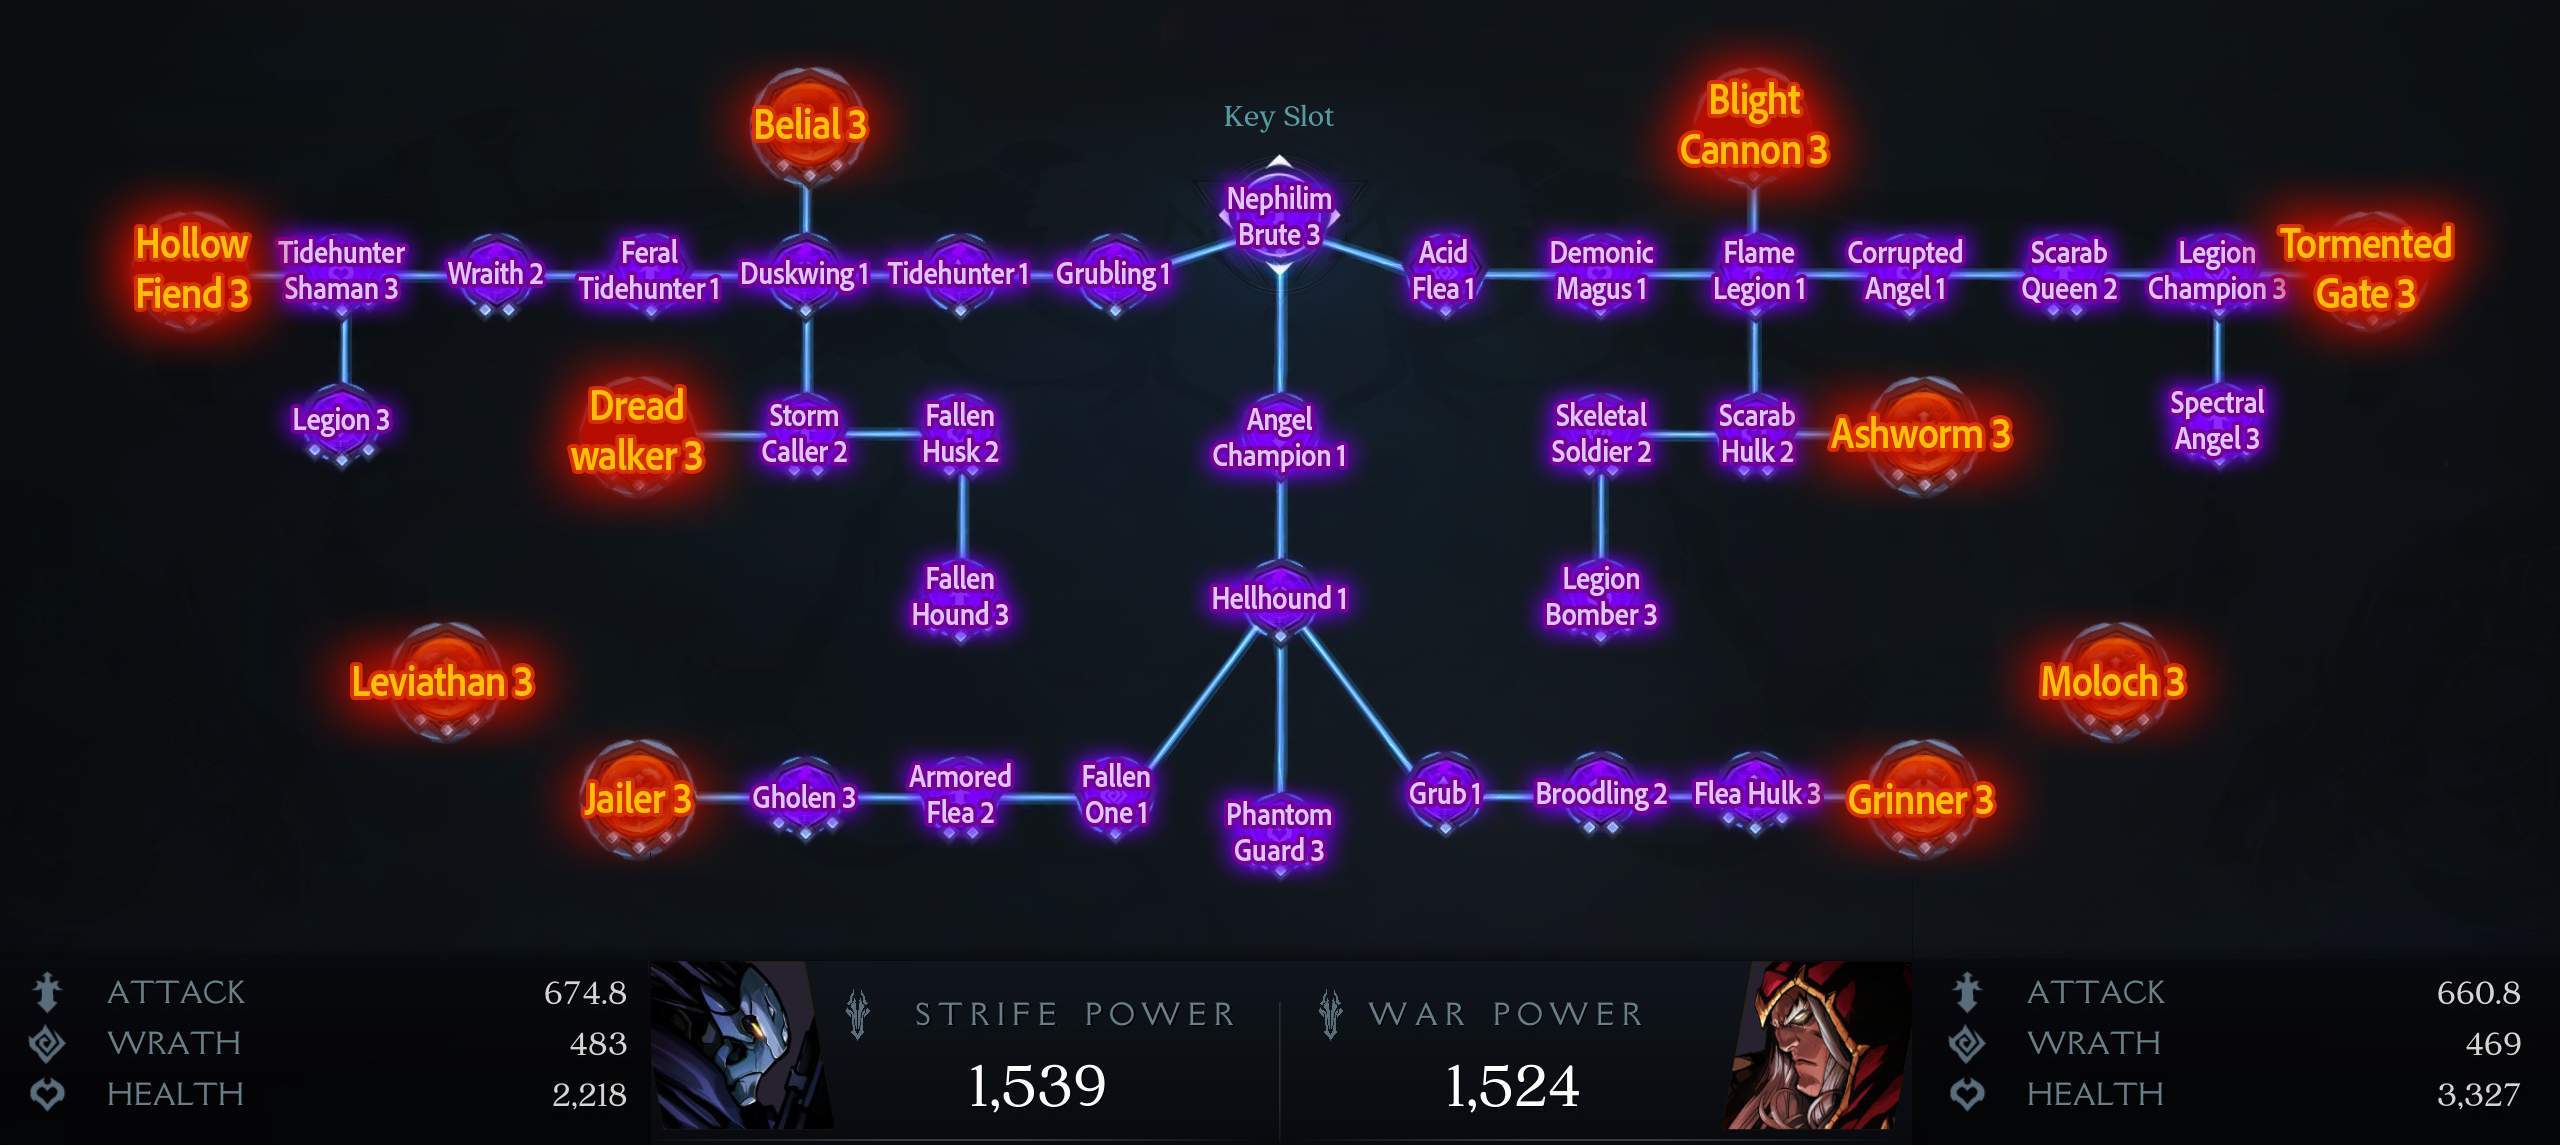
This challenge may seem daunting but it really, really isn’t. Of course, you shouldn’t attempt this without having first maxed out both War and Strife’s gear, armor, elemental upgrades and so on! You’ll also need a solid Creature Core build, with a power level of about 1500 and a focus on survival. I offer you this build below, which I used to great effect in the Arena, and never even came close to dying. Make super sure that you’re getting the matching type bonus for maximum effect. I would also recommend this build for Apocalyptic Difficulty.

Your primary strategy, especially with waves that feature a lot of enemies at once, should be to use Strife to build up the hotstreak meter, at which point you’ll be free to unleash your static shot for devastating results! I’m not kidding, Strife’s electric upgrade can carry you all the way to victory. But if you’ve made it this far, you probably already know that. All I can say is “Good luck!”, as there is no strategy to this achievement: Simply get a powerful build, and use Strife to destroy everything from a distance.
Collector
CollectorCollect every type of creature core.
Notes: This one is going to take a LONG time, even tho you technically only need the first level of every core, so you won’t have to grind out every core to level 3. That being said, some cores are rare, and one core in particular requires you to tackle a secret platforming challenge inside the Void to acquire it: The Leviathan Core.
The game has a total of 67 Creature Cores, separated into three main categories: Attack, Wrath and Health. Most orbs you’ll get from simply playing normally, as demons have a decent chance of dropping one upon death.
However, there are a lot of Cores that are not available through loot and drops, and will have to be purchased from Vulgrim. He’s got fixed versions you can purchase once, and randomized versions which will give you a randomly selected Core from a certain Chapter pool. The second option is great after beating the Arena, as you’ll have plenty of souls to spare.
Keep in mind: There’s one demon that doesn’t spawn anywhere other than in the Arena, the Corrupted Tidehunter. You’ll also need to beat the secret boss unlocked by opening all Trickster Doors, as he also has a core to drop for your collection.
In order to help you, I’ve also created a list of every Creature Core available in the game, in the order that they appear in the menu:
Name / Type
- Grubling / Attack
- Feral Tidehunter / Attack
- Spectral Angel / Attack
- Stormcaller / Attack
- Angel Champion / Attack
- Nephilim Brute / Attack
- Armored Flea / Attack
- Flame Legion / Attack
- Armored Legion Champion / Attack
- Scarab Queen / Attack
- Fallen Hound / Attack
- Molten Hound / Attack
- Void Magus / Attack
- Gholen / Attack
- Stinger / Attack
- Nephilim Vindicator / Attack
- Astarte / Attack
- Legion Boltsplitter / Attack
- Slag Demon / Attack
- Moloch / Attack
- Hollow Fiend / Attack
- Ashworm / Attack
- Jailer / Attack
- Leviathan / Attack
- Fallen One / Wrath
- Grub / Wrath
- Tidehunter / Wrath
- Corrupted Tidehunter / Wrath
- Slag Flea / Wrath
- Acid Flea / Wrath
- Legion / Wrath
- Skeletal Soldier / Wrath
- Skeletal Archer / Wrath
- Legion Champion / Wrath
- Demonic Geomancer / Wrath
- Trauma / Wrath
- Shadow Caster / Wrath
- Wraith / Wrath
- Dagon / Wrath
- Dreadwalker / Wrath
- Blight Cannon / Wrath
- Legion Siegemaster / Wrath
- Wicked Killington / Wrath
- Construct Champion / Wrath
- Corrupted Angel / Health
- Inferno Angel / Health
- Tidehunter Shaman / Health
- Scarab Hulk / Health
- Flea Hulk / Health
- Hellhound / Health
- Ghoul / Health
- Legion Bomber / Health
- Demonic Magus / Health
- Toxic Scarab / Health
- Fallen Husk / Health
- Borrower / Health
- Suffering / Health
- Phantom Guard / Health
- Duskwing / Health
- Broodling / Health
- Legion Shieldbearer / Health
- Mammon / Health
- Belial / Health
- Grinner / Health
- Houndmaster / Health
- Angelic Beast / Health
- Tormented Gate / Health
Garden of Forking Paths
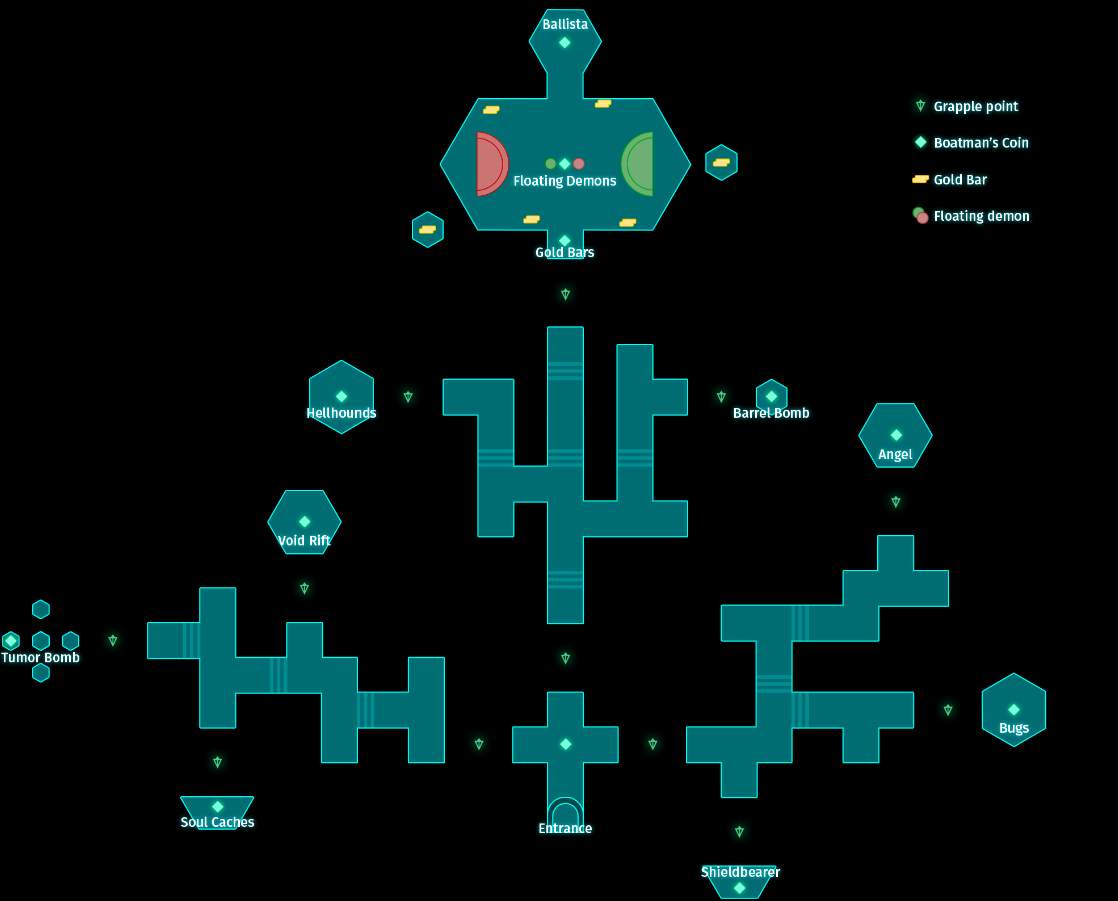
Garden of Forking PathsCollect every Boatman Coin in the Boatman’s Labyrinth.
Notes: This is a bit trickier than it sounds. The Boatman’s Labyrinth is technically accessible from the moment you finish the first Chapter, Dethroned, and access the Void. Simply head towards Dis’ shop and go through the large door at the back. You’ll get to collect the first coin immediately, but every other one will require you to complete a side quest during a main Chapter of the story, ranging from the destruction of the two ballistae in the first Chapter, to the collection of gold ingots in the third Chapter, Inferno Vault.
Let’s start with a map of the place:

You’ll notice there are twelve Coins in the maze in total, despite there being eleven Chapters with optional objectives. That’s because the first coin in the Labyrinth, right at the entrance, does not count towards the achievement and is available from the start. Here’s a list of the objectives you’ll have to complete before the coins become available:
- Ballista – Chapter 1, Dethroned: “Engines of Destruction” Destroy the two ballistae attacking Samael’s fortress. They’re both found a bit outside the beaten path, but nothing crazy. Once the objective has been completed, head to the newly spawned ballista in the Boatman’s Labyrinth and fire it three time. It’ll explode and the Coin will spawn.
- Soul Caches – Chapter 2, The Slag Pit: “Open the Soul Caches” Find and destroy every Soul Cache in the Slag Pit. You can check out the “Soul Cache” section of this guide for an easy time. Once the objective has been completed, head to the Soul Caches Island in the Boatman’s Labyrinth and simply blow them up to spawn the Coin.
- Gold Bars – Chapter 3, Inferno Vault: “Hell’s Forge” Find and collect every gold ingot in the Inferno Vault before bringing them to the Forge and activating it. You can check out the “Hell’s Forge” section of this guide for an easy time. Once the objective has been completed, head to the northern island in the Boatman’s Labyrinth, and collect the six newly spawned gold ingots. The Coin will then spawn at the entrance of the Island.
- Void Rift – Chapter 4, Icebind Cavern: “Close the Rift” Find and close the void rift in Icebind Cavern. You can check out the “Close the Rift” section of this guide to find out where the rift is located. Once the objective has been completed, head to the Void Rift island in the Labyrinth, and simply interact with the rift to spawn the Coin.
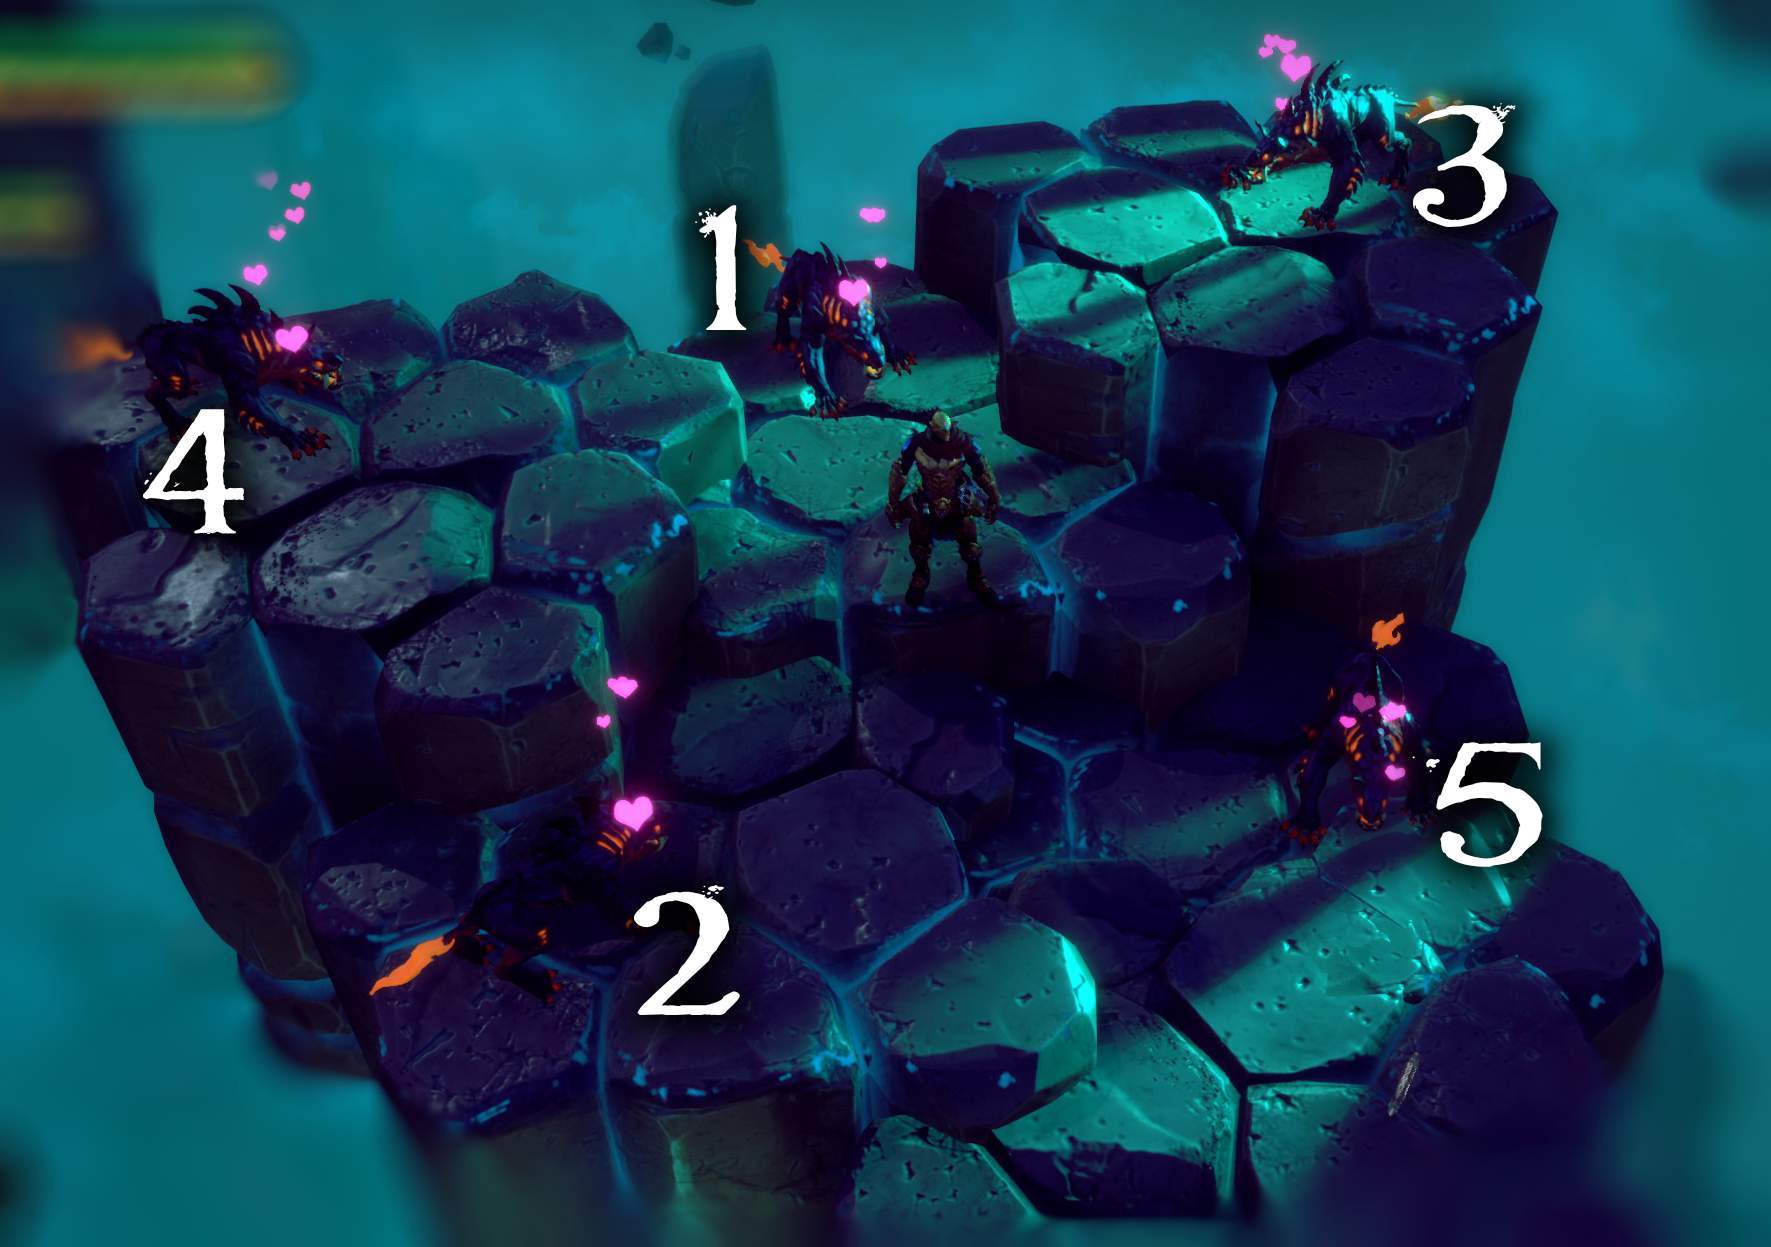
- Hellhounds – Chapter 5, The Hoard: “Cruelty” Find and kill the Houndmaster in The Hoard. This requires you to enter the Hoard through the secret entrance that is found south of the main gate, and to kill the Houndmaster itself. This does not require you to kill less than five hounds, as that is another achievement entirely. Once the objective has been completed, head to the Hellhound Island in the Boatman’s Labyrinth, and…pet the dogs. You’ll have to pet them in the correct order, shown below. They’ll emit hearts if petted correctly. With all good doggos satisfied, the Coin will spawn.

- Shieldbearers – Chapter 7, Decay: “The Dead Court” Find and kill all three Dreadwalkers in Decay. This can technically be missed, as only two of the three Dreadwalkers have to be killed for the Chapter to be completed. You can check out the “The dead court” section of this guide for extra details. Once the objective has been completed, head to the Shieldbearers island in the Boatman’s Labyrinth, and glide over the three Skeleton soldiers to collect the Coin.
- Floating Demons – Chapter 8, The Holdback: “Staunch the Flow” Find and turn every valve in the level before heading back to find out what lies at the bottom of the lake of corruption. Once the objective has been completed, head to the northern island in the Labyrinth, where two floating demons have now spawned. Push them around until you get them into their respective goals, and the Coin will spawn in the center of the island.
- Angel – Chapter 11, Bastion’s Fall: “Good Deeds” Save the uncorrupted Angels in the Bastion. You can check out the “Good deeds” section of this guide for an easy way to save them. Once the objective has been completed, head towards the Angel in the Boatman’s Labyrinth, and simply interact with them to get the Coin to spawn.
- Bugs – Chapter 12, The Maelstrom: “Infested” Defeat the Grub Queen in the Maelstrom. This is accomplished by trashing all three bug nests in the level, which causes the queen to spawn. Simply kill her and the quest will be marked as completed. You can also check out the “Infested” section of this guide for more details. Once the objective has been completed, head towards the Bug Island in the Labyrinth and squash all of them, using guns, swords and feet. With all of them dead, the Coin will spawn.
- Tumor bomb – Chapter 14, The Dredge Works: “Saboteur” Destroy every mining drill that powers Moloch’s mining operation. This is accomplished by first finding the drills themselves out in the desert after the barricade, and then hitting them with a growth bomb to make them explode. There are three of them, all of which are easily visible on the map with their rectangle shape, and there’s usually a growth bomb available nearby.
- Red barrel bomb – Chapter 15, War Machine: “Ready to blow” Blow up all 12 supply caches in War Machine. These supply caches are scattered throughout the level and take the form of piles of crates accompanied by a single red barrel bomb every time. For their locations, see the map provided in the “Ready to blow” section of this guide. With all caches destroyed, head towards the red barrel bomb in the labyrinth and simply blow it up to collect the final Coin.
Difficulty-Related
Full of HellComplete all 17 levels on Hard difficulty.
Notes: Hard Difficulty is the third highest difficulty level out of five, and provides a nice mixture of challenge and fun. I recommend switching the game to Hard Difficulty for your second playthrough as you go through levels again to collect your missing upgrades and Boatman Coins, farm souls, etc.
You can switch the Difficulty mode on the level select screen any time you wish between missions, and you do not need to complete every mission on a specific difficulty in one go. Progress is saved and the game will remember what levels you have completed on every difficulty even if you switch to an easier/harder one, meaning you can tackle the levels in a nonlinear way if you so choose.
Note that in order to unlock this achievement, you must also beat the secret seventeenth level, which only contains a boss. It is unlocked after obtaining and using every single Trickster Key, and then heading to the door left of Vulgrim’s shop.
The Promised EndComplete all 17 levels on Apocalyptic difficulty.
Notes: Apocalyptic difficulty is the highest difficulty level in the game, and is the toughest challenge the game will throw at you, should you choose to tackle it. It is unlocked after beating the game’s story once and sets every level’s recommended power level to 1900. Even with the most optimized builds you could possibly conjure, the highest power level you’ll reach will be around 1600 (speaking of which, I recommend using the same build as the one I used for the Arena, which you can find in the dedicated section above called “Are you not entertained ?!”).
This makes this difficulty impossible to beat, right? Well, not really. Enemies deal a LOT of damage, but their health isn’t that insane, so you’ll be able to take them down about as fast as on Mayhem Difficulty.
To give you an idea, I’m nowhere near a pro at this game, and it only took me three hours to get this achievement, with no game over screens (due to both Horsemen dying). I died a couple of times, usually when some demon managed to attack me by surprise, but my second character was there to pick up the slack.
Same as with Hard Difficulty, beating the secret seventeenth level is required.