Gran Turismo’s Future: “4K Resolution is Enough”, But 240fps is the Target

Kazunori Yamauchi has made some interesting comments about the future direction of Gran Turismo’s graphics. The Polyphony Digital studio boss has suggested that frame rate, rather than display resolution, may be the area in which the next titles in the series look to improve.
Yamauchi was participating in a round-table discussion with local Australian media. The questions naturally centered on the FIA event itself, but he took wide questions on GT Sport and the Gran Turismo series as a whole.
Naturally, given Gran Turismo’s reputation for pursuit of graphical fidelity, one question looked out how the series might evolve with the next generation of consoles. We’ve already seen GT Sport used to showcase 8K resolutions, and 8K is a key feature for PS5, so Yamauchi’s answer came as something of a surprise.
“I think, display resolution-wise, 4K resolution is enough.”
Given Sony’s promotion of the PlayStation 5’s abilities with 8K resolution it’s interesting to hear one of its leading first-party studios remark that it might be too much. Certainly players have few complaints about the detail offered in GT Sport, so Yamauchi’s point has good foundations.
Where Polyphony Digital is looking to improve is with frame rates. On the PS4 Pro, GT Sport will hold to 60fps in the frame-rate priority mode, but that’s not what Yamauchi is targeting for PS5. Instead he’s looking at using the PS5’s increased power to move that mark upwards:
“Rather than a spatial resolution that you’re talking about, I’m more interested in the advancements we can make in terms of the time resolution. In terms of frames per second, rather than staying at 60 fps, I’m more interested in raising it to 120 fps or even 240 fps. I think that’s what’s going to be changing the experience from here on forward.”
Higher frame rates allow for a smoother perception of motion, something potentially useful in a racing game where cars are moving in close quarters. At 60fps your screen could display an opponent’s car only to within five feet of where it actually is, but that falls dramatically as the frame rates increase — something that can only improve the racing experience. That is assuming your display is capable of those frame rates.
Yamauchi also noted that the increase in power from console generation to generation is, over time, resulting in diminishing returns: “Going from PS1 to PS2 there was a hundred times the performance difference between the two console generations. An advancement like that is no longer possible.”

Wolcen: Lords of Mayhem – Starter Guide (for Beginners)

This guide will show most important information for newbies.

Beginners Guide

Creating Your Character

Upon starting the game, players will be given the option to customize their character, from choosing the gender and various cosmetic options. And after that, players will get to choose their starting weapon from three options, a sword for melee combat, a bow for ranged attacks, and a staff for conjuring magical properties. Do not stress yourself out in this part and simply choose what you think is fit for your playstyle. Choosing your starting weapon simply means selecting your starting gear and skills, Wolcen: Lords of Mayhem does not have any classes and as you progress throughout the game, you’ll have the freedom to build a character as you want it to be, from equipping of up to two different types of Weapons, discovering and equipping various Active Skills, and eventually choosing the path you want to take via the Gates of Fate (Passive Skills).

Aspects of Apocalypse

Aspects is a special combat mechanic of the game, during the prologue, you’ll get to feel how this mechanic works in combat. Once you reach the end of Chapter 1, you’ll be given the chance to unlock and choose your first Aspect. Activating an Aspect of Apocalypse transforms the player’s character into a Primordial Being and allows the manifestation of both the being’s form and abilities. So when you get to the point of selecting which Aspect you’ll want, take your time, read the information on the four different aspects and its abilities to better understand which fits your playstyle. Press [F] to open the Aspects interface to learn more about it or to unlock a new Aspect, this can be switched at any time. Players will need to collect Primordial Essence and fill the PE meter by killing enemies, once it is full, press [R] to transform, the meter will start to deplete over time when you use Aspect Abilities or when you take damage. When it’s fully depleted, you’ll transform back into your human form – remember, use your Aspect wisely.

Learning Active Skills

In Wolcen: Lords of Mayhem, learning an Active Skill is quite different. Normally, in an ARPG, you choose a class, level up your character to obtain a Skill Point and spend it on unlocking the skill you want. But in this game, Active Skills that are mainly used in battle are unlocked or learned through using an Enneract. There are two ways to obtain an Enneract, it can be looted from killed enemies, found inside chests, while the other option is by purchasing it from a merchant named Demetra who can be found in Stormfall. It is a good practice that you always check in on Demetra’s inventory since the items refresh daily, who knows, you might find a skill worth buying. Now, for an Active Skill to level up, it needs to be equipped and used OR spend Primordial Affinity and manually force it to level up. Primordial Affinity is an in-game currency that can be used to level up your Active Skills and to respec your Passive Skills. In order to obtain Primordial Affinity, if you’re in Stormfall, you can sell it to Demtra and you’ll be provided with PA, but if you’re out in the field and you need to get rid of an Enneract that you’ve already learned, right-click on it to consume it, and it will instead provide you with Primordial Affinity.

The Gate of Fates

The Gate of Fates is the character progression of the game where players will be able to unlock various Passive Skills that will fully mold their character’s overall effectiveness in combat and playstyle. Press [P] on your keyboard to open up The Gate of Fates, now, do not feel overwhelmed when you see the interface, you’ll immediately notice that there seem to be three different colors, Red, Green, and Blue. To understand what that means, the blue nodes represent a path that focuses on strengthening magical properties, the red nodes focus on melee damage, while the green nodes are for range attacks and outputs. So, if you want to build your character’s archetype as a mage, focus on unlocking Blue nodes. If you want to be a Rogue and specialize in long-range attacks, follow the path of the green nodes, and if you prefer to be a fighter who specializes in close-quarter combat or if you want to build a tank-type character, invest on unlocking the red nodes. Next, you’ll also notice that there’s a wheel at the left side of the interface, this means that your character can become a hybrid who specializes in different areas and have the complete freedom and control of which path you want your character to take. Once you start to choose your first passive skill, you’ll start off with the inner circle, and eventually make your way to the second and third-tier (provided that you’ve met certain prerequisites) and you can rotate the wheels to change its path. Apart from that, you’ll also notice that there are two types of nodes, the smaller nodes provide smaller buffs, while the larger nodes grant higher properties. So always look at the path of each node and read its properties to better understand and familiarize yourself with what path you want your character to take. If you make a mistake, you can respec your skill points with a price, and that is by using Primordial Affinity.

Farming Gold

Farming gold or money is easy in Wolcen: Lords of Mayhem. There is a chance that gold can be found inside barrels, boxes, coffins, vases, monster sacs, and more, all you have to do is break it. So make sure to break as much as things you want whenever you are exploring, it’ll save you time to return to Stomrfall and sell any unwanted items. Another thing is to look out for an icon that has a golden ladybug on the mini-map. These are “Wealth Omens” that will appear from time to time, you’ll need to constantly attack them for it to drop a significant amount of gold and make sure you follow it or it’ll disappear when it is far away from you, successfully killing these critters will drop more gold along with some bonus item or equipment.

Fast Travel

If you need to return to Stormfall, you can use the Town Portal to travel back instead of opening your map and using a waypoint. Using a Town Portal will allow players to return back to the previous location, just make sure that you are in a safe spot and position since activating a Town Portal has a 4-5 second cast time. On the other hand, a Waypoint is considered a checkpoint that is usually found and unlocked for Fast Travel purposes. If you’ve unlocked a Waypoint, enter the World Map and click on the Waypoint you wish to go to and this will transport you to that location – using a Waypoint does not leave a portal.

Wolcen Builds for Wolcen: Lords of Mayhem are an arrangement of a character Skills and Equipment that define a specific set of playstyle or highlight a certain natural strength of character. Builds are created by users and as such their performance is varied, and should not be taken as a requirement or objective of the game.

Besiege – Comprehensive Braces and Bracecubes Guide (with GIFs)

A comprehensive guide with pictures and gifs explaining everything there is to know about Braces. Including Bracecubes, Warped Braces, Connection points and much more.

Guide on Bracecubes, Warped Braces, Connection Points

The Basics

Braces are blocks that you can use to connect other blocks together with. They don’t have any collider, in other words, they can’t touch anything if they aren’t connected beforehand. As a result, any brace that is not connected will fall through the ground and disappear.

Placing them can be strange at first, at least in comparison to how you would place other blocks. You begin by placing the first end on the block you want it to start on, then you need to hold the mouse-button and drag it to the block you want the other end to connect to. When you have it in the correct place, release the mouse-button and it will place itself.

Usage

Braces are important for the structural integrity of the machine, and it can be used to connect things that may overlap when the machine is in simulation mode, due to it not having a collider.


Moreover, braces can be used in “reaction-wheels” or “torque-steering”, where a wheel spins one direction, so the machine turns the other. The reason why this steering works is because braces for some reason have a much higher angular drag compared to all other blocks in the game. This doesn’t make any sense when you compare it to real life. If you don’t understand why or what that is, you could imagine that braces are in some sort of liquid, like water or honey as they turn and spin, and not in normal air which all other blocks are.

Essentially, braces “feel” heavier when they’re not and can therefore be used as steering.


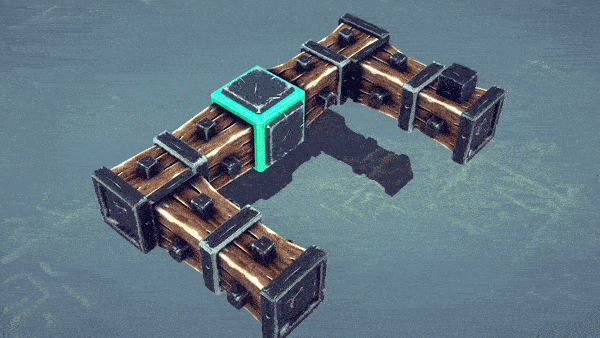
Another useful thing about braces is that you can use them for bodywork / paneling when building smooth looking machines. This is generally done using bracecubes. (See the next section)
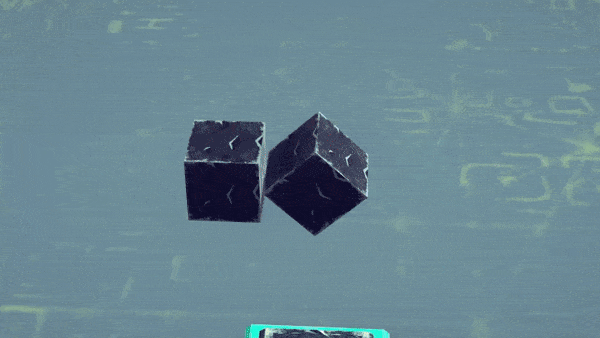
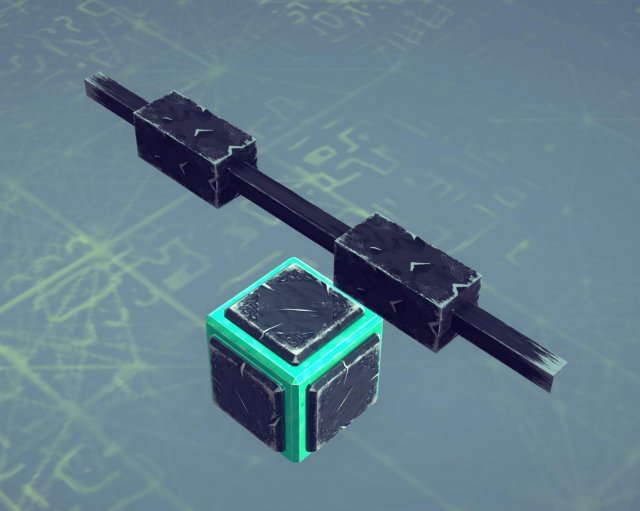
Bracecubes

Moving away from the basics, and all that you need to know in order to complete the levels, braces can be useful when creating machines based on aesthetics.

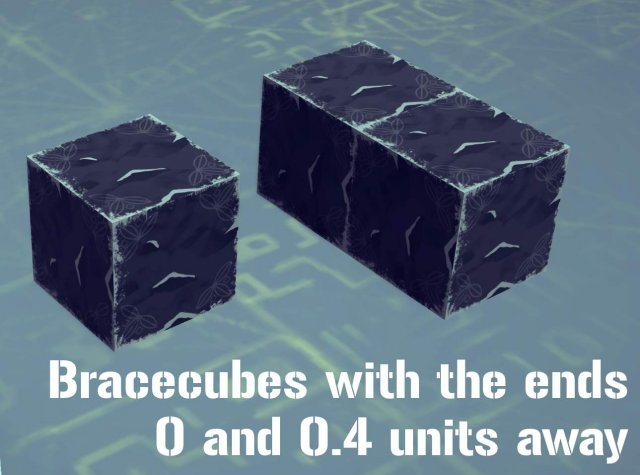
“Bracecubes” are simply put a brace where both ends are at a 0 distance from each other, creating a cube. Hence the name Brace-cube. There are similar braces you can create where both ends are 0.4 units away from each other, creating a longer one. This can sometimes be useful if you don’t use any mods.

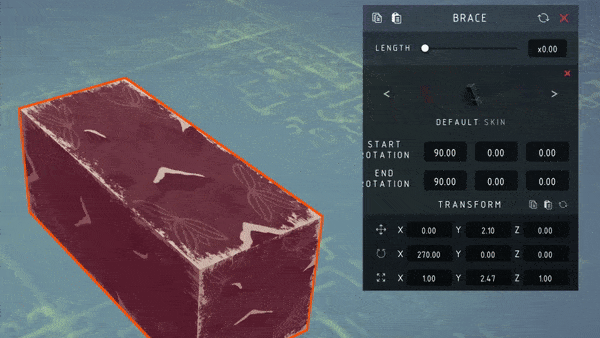
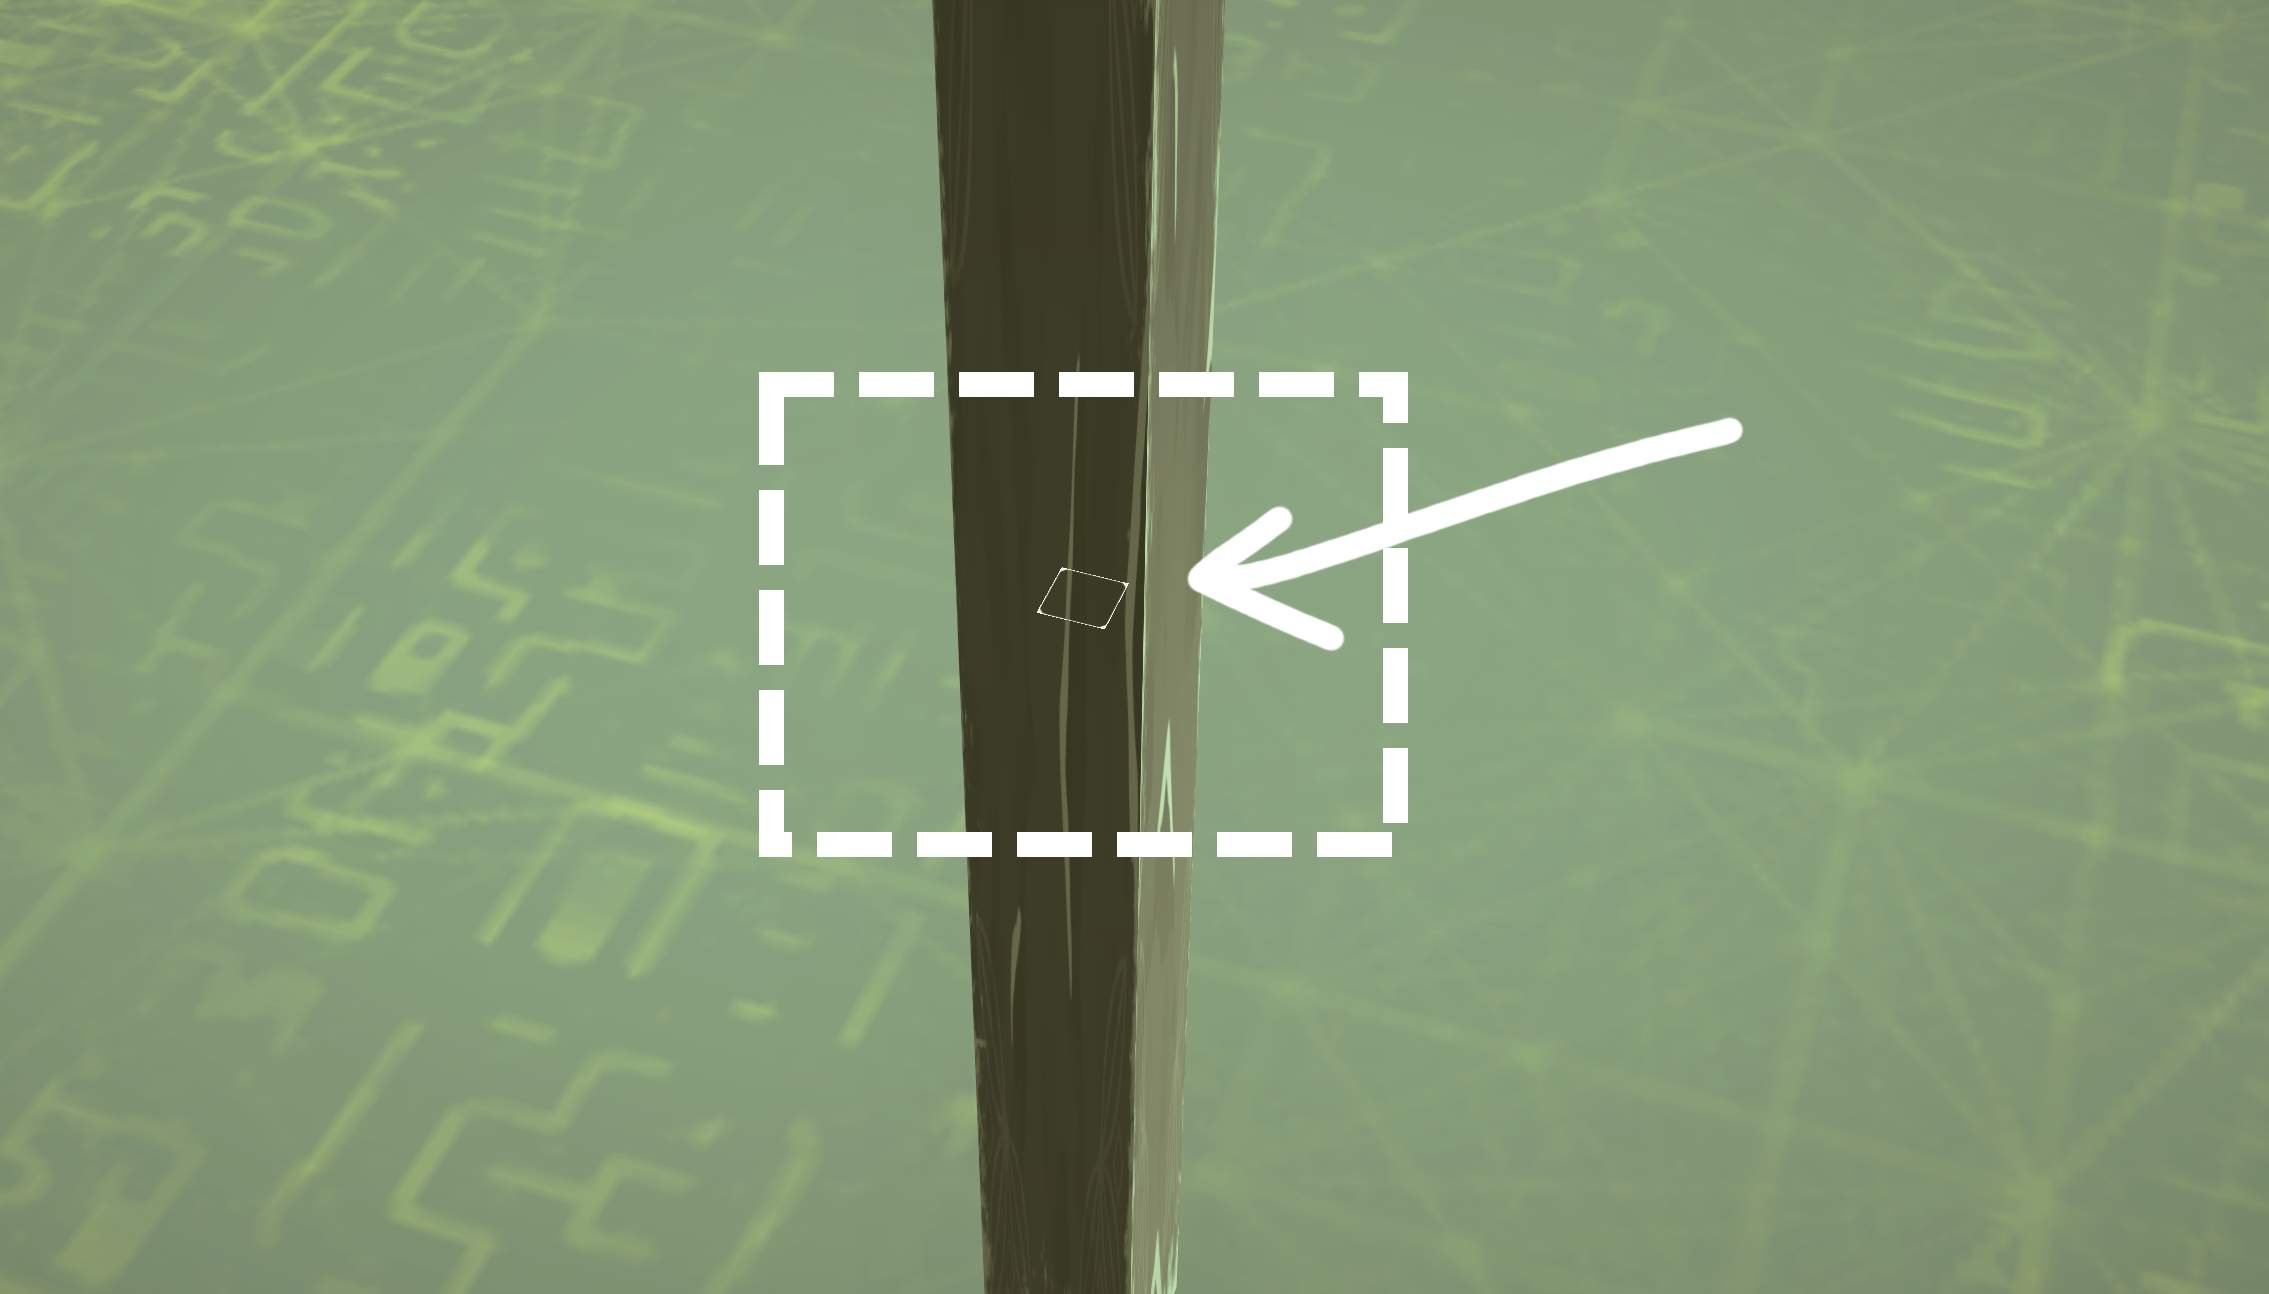
Perhaps you are completely new to all this, but want to learn how to place the ones with 0.4 distance. You need to begin by enabling the Advanced Building option in the top right when in a level or the sandbox.

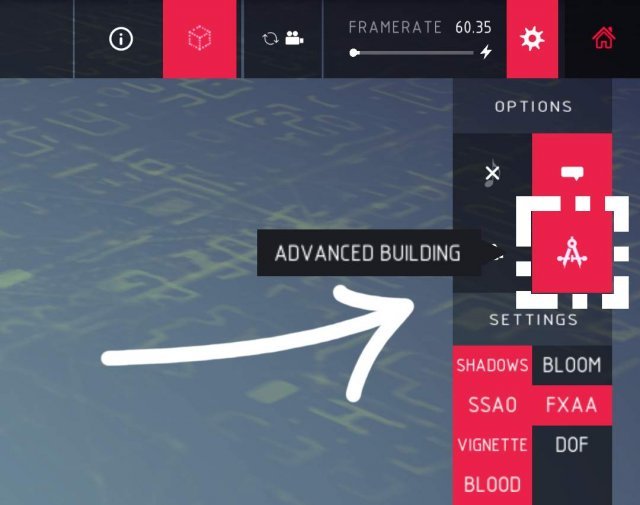
With the Advanced Building turned on, you can select blocks, move them and rotate them. If you want to make the 0.4 Brace, place a block and move it inwards by 0.6 units (as shown in the picture). Then simply place the brace and drag them between the blocks.

This can of course be done differently, and if you are precise enough, you might be able to create a 0 distance bracecube this way, but I wouldn’t recommend that.

  • Instead I would recommend downloading the bracecube mod from the steam workshop.

I won’t go into detail of how to use the mod, but it adds a slider where you can adjust the length of the brace and it adds a new bracecube-block in the block section. Note: while it’s a “new block”, all it does is to place a vanilla 0-distance bracecube. You therefore don’t need the mod to use creations that are built using it. In addition, the mod allows for you to manually input the rotation of the brace ends. This will be useful when trying to “warp” them (See the Warped bracecube section).

Bodywork

As I said before, they can be used as bodywork and paneling to make things look good.

But how? They’re just cubes…

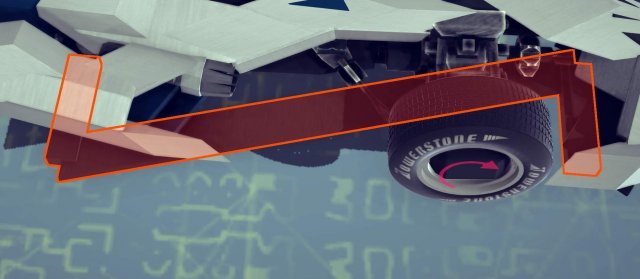
That’s exactly the reason why, they’re simple geometric shapes, so if you have any scaling mods you can scale them how ever you’d like. But you have to be aware that the connection area the braces have, correlates to the largest scale it has in one direction (This will be explained in the Connection point / Trigger section). And they’re not just simple geometric shapes, they also don’t have any collider. This allows you to create sections where blocks go straight through the bodywork. An example would be around the wheels on realistic looking cars so the wheels don’t bump the bodywork causing it to break off.

I can’t explain what makes the bodywork look good. This can be compared to drawing. I can’t really say what you need to do to make a drawing look good, but I know that you can look at what others have made, and try to make similar things yourself. If the reason to why you clicked is to learn how to make good looking bodywork, I hope you understand that it can’t really be taught. Only practice makes perfect for this.

  • The scaling mod I recommend is Block Transform Mapper. But there are others as well. Notably Easy Scale, Hardscale and PBP4
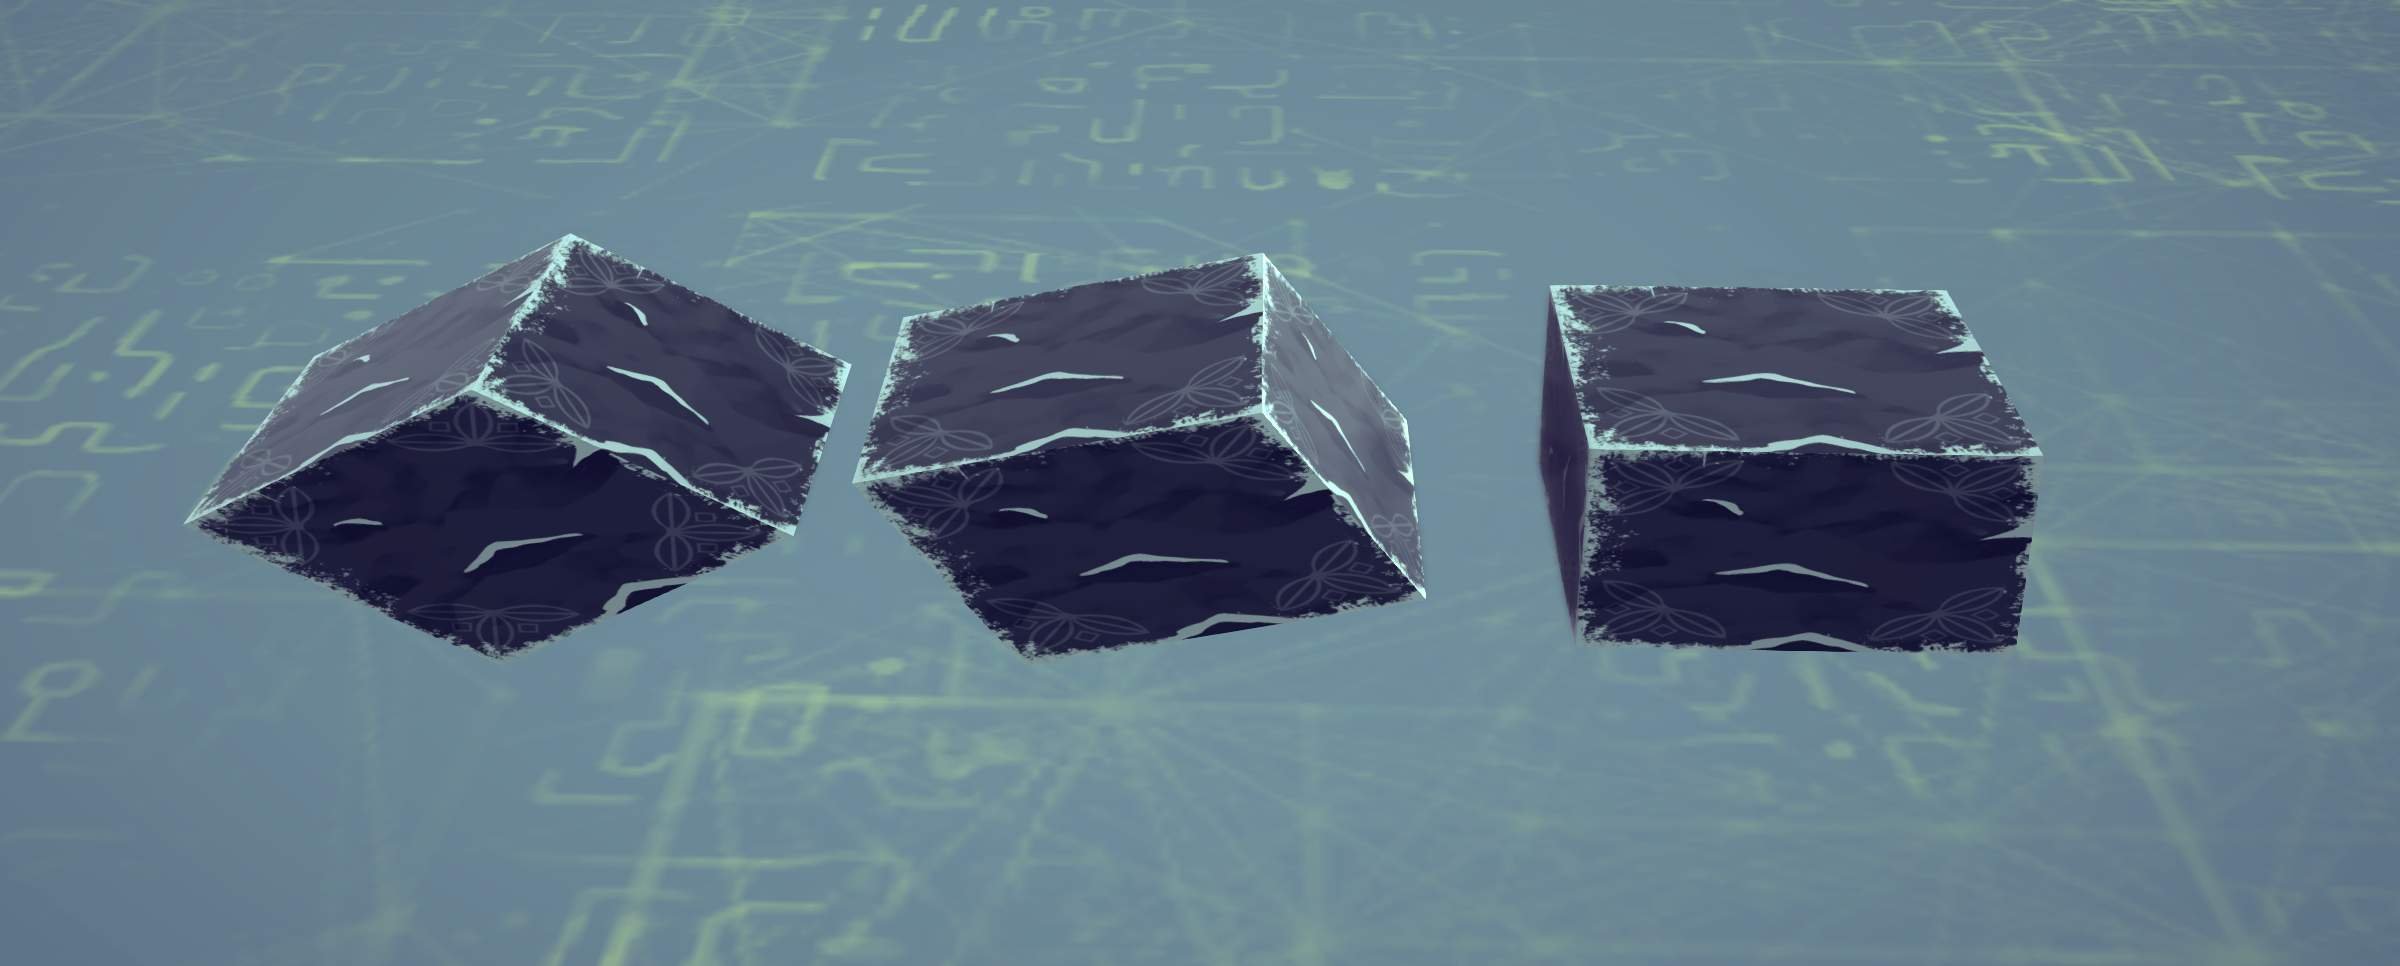
Warped Bracecubes

Images are probably the easiest way to describe what they are.

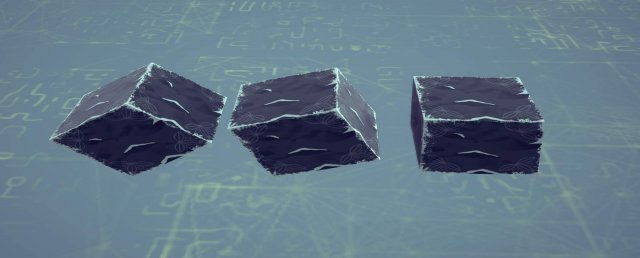
The reason why they look like this is because the entire brace is scaled, not each endpoint by themselves. See image below


These can be used the same way normal braces are used, but they can be vastly different shapes and the connection point / trigger area is smaller. With enough practice, you can often use less blocks by having the correct warped brace instead of the blocks you would have used otherwise. But you can easily replace areas where you need to fill in an edge that isn’t just 90 degrees.

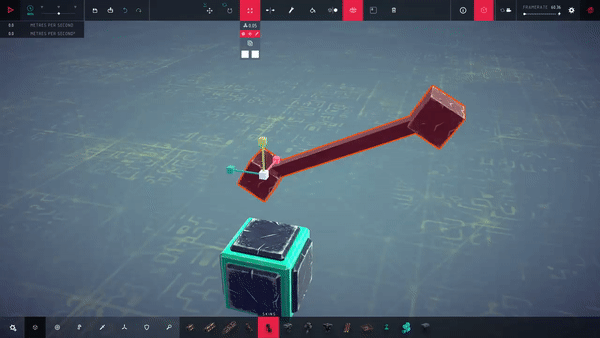
There are two easy ways to create them. The first way is to duplicate a brace when you are rotating it at the same time. This can be done by holding down the rotation gizmo, and duplicating with Ctrl + D As shown below.


How much you angle it before duplicating it is how much the warp will appear to be “warped”. Scaling is of course as important for creating the right shape when warping as well.

The other way is to use the bracecube mod and editing the values yourself.


It’s also worth noting that you can warp it as many times as you would like, and in as many specific rotations as you would like. If the brace is warped more than two times, on two different axis, they are sometimes called “Double-Warped bracecubes”.

You can of course warp “normal” braces as well.

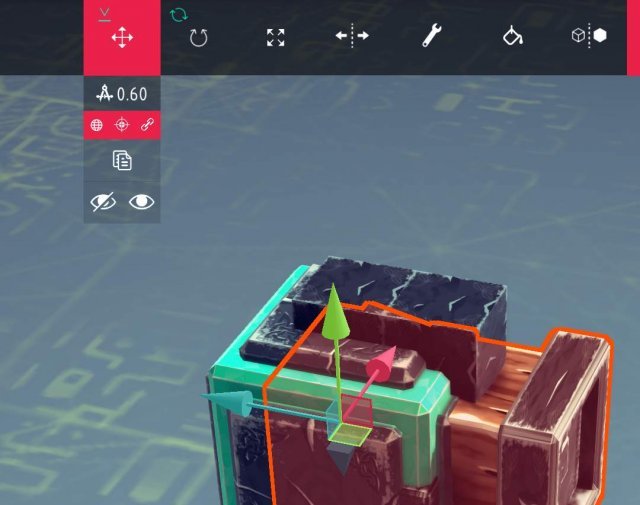
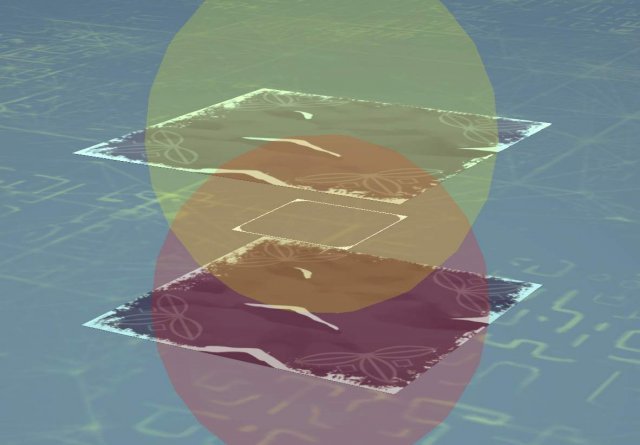
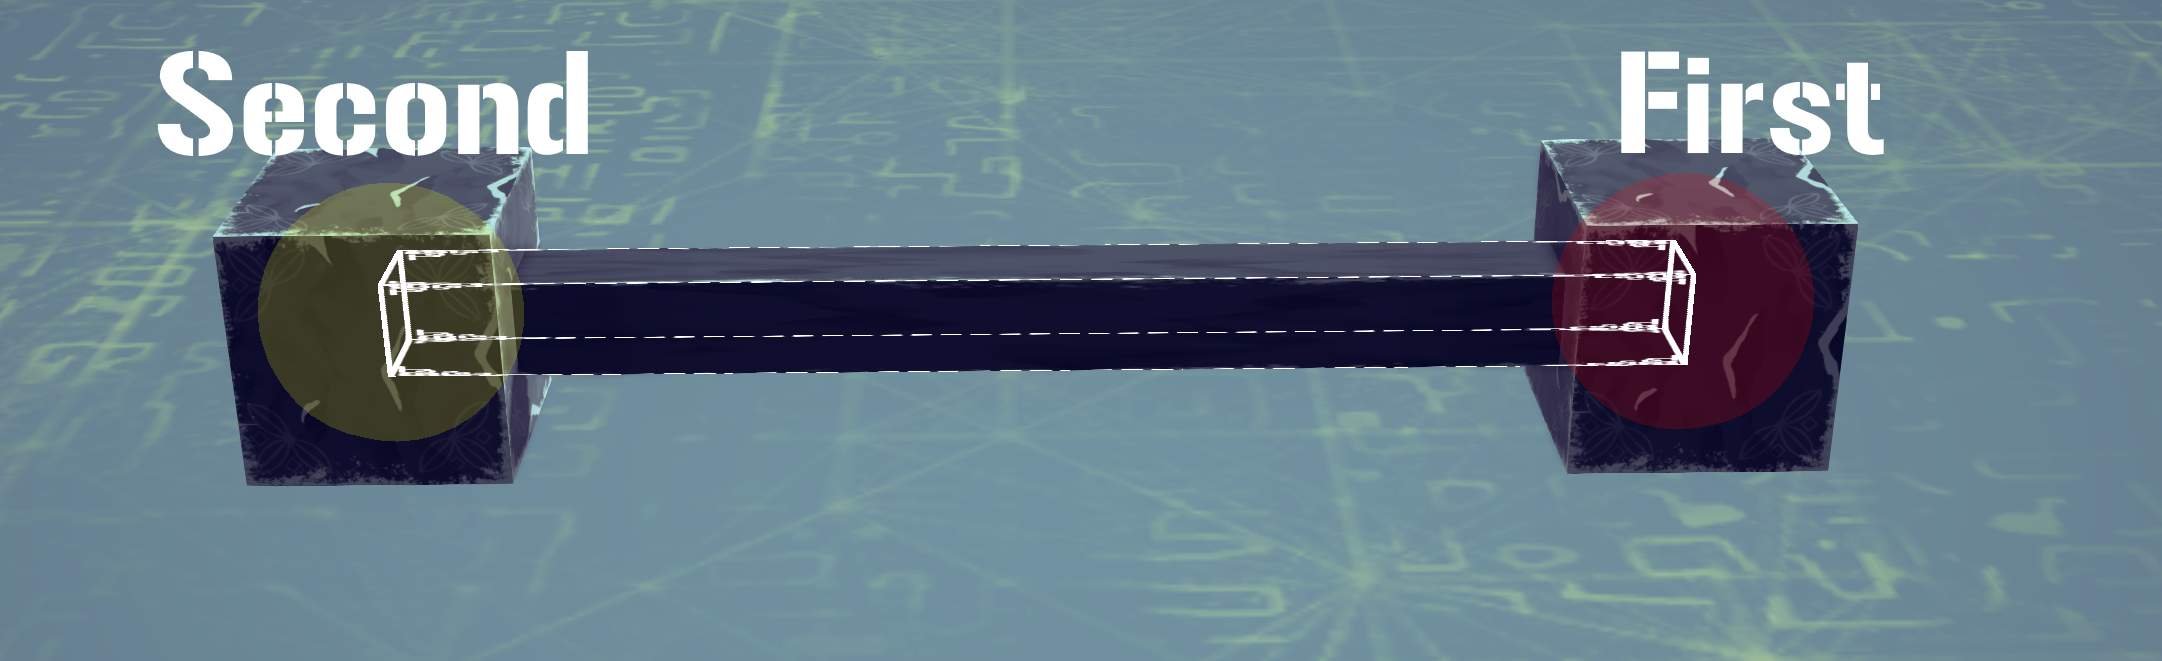
Connection Points / Triggers

The first end of the brace has the same connection point / trigger as the majority of blocks. It is always spherical and connects only to one other block. The other end of the brace has a different trigger which can connect to many blocks at once. It becomes a spherical super-glue connection.

Additionally, if the first end is connected to a block, but the second isn’t. The second trigger will remain “sticky” for approximately 1 second after the simulation has started, meaning that it will work similarly to how grabbers work during that timespan. But instead of attaching to everything, it only attaches to attachmentpoints and certain types of colliders (Cyan-ish color, and green with the Colliderscope mod posted further down)

When building and scaling braces or bracecubes you need to be aware that these connection points always stays as a sphere. The size of the sphere is based on the largest size you scale the block to. Let’s say that you create a slim, but long bracecube. This will be the size of the trigger.

This can both be used to your advantage, or in some cases where you don’t want everything to connect, it can be quite bad.

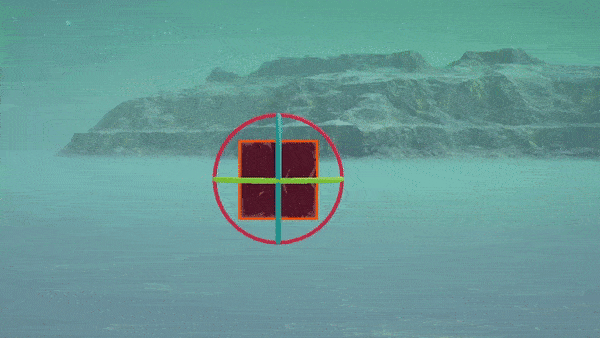
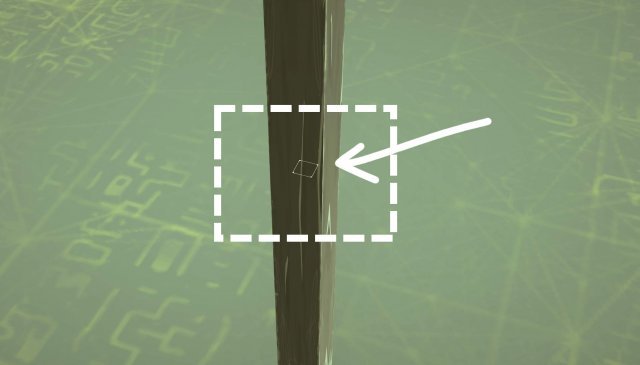
Another thing about the brace triggers is that in order to select a brace, you need to select the bar in between each end. With a 0 distance bar like the ones in bracecubes, it will be extremely difficult to select braces unless you know where the bar is located. Here is the small area you can select based on the previously shown long brace.

  • You normally can’t see this without the Colliderscope mod. So I stronly recommend downloading it to see all the different triggers and connection points

With the Colliderscope mod installed, you can easily see how warped braces always have a smaller connection point compared to normal ones with the same size.

Additional Notes About Braces

BES

There are always strange behaviours found when using braces. An example that can cause a lot of problems, but can be quite useful when used properly is the so called “BES” by many of those who use it.

The name BES (Brace Entanglement Stabilization) comes from another name “VES” (Vector Entanglement Stabilization) both named by the user Neon. VES is a glitch used by creating a 2d scaled spring into a stabilization device. The brace version is similar, hence a similar name, but with a B instead. But it’s not the same (Which is why I think the name isn’t the best). It’s created when you scale down a “normal” brace with a bar in the axis that the bar is pointed. Anything under 1.00 will give a slight effect of this, but when it becomes 0.1 down towards 0.001, effects start happening. It becomes really stabilized and effectively the block it is attached to as well. It is essentially pushing away the center of mass of the creation down towards infinity. There are however side-effects. BES will start to “wobble”, but it’s really really slow, and since it’s so strong, whatever is attached will most likely flip and get crushed in doing so.

Testing is still needed about it, but there are ways people have found to stop this from happening as you might want to use a brace that is smaller than 1.0 in scale. An easy solution, perhaps not the prettiest, is to simply duplicate the brace, turn it 180 degrees, and move it so the startpoint is in the endpoint of the other brace. Mirroring it over essentially.

Long / short midpoint

When scaling normal braces, you can also see that the bar in the middle doesn’t scale properly. I generally don’t like that this happens, but I know that it can be utilized. I have for example seen cars use these midpoints as decoration, and with the right angles you could probably create various shapes you wouldn’t have been able to create otherwise.

Besiege – Control Unit Guide

Control Unit is a system which automatically chooses its logic route according to the inputs.

Control Unit Overview

Term Explanations

In case you have no idea what I’m talking about in the following paragraphs, here are some unpopular terms you’re about to see:

Cube

A Cube placed just to store events and runs it.

Variable

A Variable which you can modify it via “Modify Variable” event.

Gate(s)

A logic gate, including an “Event Trigger” and “Events”.

Event Triggers

In this guide, it represents the “On variable” event.

About Variable “+0”

When a cube is deactivated, any variables written into it does not trigger any gates inside the cube, which means the cube’s “Event trigger” has the variables but not reacting.

But then when it comes to activating the cube, the event triggers still remain silence, Thus we need the “+0” logic, for it forces the event triggers to re-detect the variable’s current value.

So here we have one of the most basic and important feature a control unit need: Capabilitie of Reading the stored inputs.

Logic Gates

Now things get a little complicated here, a control unit doesn’t have a standard pattern, it is totally depending on who made it.

So to solve this problem I’ll just make the first standard model and show you how it works.

I’ll give it two “output” events and one “End” event for each gate, and all the stored value vanishes after used, two gates in total (Gate1 and Gate2).

Process Overview

Here’s how it work:

Wolcen: Lords of Mayhem – Plague Assassin Build

This guide will show a high mobility poison spreading monster of a build.

Guide to Plague Assassin Build

Passives

Stats per level: 2 Toughness 8 Wisdom

Gear

There is only one piece of gear that is “needed”. I am currently using the unique dagger “Edict. 2.1.4.1.7.” This dagger really makes this build what it is. Other than that I have pretty much random gear. Heavy chest and helm to take advantage of Salvatory Anchor. the rest is mostly heavy with a couple bruiser pieces.

If you do not have Edict dagger. This can be run with other one hand melee weapons as long as it has Toxic procs.

Skills

  • Plagueburst – Swarm, Rapid, Infection, Smog, Vitiation, Mortiferous, Bio. Swarm, Smog and Vitiation being the most important.
  • Aether Jump – Quantum, Escape, Flight, March, Breath, Time.
  • Light-bringer – Solar, Sudden, Blinding Light, Noble, Blinding Lights, Solar.
  • Livor Mortis – Glutton, Foul, Grief, Sacrifice, Gulf, Token.
  • Slayer’s Flurry – Final, Superdense, Foe, Moons, Cut, Curse, Slice, Knife.

Gameplay

Keep plague and mortis up at all times. Teleport between groups of enemies, Light jump into mobs, Spam flurry to regain willpower. Rinse and repeat. You’re very slow if you walk with Disallowing Vessel. But with this build you can teleport and dash to between mobs like crazy. It’s a lot of fun and does a ton of damage and pretty tough to die.

Stoneshard – Highlander Greatsword Guide (Two-Handed Sword)

A complete guide to decapitating your enemies in a single blow.

How to Decapitating Your Enemies in a Single Blow

Introduction

Welcome to Stoneshard Two-handed Sword Highlander Guide. A complete guide to quickly decapitating all your enemies. If you are looking for a quick build you should head over to the Sample Builds section of this guide.

Starting Options

Until custom character creation is avaliable our first choice is picking one of the pregenerated characters. Since we are gonna be focusing on melee combat our choice is pretty much narrowed down to characters with a higher than average STR score and a useful trait.

Jorgrim, the Reaver

  • Affinity: Axes, Swords, Maces, Shields.
  • Unique trait: Berserker Frenzy (increased Weapon Damage and Crit Efficiency for 10 turns after every kill).

Stat allocation for Jorgrim is almost perfect. Strength is going to be our main focus on this build and having some extra vitality is always useful. What really makes Jorgrim shine is his trait. As soon as you drop your first enemy your damage will ramp up which will allow you to clean enemies even faster. We will be attempting to one hit KO our enemies with this build and this trait will definetively help us achieve this.

The only downside is that Jorgrim does not start the game with any greatsword skills avaliable to learn. This means we are gonna have to hunt for a Greatsword book in order to really get started. You can always reload the save game or rest until the shopkeeper has one for sale.

Custom Character (Not avaliable)

Creating a custom character is not possible right now. When it does become avaliable we can safely assume that we will be able to customize our starting attributes and select a starting trait from a broader list.

Skill Branches

We will be focusing our build on a single skill branch: Greatswords.

Our main priority will be picking up heroic charge, feast of steel and Arc Cleave. After that we should try to get as many passives as possible since they contribute greatly to our damage and resource management.

Feint Swing lets you trick an enemy with high Block or Dodge, delivering a guaranteed strike with slightly lower damage. This will mostly be used against bandits that use Raise Shield or Fencer’s Stance. We wont see much use of this skill and sadly it is a prequisite for our main skill.

Heroic Charge allows you to instantly close the distance to an enemy, dealing bonus damage and increasing our crit chance for each tile traveled. It will be our main skill and is greatly improved by Courage passive. Automatically refreshing the cooldown of Heroic Charge on kill.

Feast of Steel lowers you damage but increases your Crit Chance by 100%. This combined with a high base crit chance and the bonus from Heroic Charge means we will be criting on almost all our attacks.

Parry increases Block Chance and Block Power with each blocked attack. It also allows you to perform a guaranteed Counter on block. We will be saving this skill for tough enemies that wont die with a 1 or 2 hit combo. Revanche passive gives us 25% cooldoiwn reduction when Parry is active and we manage to block a skill. It can be useful if we manage to get ourselves in a situation where Heroic Charge and Arc Cleave are on cooldown but honestly this shouldn’t be happening.

And finally, Arc Cleave strikes up to five adjacent enemies with high Bleed Chance and a wooping +92% damage. If anyone managed to survive heroic charge this will definetively kill them.

Fight to de Death allows us to cycle through heroic charge and arc cleave constantly and provides us with a nice passive bonus to accuracy.

Recklessness provides us with bonus crit chance and counter chance per adjacent enemy. This build will focus on 1HKO our enemies so we wont get to abuse this passive that much. It will still come in handy when heroic charge fails to deliver a fatal blow and we have to rely on Arc Cleave.

Taste of Victory is our final passive and the one that makes energy management a non-issue on this build. +7.5% Energy restored per kill.

Equipment

Whenever we get a critical hit with a greatsword the damage will be done in an arc to all the enemies adjacement to our target instead of being single target. Because of this we will be focusing on getting our critical strike as high as possible in order to reset heroic charge and guarantee we can 1HKO our enemies. Energy will also be important since Taste of Victory gives us back 7.5% energy back per kill and we want to get enough energy back to be able to constatnly cycle through Heroic Charge and Arc Cleave.

The Mail Cof provides good protection without incurring almost any penalties. We do not want to accrue too many Energy penalties since Taste of Victory passive will be giving us back percentage energy on kill.

  • Recommended Enchantment: Healthy +7, Energy +8

The Royal Ranger Gambeson provides adequate protection and some incredible resistances. It gives us 10% Nature resistance. This is 10% reduced damage from Fire, Frost, Shock, Poison & Caustic damage. It doesnt penalize our Energy too much and it keeps our noise level on acceptable levels.. Normally we wouldn’t care about noise level but since we want to engage our enemies from 5 tiles away we do not want them popping up right next to us when we open dungeon doors.

  • Recommended Enchantment: Health +7, Energy +11

The Knightly Girdle is the only belt in the game with protection. It helps us increase our counter chance and helps us offset our Greatsword’s fumble chance a tiny amount. Worth mentioning is the 3% Physical Resistance. This is 3% damage reduced from Slashing, Piercing, Crushing and Rending damage.

  • Recommended Enchantment: Health +5, Energy +10

The Split Vambraces are one of the few glove items that dont provide energy penalties while still retaining some protection and basic resistances. The main reason we are going for these though is the increased accuracy and lower fumble chance. Greatswords tend to accrue high fumble chance so we will be attempting to lower it when possible.

  • Recommended Enchantment: Health +6, Energy +10

We will be picking up some better protection on our boots to compensate our lower than average protection. The Sergeant Greaves helps us achieve this and also increases our resistances.

  • Recommended Enchantment: Health +6, Energy +9

Not exactly the best name for a greatsword. The Longsword provides adequate damage, a good block chance, block power and a nice accuracy boost. The kicker here is the +3% Crit Chance that gets doubled when we buff with Feast of Steel. We will be enchanting this with extra Crit Chance of course. As you can probably tell by now our Protection is not very high. However, our constantly high burst damage combined with a Life Drain enchantment means we will be always in top shape.

  • Recommended Enchantments: Life Drain +9%, Crit Chance +3%

Early on you might want to pick up a Backpack for the extra inventory space. But once gold stops being a problem you will want to go back to your trusty Worn Cloak. Besides providing a small bonus to Physical Resistance it has an extra benefit that the backpack cannot provide. It can be further enchanted.

  • Recommended Enchantment: Health +4,Energy +6

If you’ve been playing as Jorgrim you will get some milleage out of his starting amulet. But eventually you are gonna want to head over to the Witch’s hut and get yourself a Fang Amulet. Appart from providing us 2% to Physical, Nature & Magic resistances (Basically all the damage types in the game) it gives us 2% extra Crit Chance which gets doubled by Feast of Steel.

  • Recommended Enchantment: Health +5, Energy +8

Up until now we have managed to keep all our resistances in the green except for one. Shock Resistance. We will be using 2x Silver Aquamarine Rings to offset our fear of lightning. These rings are the only ones in the game so far that provide a bonus to 5 different secondary stats making them a Best in slot for a handful of builds.

  • Recommended Enchantment: Health +6, Energy +11

Cursed Items give you a curse in exchange for a positive effect on the item. Under normal circumstances cursed items are too detrimental and cannot be used without eventually dying. Mostly because they cannot be unequipped unless you use a disenchantment scroll (Which wipes your cursed item completely of both the negative and the positive effects). There is a cursed item that gives us +15% Crit chance. I will be updating the guide as soon as I can get my hands on one of these fabled rings.

Combat

Combat with the Highlander style is pretty straight forward. As soon as we spot an enemy we should get almost at charging range and buff with Feast of Steel followed by a Heroic Charge to the face. 90% of the time we can safely shout off with his head and get our energy back.. Notice how Feast of Steel gets its duration extended by 2 rounds and our Weapon Damage and Crit efficency increases thanks to Jorgrims passive. This bonus stacks with itself and lasts 10 rounds so performing multiple kills in a 10 round window will give us an amazing damage increase.

Here is a quick example of how most fights turn out:

The fun thing begins when we get ambushed by bandits or other enemies that like to spread themselves appart. Since Heroic Charge damage scales with distance we get to ping pong between them and watch our damage go completely bonkers. If you find yourself in a situation where you have to choose between different targets always go for the ones farthest away. Since you can always bounce back from them into a different target after killing them. Rabbits and other neutral animals can be used for this purpose as well. If you somehow mess up or you are RNG cursed you can always Arc Cleave your enemies into oblivion.

Sample Builds

Highlander

This is our main build. It will allow us to quickly dispatch enemies in a 1 or 2 hit combo at most. Resetting our cooldowns and givies us our energy back on kills. Life Drain will keep our HP topped out and our focus on Energy enchantments means we will always have enough energy to heroicly charge our way through.

  • Character: Jorgrim
  • Ability Points: All into Strength
  • Greatsword Skills: Feint Swing, Heroic Charge, Courage, Feast of Steel, Arc Cleave, Taste of Victory, Fight to de Death.

CryoFall – Ultimate Guide to PVE

Guide made by a beginner for other beginners or people interested in the game.

Complete PVE Guide

Introduction

Warning!

This guide may and will contain spoilers. If you like to explore things by yourself this guide is probably not for you. To search for specific informations use [CTRL] + [F].

Preface

Beware that this guide is written by a beginner and may lack some informations.

CryoFall – Strange Alien Island

You wake up on a strange island. Surrounded by nothing but nature and everything that wants to kill you. Hungry and thirsty with no idea what to do. Except that you would probably like to visit a plastic surgeon. – What?!

Navigation

Character Customization

If you would like to customize your character’s appearance, click [E] and head to Customize at top of the window.

HUD & UI

To navigate in CryoFall you can either click on icons at top of the screen or use assigned shortcuts.

Topbar

  • [E] Equipment
  • [C] Crafting
  • [TAB] Construction
  • [M] Map
  • [K] Skills
  • [G] Technologies
  • [J] Quests
  • [H] Social
  • [P] Politics

Toolbar

Here you can put your tools and everything that you want to use for hand like for example an axe or a pickaxe. You can use number on your keyboard [1] to [9] or you can go to settings by clicking [ESC], options at top of the screen and choose to use your scroll wheel.

Attributes

There are four basic attributes which are – in the left corner – health and stamina – and in the right one – food and water.

Basics

Movement

To move your character use [W][A][S][D], sprint by holding [L SHIFT] and gather by using [RMB]. To use your tools like for example pickaxe, hold down [LMB]

First Steps

You first quest, which you can see in the top right corner of your screen is to gather fibers, twigs and stones. As the quests tells you, right click them on the ground.

Your next mission is to craft a Stone Axe, which you do by pressing [C], crafting a rope and after that your first axe.

When you are done with making your very first tool, except a torch you magically woke up with, press [E] in order to open your inventory and simply drag it to your toolbar.

Now you are ready to go out in the world!

Following quests is very important as those are your tutorial – which is explaining the very basics you are reading here.

Chop down a tree – by pressing the button corresponding to your axe in the hotbar and holding [LMB] next to it.

Food and Water

As by now you are probably dying of hunger and thirst. Simply grab some shrooms and roast them in a campfire which you build by pressing [TAB] and then going to Food. You could also eat some berries when you are already at it. Those provide your body some luqids, but not enough to survive. You can gain water by using one of following methods;

  • Eating Waterbulb Fruits.
  • Filling bottles with lake water which you later have to cook.
  • Building a Water Collector or a Well.

Building a Base

Place of Your Own

What you probably want to make the most right now is to get a place of your own. To build your very first home you need to unlock Construction Tier I in Technologies [G].

Land Claim (Tier 1) is what you need to make a place your own. [TAB], Other. You can take a walk through the map and find a free spot. To see which land is already claimed by other players you either hold [L ALT] or [L]. You can’t place your claim in the red or gray spots as those belong to others. Don’t worry! You can remove your claim and build it somewhere else later on. Use a crowbar to remove your buildings. You can have 3 landclaims, one from every tier up to the fourth where you don’t get any. You can also expand them a little.

Your buildings are safe only in the green spot, not in the grey one!

Grey spot will fill in while you upgrade your claim, but there will be 1 or 2 tiles between so that you can’t block of anyone and vice versa. You can still connect your own claims though.

You can’t build too close to cliffs!

Frequently Asked Questions

  • Where do I find coffee beans?
  • First you need to gather coffee berries from oval bushes with red/brown/orange dots on. Then you need to roast them in an oven. Unlocks in Tier II Cooking.

Shady Lewd Kart – How to Find All Hidden Character and Unlock Them (Key Locations and Hints)

This guide will help you find all the 5 secret characters hidden in the tracks. To Unlock them, you must find a key and get in the top 3 karters. Note that it is possible to find them in free play, making the task easier.

Key Location Hints and Location

Terry Trash Dome

Character: Trashette

This key is found early in the track.

  • Hint 1: It is located in the Zone where you go down a long slope.

Location: If you go down early from the slope and check behing you, you should find the key.

Flambeau’s Manor

Character: Flambeau herself!

This one is tricky too find, it follows the same rule as a Mario Boo mansion!

  • Hint 1: One of the walls is a fake one.
  • Hint 2: It is located in the room with the minecarts coming out of the paintings, the green room.

Location: At the right, right bellow the torch is the fake wall location.

Leazure Sleaze Alley

Character: Artemis

You might want to find a back alley for this one.

  • Hint 1: When the road forks and gives a descision between right and left, take left.

Location: After taking the left side, jump on theramp and pass the wall inside a little car lot, it will be sitting on a truck. You can also find a alley leading to it towards the right if you miss the jump

Sexy Island Resort

Character: Carmilla

Extra unlock: Mantis Kart

It took me the longest to find this one! It is NOT in one of the huts.

  • Hint 1: It is next too a long beach chair.

Location: The beach chair is right after a slope, to the left.

Uncharted Wild Woods

Character: Ingrid

If you very lightly stray from the normal path, you might find it!

  • Hint 1: The location is the room with the big pillar you can boost on.
  • Hint 2: It is located behind a rock.

Location: Behind a rock on the right side, very early in the pillar room.

God of War Became 2018’s Game of the Year with a Single Moment – GW


This article contains major spoilers for God of War (2018).
“I must return home and dig up a past I swore would remain buried.” If 2018’s God of War was your first trip into the series, then this was just a pretty cool line in a game that was already filled with a lot of pretty cool lines. But if you were a fan of Kratos’ Greek adventures on previous Sony consoles and handhelds, you probably understood the tragic weight of those words. What occurs over the next five minutes represents an emotional and mechanical turning point in what a lot of folks, myself included, hold up to be one of the absolute best games of the generation.
Kratos’ son Atreus is suffering from a sickness that can only be cured by venturing deep into the frozen wasteland of Helheim. So the titular God of War realizes that his trusty Leviathan Axe, a frosty weapon that had been at the heart of the game’s deep, fantastic combat system for the previous 10+ hours, would be useless. In order to save Atreus, we’ll have to travel back home, face the literal ghosts of Kratos’ past, and embrace the rage he has so desperately tried to quell.
The latest God of War is presented entirely without a single visible cut, much like last year’s film, 1917. This technique is used to incredibly impressive effect as we accompany Kratos along every second of his journey. Retracing his steps back to where the game began many hours prior adds a sense of gravity and contemplation to everything we’ve accomplished so far.

As Kratos steps into the boat and sets off down the river towards his home, a literal and metaphorical storm envelops us. The bitter howl of the wind, the savage crack of thunder, and the panicked cries of fleeing wildlife fill our ears. Bear McCreary’s score simultaneously puts us in the mindset of a parent grieving for their ailing child as well as a man who’s on a reluctant and painful collision course with his past.
The camera tracks in a circle around Kratos, who’s clearly alone in the boat. But then the cinematic blocking expertly reveals Athena, the ghost of his past, sitting opposite him — a silent totem of what’s to come. Once the boat reaches shore, we see ominous red light has supplanted the natural beauty of the cabin Kratos and Atreus used to call home, the same color of the rage that Kratos has been suppressing.
This moment again plays incredibly well, but also incredibly differently depending on your history with the God of War series. If you’re new, this is just solid storytelling. If you’re not, the foreshadowing has been there the entire time. Kratos often rubs his wrists as he recalls his past life, the lingering phantom pain a constant reminder of who he is, what he’s done, and what he will always be. When he pulls out the parcel from beneath the floorboards and we see it wrapped in that familiar red fabric, we know what’s about to happen.
It’s here we see the Blades of Chaos — the physical manifestation of destruction that Ares forged as a reminder of Kratos’ servitude to the gods — for the first time in this game. As Kratos wraps the chains around his arms, the ghost of Athena reappears in the doorway, watching what’s about to unfold. She begins to lecture him, much like she used to do from her perch high atop Mount Olympus. “There’s nowhere you can hide, Spartan. Put as much distance between you and truth as you want. It changes nothing. Pretend to be everything you are not. Teacher. Husband. Father. But there is one unavoidable truth you will never escape: You cannot change. You will always be… a monster.”
God of War 2018 game of the year best moment Blades of Chaos
Up until this point, one of the core themes of the game has been Kratos coming to terms with the disease known as rage, trying his damndest to repress those past urges and, above all else, hoping he didn’t pass the sickness on to his child. Athena knows this and is able to use her words to slice at him in a way only those who’ve seen you at your lowest can. And it’s this foundation that makes Kratos’ response so powerful.
“I know. But I am your monster no longer.”
Back when God of War was first revealed at Sony’s E3 2016 Press Conference, the incredible demo was also met with some understandable questions, many stemming from the absence of the series’ iconic weapons, the Blades of Chaos. Not only did they provide the backbone of arguably the deepest and most satisfying combat mechanics of any non-Japanese-developed action game in history, but the Chains also acted as the backbone of the story’s conflict and Kratos’ character as a whole. We obviously ended up falling in love with the fluidity and complexity of the Leviathan Axe, but there was always a jagged little hole in our hearts for the Blades of Chaos.
The fact that Sony was able to keep this reveal close to the vest up through launch made the moment all the more powerful. I can distinctly recall hitting this beat and thinking to myself how they were going to pull this off on a mechanical level. We’d gotten so used to the new over-the-shoulder camera, slower and more methodical pace of combat, and specific nuances with the axe. So despite understanding what was about to happen, I just couldn’t quite wrap my head around how.
God of War 2018 game of the year best moment Blades of Chaos Athena
After Kratos delivers that incredible response to Athena, he walks straight through her, the manifestation of his past dissipating in the air like a wisp of smoke. It’s here that the player is finally reunited with the weapons of the original trilogy — and in an instant, the flow of the game that we’ve become accustomed to fundamentally changes. The already-deep combat system instantly doubles in intricacy, complete with an additional skill tree, runic attacks, equipment, and stats to keep track of, as well as an entirely new suite of attacks. Over 10 hours into the adventure, and the combat verbs available to you at any given moment suddenly multiply. And using the Blades immediately becomes just as satisfying as mastering the Leviathan Axe, while also providing the resonance of nostalgia.
The thing about this moment that really stands out to me is how it succeeds at being an elemental turning point in God of War on so many levels. It’s a true moment of growth for Kratos, an emotional juncture in his relationship with his son, and a fitting culmination of his tragic arc across the previous games. Simultaneously, it opens up an entirely new realm of possibilities in how the player can express themselves through the game’s magnificent combat. It changes the way we see the world, as well as how we interact with it. In short, it’s a perfect marriage of emotion and mechanics that can only exist in video games.

Marvel’s Avengers Game Characters Redesign Shows New Thor Look and Other Changes – GW

The latest trailer for Marvel’s Avengers is out and judging by the “old” footage shown off in it, it would seem like Crystal Dynamics has heard some of the fan’s feedback and have once again done some Avengers game characters redesign/changes.
When Crystal Dynamic’s Marvel’s Avengers game was first fully revealed at E3 2019, many were quick to criticize the game’s visual, especially with how some of the character models looked. This was mostly directed towards Black Widow’s “Manly” look, which as we saw last year has actually gone through slight improvements. It now appears that after closer examination of the latest pre-order trailer, Thor now has a new hairstyle along with some general improvements to other areas in the game. Take a look down below at the collection of images we created to show these differences.
Quick note: The changes down below may have in fact been added last October, but due to the limited footage the studio had released we only got a small look at the new revised Thor and could not provide a side-by-side comparison. The latest Pre-order trailer shows the exact same scenes that were present in the original 2019 reveal trailer.
As you can see his hair is now styled and also appears to be softer. One could say that the 2019 version bears a resemblance to Thor’s first introduction in the MCU (Marvel Cinematic Universe) and his 2020 version goes for the style he had in Avenger 2: Age of Ultron and at the start of Thor Ragnorok.
We included this one as it’s the actual in-game model versus a similar scene from the 2019 trailer.
Next is The Hulk.
General lighting has been changed, though that may be explained by the less dense smoke that is now present in this scene. Besides that, there are some minor differences between the 2019 and 2020 build of The Hulk. Like Thor, his hair has been adjusted slightly to give it more details. The “big” difference comes in the Hulk’s chest hair which is now gone in the newer build.
This 2020 build added a focus blur, a very minor change there. The environment, however, is a bit different as the car in the background has more details as does the street. There’s even a very visible puddle (Puddlegate!) of water near Iron Man.

No major changes when you see it as a still image outside of the different lighting. Particle effects do appear to be downgraded a bit when you see it side-by-side in motion, mostly seen in the effect under the carrier. A bit of color was added to the carrier.
An interesting one as the 2019 build featured some very tall hills or mountain ranges in the background. The 2020 build gets rid of these and trades it for taller trees and more man-made structures.
That’s all the changes that we could spot in the trailer, though we are sure there are more smaller ones in there. Sadly we couldn’t get a better look at Black Widows character or Captain American, and for the most Iron Man appears to hold the same visual appearance. Overall we do feel that there have been some improvements (debatable) made, and in the least, it shows that Crystal Dynamics is still hard at work at polishing.  It’ll be even more interesting to see what the team does with the additional months they have received due to Marvel’s Avengers delay. It was originally going to launch this May but has since been pushed back for a September release.
What do you guys think of Thor’s new hair? Did you prefer the old one more or the new one?
Design a site like this with WordPress.com
Get started